


Falco Feeds extends the power of Falco by giving open source-focused companies access to expert-written rules that are continuously updated as new threats are discovered.

Many of the benefits of running Kubernetes come from the efficiencies that you get when you share the cluster – and thus the underlying compute and network resources it manages – between multiple services and teams within your organization. Each of these major services or teams that share the cluster are tenants of the cluster, so this approach is referred to as multi-tenancy.
Most Kubernetes security challenges come from the sharing of the cluster – its control plane and API, its underlying Nodes and Linux kernels, and its network – between these multiple tenants as well. This blog will walk you through the security challenges of Kubernetes multi-tenancy, especially the issues with the default settings, as well as how to harden your environment(s) to mitigate those risks.
The three multi-tenant isolation boundaries of Kubernetes
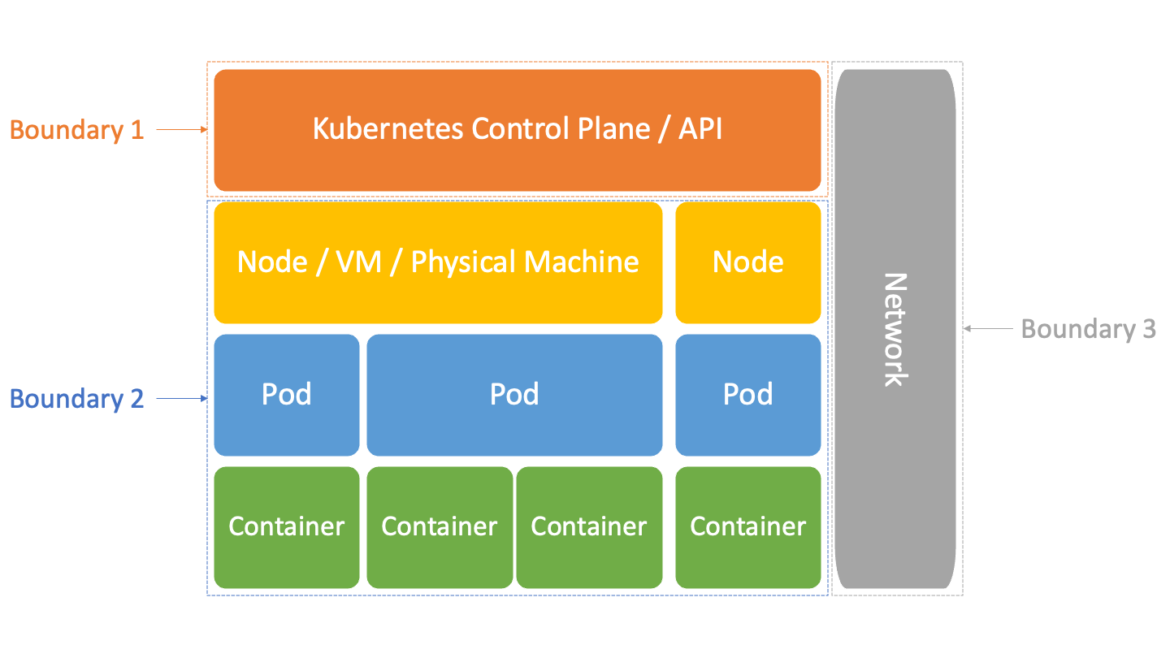
As noted above, there are three different isolation boundaries to think about when it comes to Kubernetes:
- The Kubernetes Control Plane and API: one tenant is isolated from another via Kubernetes Namespaces and Role-Based Access Control (RBAC).
- The hosts: one tenant's workload(s) are isolated from another by containers, and the underlying Linux Namespace and cgroup features are leveraged by those to do so. In turn, Kubernetes orchestrates across all of the Nodes of your cluster.
- The network: one tenant's workload(s) are isolated from another by Kubernetes NetworkPolicies, and the underlying management of each host's firewall they orchestrate, across all of the Nodes of your cluster.
It is important to understand how all of these isolation boundaries work in order to understand how to secure Kubernetes holistically. But also, it is easiest to frame the various challenges inherent in securing it for multi-tenancy by which each of them relates to.
So, we'll now look at each of them, and their associated challenges, in detail.
Boundary #1 – Kubernetes Namespaces and RBAC
When you use the Kubernetes CLI kubectl or call its APIs another way, your request is authorized by Kubernetes' Role-based Access Control (RBAC). That, in turn, works as follows:
- Kubernetes is divided into logical boundaries/virtual clusters called Namespaces.
- Each user or group gets mapped to a Role or a ClusterRole, with a Role giving access to a Namespace and a ClusterRole giving access to the whole cluster.
- Both Roles and ClusterRoles can be further restricted by what Rules they allow within the Namespace or Cluster. These are composed of:
In short, you want to give each service or team a Namespace and then ensure they have only a Role, as opposed to a ClusterRole, within/for their Namespace to achieve least privilege with Kubernetes.
The simplest example of defining a Role called admin in the Namespace team1 is using wildcards/stars for the rules:
apiVersion: rbac.authorization.k8s.io/v1
kind: Role
metadata:
    name: admin
    namespace: team1
rules:
    apiGroups:
        - '*'
    resources:
        - '*'
    verbs:
        - '*'
For anybody who it is mapped to, this Role will limit them to only be able to do anything within the team1 Namespace. Seems easy enough, right? The issue is that it is a bit tedious to do least privilege with Kubernetes RBAC, as you need to explicitly declare each thing that is allowed to move beyond the easy wildcards without the benefit of any deny's. This would allow Users who are mapping to this Role to do the following:
- Create other Roles and RoleMappings for this Namespace
- Create or change NetworkPolicies (e.g.m, firewall rules) covering their Namespace
- Access to all the applications' runtime Secrets within the Namespace
- Delete the Namespace and everything within it
- Etc.
A good example for what it takes to move beyond the *'s is the built-in admin ClusterRole, which is an example of allowing nearly full administrative access within a Namespace explicitly instead of via the wildcards. You can retrieve this with the command kubectl get clusterrole admin -o yaml which, in our case, outputs 324 lines of YAML! It is a good starting point, though, to remove resources/verbs you don't want to allow to slim it down to a least privileged role.
One other thing to note when creating Roles/ClusterRoles is that when you put a wildcard for Verbs, it includes at least three that you might not want: escalate, bind, and impersonate.
- Escalate allows you to create a Role with more permissions than your Role.
- Bind allows you to bind your User to a Role that has more permissions than your Role.
- Impersonate allows you to swap to other Roles (similar to the
sucommand on Linux).
You'll note that the built-in admin ClusterRole avoids these in most cases by specifying all the verbs explicitly, rather than using a wildcard.
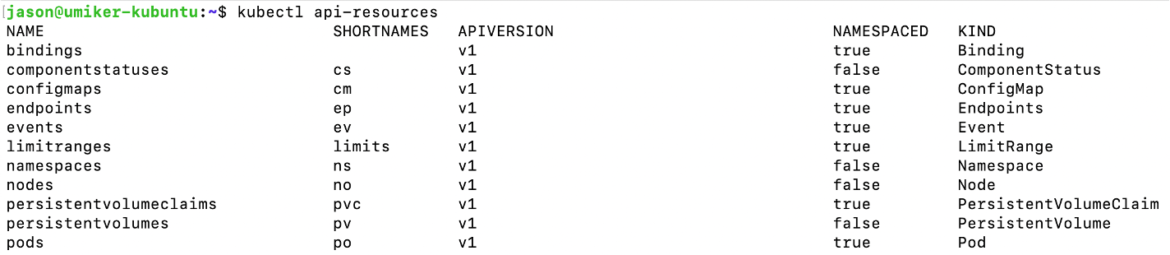
Finally, not everything in Kubernetes can be 'namespaced.' You can run the command kubectl api-resources to see which things can and can't be. If a user needs to regularly interact with things that are non-Namespaced, and that can't be offloaded to a managed/controlled pipeline or something instead, then they'll need a ClusterRole. That makes least privilege much harder to achieve for them. So, this is one of the things that often triggers that user/team to be given their own single-tenant cluster.
Detecting Kubernetes control plane isolation boundary issues with Falco
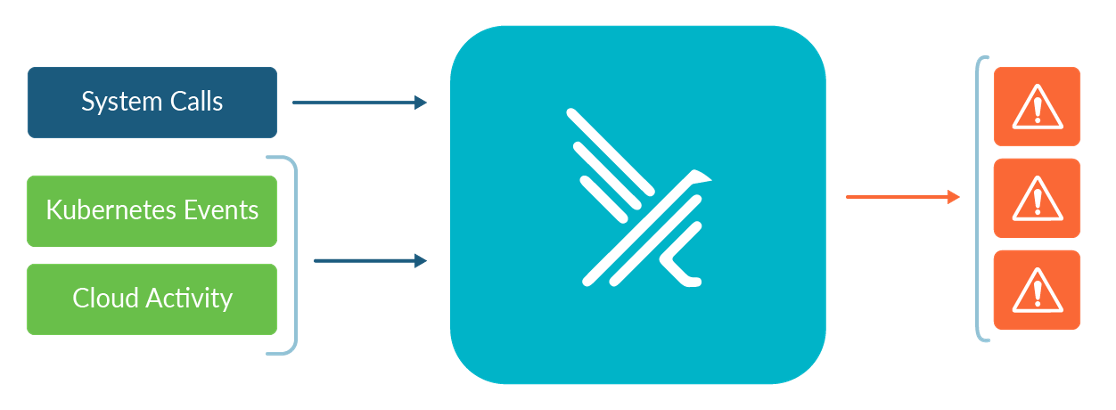
In addition to configuring your Kubernetes access via least privilege (leveraging Namespaces and non-wildcard Roles etc.), you should monitor your Kubernetes audit trail for suspicious activity as well. Falco is an open source project that Sysdig has contributed to the CNCF, with a focus on watching streams of runtime information – such as the Kubernetes audit trail, the Linux kernel syscalls, and even your cloud provider's audit trails (e.g., AWS CloudTrail) – for runtime threats which it surfaces to you as events in real time.
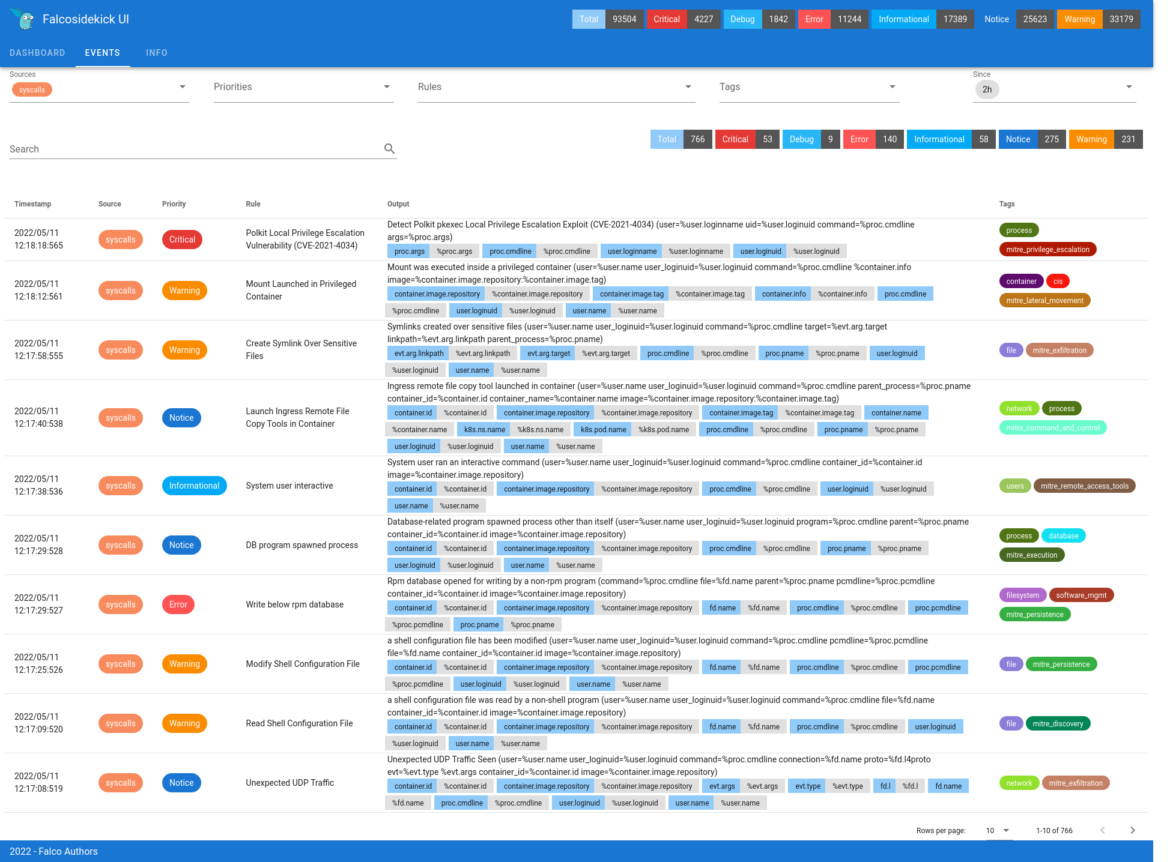
Falco has another associated service called sidekick that:
- Aggregates the events from all the Falcos in your environment(s) in one place.
- Fans them out to all of the places you'd like them to go (SIEM, Slack/Teams, AlertManager/PagerDuty, etc.).
- Has a basic UI to visualize the events, rather than needing to look at the JSON log output from the Falcos.
You can install Falco to watch the Kubernetes Audit Trail as a Deployment together with a great set of starter rules on what suspicious activity to look for via its Helm chart here.
In the case of the managed Kubernetes offerings, where you don't get direct access to the audit logs on the control plane, there are plugins that will forward the events to Falco from the cloud provider's logging system available. Here they are for EKS, AKS and GKE (note that even though these say they are for the Sysdig Agent they should work with opensource Falco as well).
Here are some examples of the kind of activity that these included default rules of the Helm chart will alert you about:
- Retrieving secrets from a non-ServiceAccount (e.g., by an admin not an application)
- Pods that mount volumes from sensitive host directories (e.g., /proc)
- Pods that are launched with insecure options (HostPID, HostNetwork, etc.)
- Creation or modification of Roles, ClusterRoles, ServiceAccounts, etc.
Boundary #2 – Host Isolation – Containers, Linux Namespaces and cgroups
Kubernetes orchestrates containers which, in turn, use these Linux features for isolation within each host/Node:
- Namespaces (not to be confused with Kubernetes Namespace) partitions kernel resources such that one set of processes sees one set of resources while another set of processes sees a different set of resources.
- cgroups (abbreviated from control groups) limit, account for, and isolate the resource usage (CPU, memory, disk I/O, network, etc.) of a collection of processes.
Each Kubernetes Pod gets provisioned into its own Linux Namespace which prevents it from seeing what is going on with things outside of that Namespace – such as things running within the other Pods or on the Host. However, a Pod with multiple containers running within it (such as sidecar containers) all share the same Linux Namespace and Network – basically the same security boundary/context.
When it comes to cgroups, they are about reserving and/or limiting resource usage. This is important for multi-tenancy as you need to ensure that one tenant isn't a "noisy neighbor" that disrupts other tenants that are scheduled on the same Node(s) as they are. They are leveraged as part of the wider Kubernetes resource management approach as we described here.
The main issue with the Host/Node isolation boundaries of Kubernetes is that you can ask Kubernetes to undermine them by default in your PodSpec with parameters like:
- hostPID: asks to not be put in a Linux namespace (exiting isolation)
- hostNetwork: asks to use the host's network (exiting isolation)
- hostPath: Volumes which allows the Pod to mount any path on the host
- Linux capabilities such as NET_ADMIN (which allows management of the host's firewall)
- And there are more!
Possible solutions
Open Policy Agent (OPA) Gatekeeper
There used to be a built-in mechanism to restrict this called Pod Security Policies (PSPs) – but they were cumbersome, not widely adopted and have been deprecated and removed. There is a built-in replacement for them called Pod Security Admission – which went GA in Kubernetes 1.25.
But, many have moved on in the interim to a general-purpose admission controller – usually Open Policy Agent (OPA's) Gatekeeper – to limit your ability to ask for these sorts of insecure parameters in your PodSpecs. OPA is both open-source as well as a graduated CNCF project – just like Kubernetes.
The idea of an Admission controller is that it is like a firewall for new/updated YAML documents (like PodSpecs) you are giving your Kubernetes clusters:
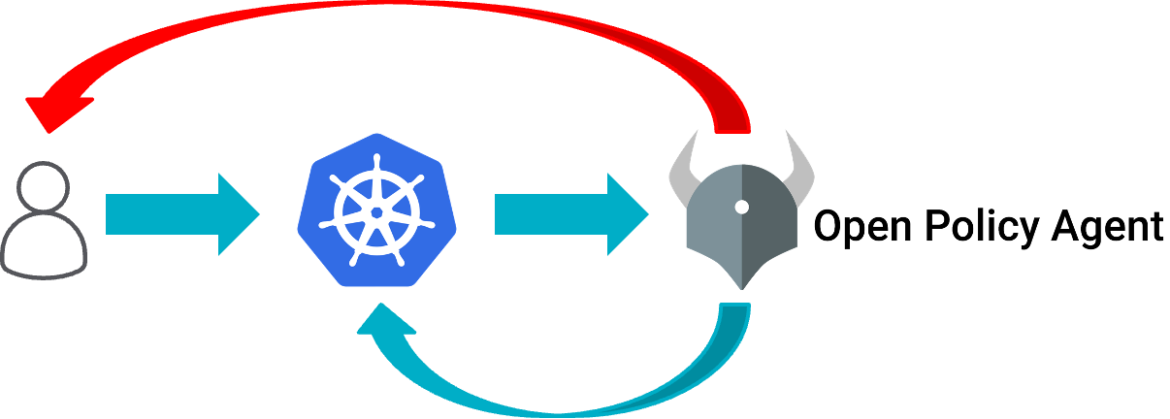
When you give the cluster new or updated YAML, it runs it by OPA to ask if it's OK before doing it, or returns an error message to you if OPA if it isn't.
You can easily install OPA on Kuberntes with Gatekeeper by following the instructions here.
And there is a library of example OPA policies they publish on GitHub – https://github.com/open-policy-agent/gatekeeper-library. In particular, there are examples on how to replicate the old Pod Security Policy (PSP) rules, which cover most common Pod security concerns, within that library. You'll notice one of the key advantages of using OPA Gatekeeper over Pod Security Admission there too – that you can specify policies to be enforced that are not strictly security-related but very good operationally. For example, you can add:
- A requirement for every container to have a CPU and memory Request defined (as that is how Kubernetes effectively schedules and prioritises the workloads so they don't perform poorly themselves or become noisy neighbors)
- A requirement that images come from certain trusted private registries
- A requirement for every container to have a Probe (Kubernetes' health check) defined so Kubernetes knows when services have started successfully and when they have become unhealthy and need to be replaced
- And many more…
Detecting host isolation boundary issues with Falco
OPA is good at making sure that YAML instructions you declare to Kubernetes about how to run your container doesn't have insecure or inappropriate parameters in it. What it doesn't help with, though, is the runtime behaviour of that container – and that is where Falco comes in.
Falco can be configured to watch all of the Linux syscalls on each Node and can detect many common runtime events/behaviors that are suspicious and alert you to them, such as when a container is doing something nefarious because it has an unpatched vulnerability that is being actively exploited.
Falco can be easily installed as a DaemonSet (so Kubernetes ensures it is running on each Node watching that Node's local kernel syscalls) together with sidekick and a great set of starter rules on what suspicious activity to look for via its Helm chart here.
Some examples of the kind of activity that these default rules included with that Helm chart will alert you as events:
- Writing to sensitive areas (below binary dir, below /etc, etc.)
- New execututable created in container by chmod
- Read of sensitive trusted files after startup or by untrusted programs
- Clearing of logs or shell history
- The docker client or a terminal shell or a suspicious network tool is launched within a container
- Etc.
Boundary #3 – Network
NetworkPolicies
The last isolation you'll likely want in your Kubernetes cluster(s) is Network isolation – usually referred to as a firewall. With Kubernetes you do this via NetworkPolicies which:
- Are declarative documents saying what traffic you'd like to allow or not allow
- Allow you to define rules based on Kubernetes labels rather than just IPs/CIDRs (making them much more dynamic and easier to define and maintain)
- And, like many things in Kubernetes, are enforced by a pluggable NetworkPolicyProvider giving you a choice between several options such as Calico or Cilium. These often also service as the Kubernetes Network, or CNI, driver as well – which makes sense as the service that is responsible for provisioning all the Pod networking is best positioned to also secure that networking as it is provisioned.
There are a few challenges with NetworkPolicies though including:
- Many common Kubernetes services such as EKS, AKS and GKE don't include a NetworkPolicyProvider by default – you need to either ask for one via an optional parameter or, in the case of EKS currently, install and manage one yourself to be able to use NetworkPolicies.
- Once there is a NetworkPolicyProvider installed, all Pods on the cluster can communicate with each other by default (i.e. it is always a default allow rather than a default deny).
- They operate at the Network Layer rather than the Application Layer of the OSI Model (layer 3 instead of 7) – meaning that, among other things, rules for things outside the cluster need to be based on IPs and CIDRs. This might mean needing to resort to putting certain things external to the cluster such as databases in their own subnets when their IP addresses are dynamic (which is quite common with managed services in the public clouds).
Some NetworkPolicyProviders such as Cilium have extended NetworkPolicies to do Application layer things as well as allow you to use DNS names in rules instead of just IPs/CIDRs. They have done this by creating their own document type (such as CiliumNetworkPolicies) that are a superset of NetworkPolicies but with these non-standard (but very useful) additions.
So which NetworkPolicyProvider you choose and then whether you leverage any non-standard extensions that provider has added to make things easier on yourself – but locking yourself into that provider – is one of the key decisions to make when you implement NetworkPolicies today.
There are some great examples of common NetworkPolicies with associated diagrams.
Detecting network isolation issues with Falco
Similar to the OPA vs. Falco distinction as above, NetworkPolicies can block or allow network traffic. But Falco has visibility into that network traffic via the related Linux kernel syscalls – and so the same DaemonSet installation we did on each Node would enable that visibility as well.
Some examples of the kind of activity that these default rules will alert you as events:
- Outbound network connections to a non-local subnet or untrusted destination (an pre-defined allowed set of ips, networks or domain names)
- Outbound connection to common command & control servers
- Connection to an SSH server
- Etc.
Beyond these defaults in the Helm chart, a good example of what is possible with Falco rules when it comes to monitoring network traffic is described in this blog post.
Conclusion
This was a high-level introduction to Kubernetes security concepts framed around the three main isolation boundaries you'll run into with Kubernets as well as how to configure/harden the defaults, as well as additional opensource tools such as OPA and Falco that you can levarage, to make your cluster(s) more secure. This is especially important when you are sharing these clusters between your teams – multi-tenancy – if there would be an expectation from one team that another wouldn't/couldn't interfere with their environment(s)/workload(s).
In particular, you'll note that Falco was relevant to all three of the isolation boundaries:
- watching the stream of Kuberentes audit events as well as all the Nodes' syscalls (including network traffic)
- looking for threats at runtime across all three. While its default settings are a good start, getting the most out of Falco involves tweaking or writing your own rules and exceptions to tailor it to your environment and needs.
Sysdig offers a free Falco 101 training course to really get you started.