How to Monitor kube-controller-manager

By Victor Hernando - DECEMBER 15, 2022
Topics: Monitoring

SHARE:

Facebook logo LinkedIn logo X (formerly Twitter) logo

When it comes to creating new Pods from a ReplicationController or ReplicaSet, ServiceAccounts for namespaces, or even new EndPoints for a Service, kube-controller-manager is the one responsible for carrying out these tasks. Monitoring the Kubernetes controller manager is fundamental to ensure the proper operation of your Kubernetes cluster.

If you are in your cloud-native journey, running your workloads on top of Kubernetes, don’t miss the kube-controller-manager observability. In the event of facing issues with the Kubernetes controller manager, no new Pods (among a lot of different objects) will be created. That’s why monitoring Kubernetes controller manager is so important!

If you are interested in knowing more about monitoring Kubernetes controller manager with Prometheus, and what the most important metrics to check are, keep reading!

What is kube-controller-manager?

The Kubernetes controller manager is a component of the control plane, running in the form of a container within a Pod, on every master node. You’ll find its definition in every master node in the following path: /etc/kubernetes/manifests/kube-controller-manager.yaml.
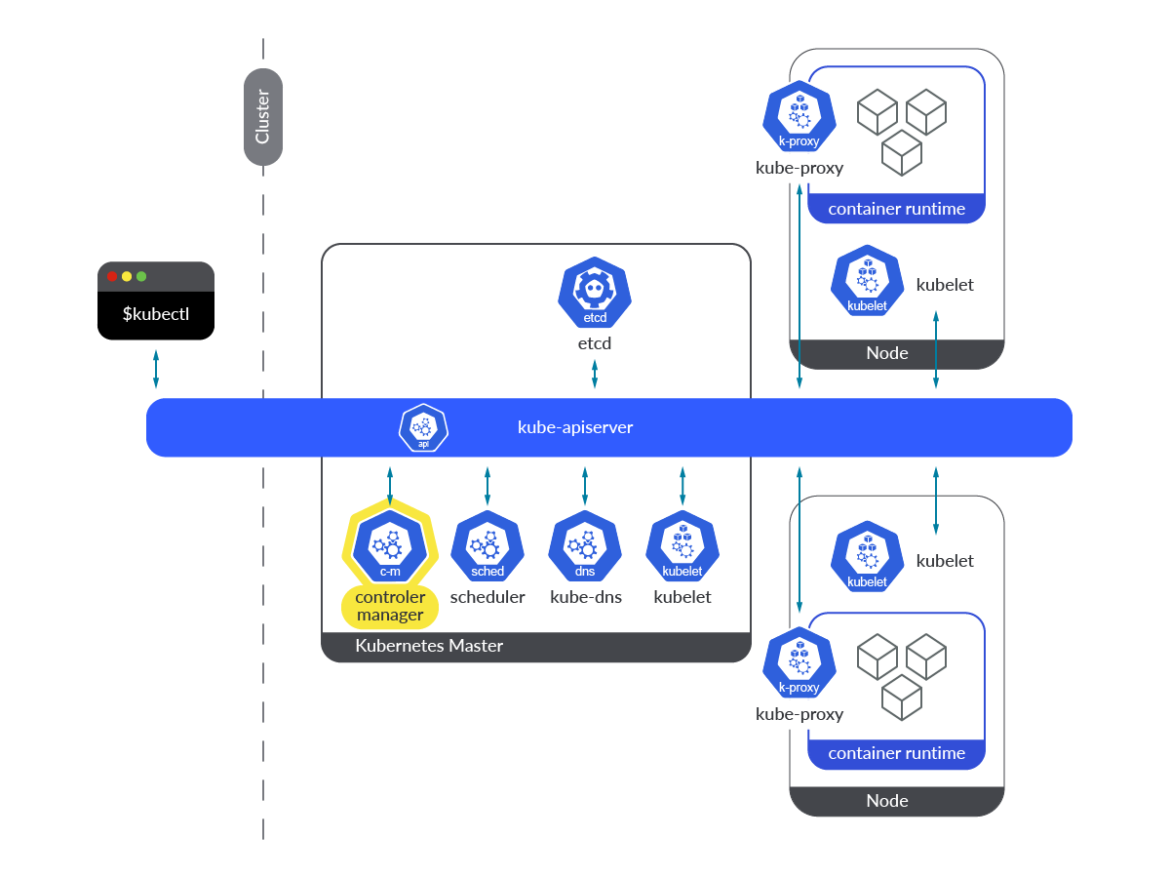
Kube-controller-manager is a collection of different Kubernetes controllers, all of them included in a binary and running permanently in a loop. Its main task is to watch for changes in the state of the objects, and make sure that the actual state converges towards the new desired state. In summary, it is responsible for the reconciling tasks around the state of Kubernetes objects.

Controllers running in the kube-controller-manager use a watch mechanism to get notifications every time there are changes on resources. Each controller acts accordingly to what is required from this notification (create/delete/update).

There are multiple controllers running in the kube-controller-manager. Each one of them is responsible for reconciling its own kind of Object. Let’s talk about some of them:

  • ReplicaSet controller: This controller watches the desired number of replicas for a ReplicaSet and compares this number with the Pods matching its Pod selector. If the controller is informed via the watching mechanism of changes on the desired number of replicas, it acts accordingly, via the Kubernetes API. If the controller needs to create a new Pod because the actual number of replicas is lower than desired, it creates the new Pod manifests and posts them to the API server.
  • Deployment controller: It takes care of keeping the actual Deployment state in sync with the desired state. When there is a change in a Deployment, this controller performs a rollout of a new version. As a consequence, a new ReplicaSet is created, scaling up the new Pods and scaling down the old ones. How this is performed depends on the strategy specified in the Deployment.
  • Namespace controller: When a Namespace is deleted, all the objects belonging to it must be deleted. The Namespace controller is responsible for completing these deletion tasks.
  • ServiceAccount controller: Every time a namespace is created, the ServiceAccount controller ensures a default ServiceAccount is created for that namespace. Along with this controller, a Token controller is run at the same time, acting asynchronously and watching ServiceAccount creation and deletion to create or delete its corresponding token. It applies for ServiceAccount secret creation and deletion.
  • Endpoint controller: This controller is responsible for updating and maintaining the list of Endpoints in a Kubernetes cluster. It watches both Services and Pod resources. When Services or Pods are added, deleted, or updated, it selects the Pods matching the Service Pod criteria (selector) and their IPs and ports to the Endpoint object. When a Service is deleted, the controller deletes the dependent Endpoints of that service.
  • PersistentVolume controller: When a user creates a PersistentVolumeClaim (PVC), Kubernetes must find an appropriate Persistent Volume to satisfy this request and bind it to this claim. When the PVC is deleted, the volume is unbound and reclaimed according to its reclaim policy. The PersistentVolume controller is responsible for such tasks.

In summary, kube-controller-manager and its controllers reconcile the actual state with the desired state, writing the new actual state to the resources’ status section. Controllers don’t talk to each other, they always talk directly to the Kubernetes API server.

How to monitor Kubernetes controller manager

Kube-controller-manager is instrumented and provides its own metrics endpoint by default, no extra action is required. The exposed port for accessing the metrics endpoint is 10257 for every kube-controller-manager Pod running in your Kubernetes cluster.

In this section, you’ll find some easy steps you need to follow to get access directly to the metrics endpoint manually, and how to scrape metrics from a Prometheus instance.

Note: If you deployed your Kubernetes cluster with kubeadm using the default values, you may have difficulties reaching the 10257 port and scraping metrics from Prometheus. Kubeadm sets the kube-controller-manager bind-address to 127.0.0.1, so only Pods in the host network could reach the metrics endpoint: https://127.0.0.1:10257/metrics.

Getting access to the endpoint manually

As discussed earlier, depending on how your Kubernetes cluster was deployed, you can face issues while accessing the kube-controller-manager 10257 port. For that reason, getting access to the kube-controller-manager metrics by hand is only possible when either the controller Pod is started with –bind-address=0.0.0.0, or by accessing from the master node itself or a Pod in the host network if bind-address is 127.0.0.1.

$ kubectl get pod kube-controller-manager-k8s-control-1.lab.example.com -n kube-system -o json
…
    "command": [
      "kube-controller-manager",
      "--allocate-node-cidrs=true",
      "--authentication-kubeconfig=/etc/kubernetes/controller-manager.conf",
      "--authorization-kubeconfig=/etc/kubernetes/controller-manager.conf",
      "--bind-address=127.0.0.1",
      "--client-ca-file=/etc/kubernetes/pki/ca.crt",
      "--cluster-cidr=192.169.0.0/16",
      "--cluster-name=kubernetes",
      "--cluster-signing-cert-file=/etc/kubernetes/pki/ca.crt",
      "--cluster-signing-key-file=/etc/kubernetes/pki/ca.key",
      "--controllers=*,bootstrapsigner,tokencleaner",
      "--kubeconfig=/etc/kubernetes/controller-manager.conf",
      "--leader-elect=true",
      "--requestheader-client-ca-file=/etc/kubernetes/pki/front-proxy-ca.crt",
      "--root-ca-file=/etc/kubernetes/pki/ca.crt",
      "--service-account-private-key-file=/etc/kubernetes/pki/sa.key",
      "--service-cluster-ip-range=10.96.0.0/12",
      "--use-service-account-credentials=true"
    ],
…
(output truncated)

You can run the curl command from a Pod using a ServiceAccount token with enough permissions:

$ curl -k -H "Authorization: Bearer $(cat /var/run/secrets/kubernetes.io/serviceaccount/token)" https://localhost:10257/metrics

# HELP apiserver_audit_event_total [ALPHA] Counter of audit events generated and sent to the audit backend.
# TYPE apiserver_audit_event_total counter
apiserver_audit_event_total 0
# HELP apiserver_audit_requests_rejected_total [ALPHA] Counter of apiserver requests rejected due to an error in audit logging backend.
# TYPE apiserver_audit_requests_rejected_total counter
apiserver_audit_requests_rejected_total 0
# HELP apiserver_client_certificate_expiration_seconds [ALPHA] Distribution of the remaining lifetime on the certificate used to authenticate a request.
# TYPE apiserver_client_certificate_expiration_seconds histogram
apiserver_client_certificate_expiration_seconds_bucket{le="0"} 0
apiserver_client_certificate_expiration_seconds_bucket{le="1800"} 0

(output truncated)

Or run the curl command from a master node, using the appropriate certificates to pass the authentication process:

[root@k8s-control-1 ~]# curl -k --cert /tmp/server.crt --key /tmp/server.key https://localhost:10257/metrics

# HELP apiserver_audit_event_total [ALPHA] Counter of audit events generated and sent to the audit backend.
# TYPE apiserver_audit_event_total counter
apiserver_audit_event_total 0
# HELP apiserver_audit_requests_rejected_total [ALPHA] Counter of apiserver requests rejected due to an error in audit logging backend.
# TYPE apiserver_audit_requests_rejected_total counter
apiserver_audit_requests_rejected_total 0
# HELP apiserver_client_certificate_expiration_seconds [ALPHA] Distribution of the remaining lifetime on the certificate used to authenticate a request.
# TYPE apiserver_client_certificate_expiration_seconds histogram
apiserver_client_certificate_expiration_seconds_bucket{le="0"} 0
apiserver_client_certificate_expiration_seconds_bucket{le="1800"} 0

(output truncated)

How to configure Prometheus to scrape kube-controller-manager metrics

When it comes to scraping kube-controller-manager metrics, it is mandatory for the kube-controller-manager to listen on 0.0.0.0. Otherwise, the Prometheus Pod or any external Prometheus service won’t be able to reach the metrics endpoint.

In order to scrape metrics from the kube-controller-manager, let’s rely on the kubernetes_sd_config Pod role. Keep in mind what we discussed earlier: the metrics endpoint should be accessible from any Pod in the Kubernetes cluster. You only need to configure the appropriate job in the prometheus.yml config file.

This is the default job included out of the box with the Community Prometheus Helm Chart.

    scrape_configs:
    - honor_labels: true
      job_name: kubernetes-pods
      kubernetes_sd_configs:
      - role: pod
      relabel_configs:
      - action: keep
        regex: true
        source_labels:
        - __meta_kubernetes_pod_annotation_prometheus_io_scrape
      - action: replace
        regex: (https?)
        source_labels:
        - __meta_kubernetes_pod_annotation_prometheus_io_scheme
        target_label: __scheme__
      - action: replace
        regex: (.+)
        source_labels:
        - __meta_kubernetes_pod_annotation_prometheus_io_path
        target_label: __metrics_path__
      - action: replace
        regex: (.+?)(?::\d+)?;(\d+)
        replacement: $1:$2
        source_labels:
        - __address__
        - __meta_kubernetes_pod_annotation_prometheus_io_port
        target_label: __address__
      - action: labelmap
        regex: __meta_kubernetes_pod_annotation_prometheus_io_param_(.+)
        replacement: __param_$1
      - action: labelmap
        regex: __meta_kubernetes_pod_label_(.+)
      - action: replace
        source_labels:
        - __meta_kubernetes_namespace
        target_label: namespace
      - action: replace
        source_labels:
        - __meta_kubernetes_pod_name
        target_label: pod
      - action: drop
        regex: Pending|Succeeded|Failed|Completed
        source_labels:
        - __meta_kubernetes_pod_phase

In addition, to make these Pods available for scraping, you’ll need to add the following annotations to the /etc/kubernetes/manifests/kube-controller-manager.yaml file. After editing these manifests in every master, a new kube-controller-manager Pods will be created.

metadata:
  annotations:
    prometheus.io/scrape: "true"
    prometheus.io/port: "10257"
    prometheus.io/scheme: "https"

Monitoring the kube-controller-manager: Which metrics should you check?

At this point, you have learned what the kube-controller-manager is and why it is so important to monitor this component in your infrastructure. You have already seen how to configure Prometheus to monitor Kubernetes controller manager. So, the question now is:

Which are the kube-controller-manager metrics should you monitor?

Let’s cover this topic right now. Keep reading!

Disclaimer: kube-controller-manager server metrics might differ between Kubernetes versions. Here, we used Kubernetes 1.25. You can check the metrics available for your version in the Kubernetes repo.

  • workqueue_queue_duration_seconds_bucket: The time that kube-controller-manager is taking to fulfill the different actions to keep the desired status of the cluster.
    # HELP workqueue_queue_duration_seconds [ALPHA] How long in seconds an item stays in workqueue before being requested.
    # TYPE workqueue_queue_duration_seconds histogram
    workqueue_queue_duration_seconds_bucket{name="ClusterRoleAggregator",le="1e-08"} 0
    workqueue_queue_duration_seconds_bucket{name="ClusterRoleAggregator",le="1e-07"} 0
    workqueue_queue_duration_seconds_bucket{name="ClusterRoleAggregator",le="1e-06"} 0
    workqueue_queue_duration_seconds_bucket{name="ClusterRoleAggregator",le="9.999999999999999e-06"} 0
    workqueue_queue_duration_seconds_bucket{name="ClusterRoleAggregator",le="9.999999999999999e-05"} 0
    workqueue_queue_duration_seconds_bucket{name="ClusterRoleAggregator",le="0.001"} 0
    workqueue_queue_duration_seconds_bucket{name="ClusterRoleAggregator",le="0.01"} 0
    workqueue_queue_duration_seconds_bucket{name="ClusterRoleAggregator",le="0.1"} 3
    workqueue_queue_duration_seconds_bucket{name="ClusterRoleAggregator",le="1"} 3
    workqueue_queue_duration_seconds_bucket{name="ClusterRoleAggregator",le="10"} 3
    workqueue_queue_duration_seconds_bucket{name="ClusterRoleAggregator",le="+Inf"} 3
    workqueue_queue_duration_seconds_sum{name="ClusterRoleAggregator"} 0.237713632
    workqueue_queue_duration_seconds_count{name="ClusterRoleAggregator"} 3

A good way to represent this is using quantiles. In the following example, you can check the 99th percentile of the time the kube-controller-manager needed to process the items in the workqueue.
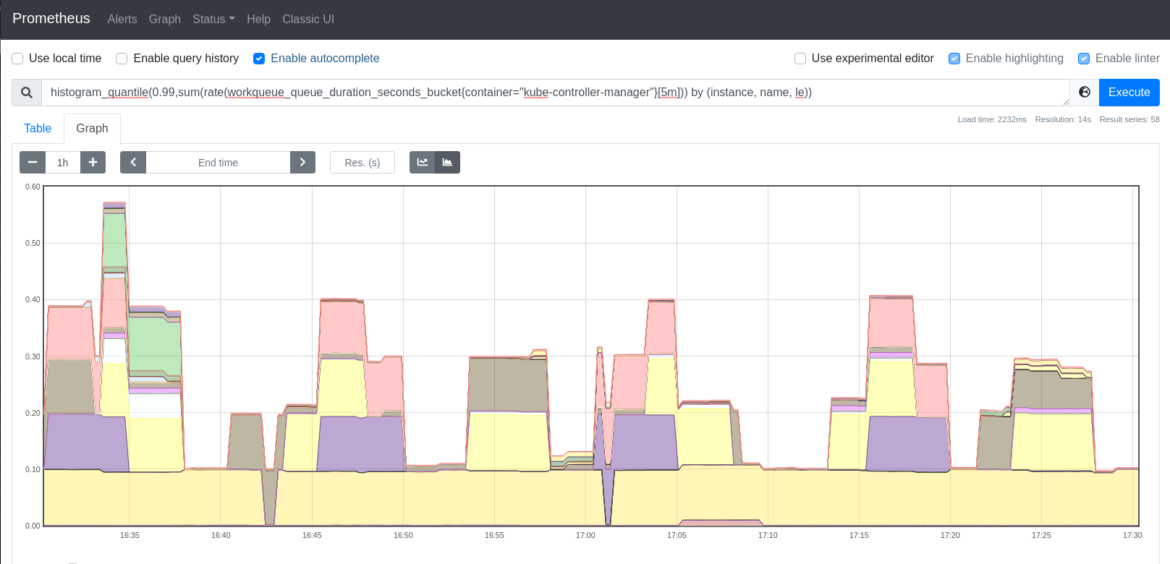
histogram_quantile(0.99,sum(rate(workqueue_queue_duration_seconds_bucket{container="kube-controller-manager"}[5m])) by (instance, name, le))
  • workqueue_adds_total: This metric measures the number of additions handled by the workqueue. A high value might indicate problems in the cluster, or in some of the nodes.
    # HELP workqueue_adds_total [ALPHA] Total number of adds handled by workqueue
    # TYPE workqueue_adds_total counter
    workqueue_adds_total{name="ClusterRoleAggregator"} 3
    workqueue_adds_total{name="DynamicCABundle-client-ca-bundle"} 1
    workqueue_adds_total{name="DynamicCABundle-csr-controller"} 5
    workqueue_adds_total{name="DynamicCABundle-request-header"} 1
    workqueue_adds_total{name="DynamicServingCertificateController"} 169
    workqueue_adds_total{name="bootstrap_signer_queue"} 1
    workqueue_adds_total{name="certificate"} 0
    workqueue_adds_total{name="claims"} 1346
    workqueue_adds_total{name="cronjob"} 0
    workqueue_adds_total{name="daemonset"} 591
    workqueue_adds_total{name="deployment"} 101066
    workqueue_adds_total{name="disruption"} 30
    workqueue_adds_total{name="disruption_recheck"} 0

You may want to check the rate of additions to the kube-controller-manager workqueue. Run the following query to check the additions rate.
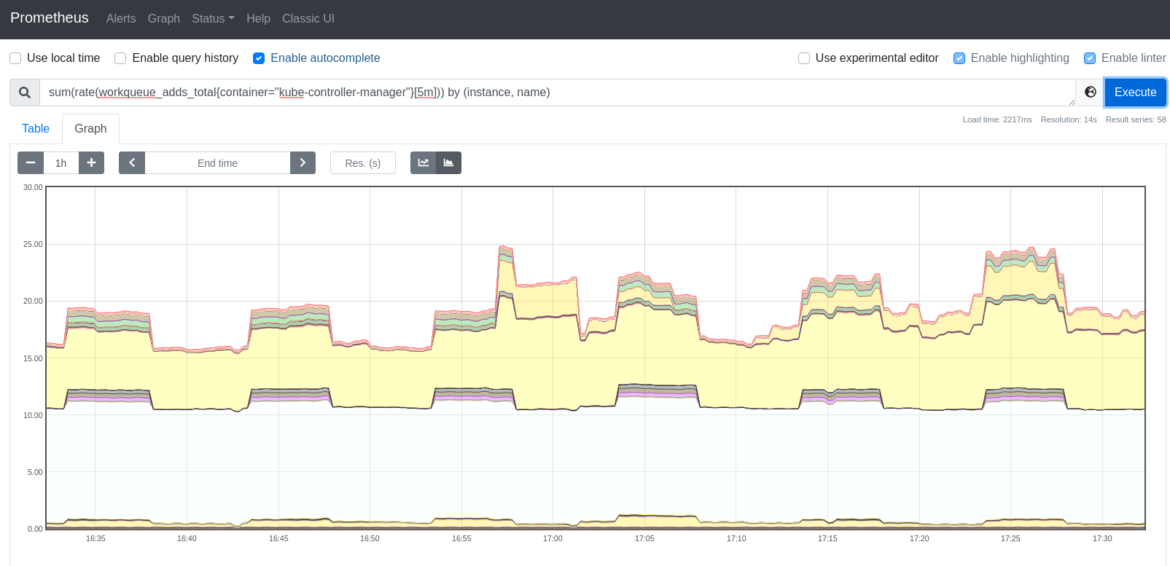
sum(rate(workqueue_adds_total{container="kube-controller-manager"}[5m])) by (instance, name)
  • workqueue_depth: This metric enables you to verify how big the workqueue is. How many actions in the workqueue are waiting to be processed? It should remain a low value. The following query will allow you to easily see the increase rate in the kube-controller-manager queue. The bigger the workqueue is, the more has to process. Thus, a workqueue growing trend may indicate problems in your Kubernetes cluster.
    sum(rate(workqueue_depth{container="kube-controller-manager"}[5m])) by (instance, name)
    # HELP workqueue_depth [ALPHA] Current depth of workqueue
    # TYPE workqueue_depth gauge
    workqueue_depth{name="ClusterRoleAggregator"} 0
    workqueue_depth{name="DynamicCABundle-client-ca-bundle"} 0
    workqueue_depth{name="DynamicCABundle-csr-controller"} 0
    workqueue_depth{name="DynamicCABundle-request-header"} 0
    workqueue_depth{name="DynamicServingCertificateController"} 0
    workqueue_depth{name="bootstrap_signer_queue"} 0
    workqueue_depth{name="certificate"} 0
    workqueue_depth{name="claims"} 0
    workqueue_depth{name="cronjob"} 0
    workqueue_depth{name="daemonset"} 0
    workqueue_depth{name="deployment"} 0
    workqueue_depth{name="disruption"} 0
    workqueue_depth{name="disruption_recheck"} 0
    workqueue_depth{name="endpoint"} 0
  • rest_client_request_duration_seconds_bucket: This metric measures the latency or duration in seconds for calls to the API server. It is a good way to monitor the communications between the kube-controller-manager and the API, and check whether these requests are being responded to within the expected time.
    # HELP rest_client_request_duration_seconds [ALPHA] Request latency in seconds. Broken down by verb, and host.
    # TYPE rest_client_request_duration_seconds histogram
    rest_client_request_duration_seconds_bucket{host="192.168.119.30:6443",verb="GET",le="0.005"} 15932
    rest_client_request_duration_seconds_bucket{host="192.168.119.30:6443",verb="GET",le="0.025"} 28868
    rest_client_request_duration_seconds_bucket{host="192.168.119.30:6443",verb="GET",le="0.1"} 28915
    rest_client_request_duration_seconds_bucket{host="192.168.119.30:6443",verb="GET",le="0.25"} 28943
    rest_client_request_duration_seconds_bucket{host="192.168.119.30:6443",verb="GET",le="0.5"} 29001
    rest_client_request_duration_seconds_bucket{host="192.168.119.30:6443",verb="GET",le="1"} 29066
    rest_client_request_duration_seconds_bucket{host="192.168.119.30:6443",verb="GET",le="2"} 29079
    rest_client_request_duration_seconds_bucket{host="192.168.119.30:6443",verb="GET",le="4"} 29079
    rest_client_request_duration_seconds_bucket{host="192.168.119.30:6443",verb="GET",le="8"} 29081
    rest_client_request_duration_seconds_bucket{host="192.168.119.30:6443",verb="GET",le="15"} 29081
    rest_client_request_duration_seconds_bucket{host="192.168.119.30:6443",verb="GET",le="30"} 29081
    rest_client_request_duration_seconds_bucket{host="192.168.119.30:6443",verb="GET",le="60"} 29081
    rest_client_request_duration_seconds_bucket{host="192.168.119.30:6443",verb="GET",le="+Inf"} 29081
    rest_client_request_duration_seconds_sum{host="192.168.119.30:6443",verb="GET"} 252.18190490699962
    rest_client_request_duration_seconds_count{host="192.168.119.30:6443",verb="GET"} 29081

    Use this query if you want to calculate the 99th percentile of latencies on requests to the Kubernetes API server.

    histogram_quantile(0.99, sum(rate(rest_client_request_duration_seconds_bucket{container="kube-controller-manager"}[5m])) by (url, le))
  • rest_client_requests_total: This metric provides the number of HTTP client requests for kube-controller-manager by HTTP response code.
    # HELP rest_client_requests_total [ALPHA] Number of HTTP requests, partitioned by status code, method, and host.
    # TYPE rest_client_requests_total counter
    rest_client_requests_total{code="200",host="192.168.119.30:6443",method="GET"} 31308
    rest_client_requests_total{code="200",host="192.168.119.30:6443",method="PATCH"} 114
    rest_client_requests_total{code="200",host="192.168.119.30:6443",method="PUT"} 5543
    rest_client_requests_total{code="201",host="192.168.119.30:6443",method="POST"} 34
    rest_client_requests_total{code="503",host="192.168.119.30:6443",method="GET"} 9
    rest_client_requests_total{code="<error>",host="192.168.119.30:6443",method="GET"} 2

    If you want to get the rate for HTTP 2xx client requests, run the following query. It will report the rate of HTTP successful requests.

    sum(rate(rest_client_requests_total{container="kube-controller-manager",code=~"2.."}[5m]))

    For HTTP 3xx client requests rate, use the following query. It will provide the rate on the number of HTTP redirection requests.

    sum(rate(rest_client_requests_total{container="kube-controller-manager",code=~"3.."}[5m]))

    The following query shows you the rate for client errors HTTP requests. Monitor this thoroughly to detect any client error response.

    sum(rate(rest_client_requests_total{container="kube-controller-manager",code=~"4.."}[5m]))

    Lastly, if you want to monitor the server errors HTTP requests, use the following query.

    sum(rate(rest_client_requests_total{container="kube-controller-manager",code=~"5.."}[5m]))
  • process_cpu_seconds_total: The total CPU time spent in seconds for kube-controller-manager by instance.
    # HELP process_cpu_seconds_total Total user and system CPU time spent in seconds.
    # TYPE process_cpu_seconds_total counter
    process_cpu_seconds_total 279.2

    You can get the spending time for CPU rate by running this query.

    rate(process_cpu_seconds_total{container="kube-controller-manager"}[5m])
  • process_resident_memory_bytes: This metric measures the amount of resident memory size in bytes for kube-controller-manager by instance.
    # HELP process_resident_memory_bytes Resident memory size in bytes.
    # TYPE process_resident_memory_bytes gauge
    process_resident_memory_bytes 1.4630912e+08

    Easily monitor the kube-controller-manager resident memory size with this query.

    rate(process_resident_memory_bytes{container="kube-controller-manager"}[5m])

Conclusion

In this article, you have learned that the Kubernetes controller manager is responsible for reaching the desired state of Kubernetes objects by communicating with the Kubernetes API via a watch mechanism. This internal component, an important piece within the Kubernetes control plane, is key to monitor kube-controller-manager for preventing any issues that may come up.

Monitor kube-controller-manager and troubleshoot issues up to 10x faster

Sysdig can help you monitor and troubleshoot problems with kube-controller-manager and other parts of the Kubernetes control plane with the out-of-the-box dashboards included in Sysdig Monitor. Advisor, a tool integrated in Sysdig Monitor, accelerates troubleshooting of your Kubernetes clusters and its workloads by up to 10x.

Sign up for a 30-day trial account and try it yourself!

Subscribe and get the latest updates