Falco Feeds extends the power of Falco by giving open source-focused companies access to expert-written rules that are continuously updated as new threats are discovered.
Microservices and Kubernetes have completely changed the way you reason about network security. Luckily, Kubernetes network policies are a native mechanism to address this issue at the correct level of abstraction.
Implementing a network policy is challenging, as developers and ops need to work together to define proper rules. However, the best approach is to adopt a zero trust framework for network security using Kubernetes native controls (network policies).
Learn how Sysdig Secure is closing this gap with its latest Sysdig Network Policy feature that provides Kubernetes-native network security, allowing both teams to author the best possible network policy, without paying the price of learning yet another policy language. It also helps meet compliance requirements (NIST, PCI, etc) that require network segmentation.
Network Policy Needs Context
Kubernetes communications without metadata enrichment are scribbled.
Before you can even start thinking about security and network policies, you first need to have deep visibility into how microservices are communicating with each other.
In a Kubernetes-world, pods are short-lived, they jump between hosts, have ephemeral IP addresses, scale up and down. All that is awesome and gives you the flexibility and reactiveness that you love. But it also means that if you look at the physical communication layer at L3/L4 (just IPs and ports, it looks like this:
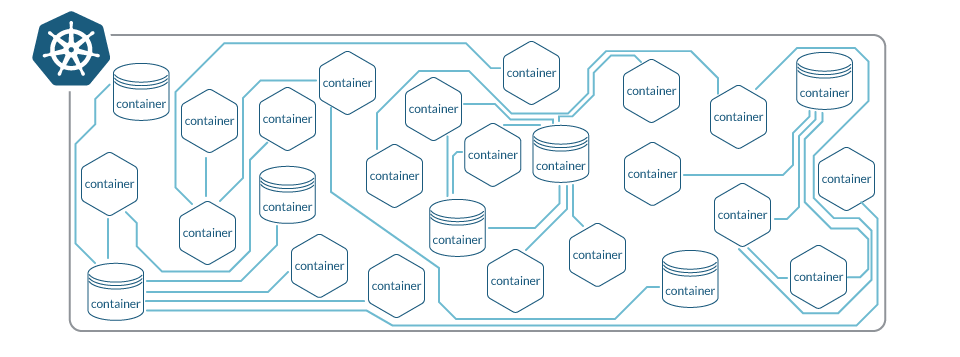
In other words, you have all the connection information, but it is not correctly aggregated and segmented. As you can expect, trying to configure classic firewall rules is not going to make it. Yes, you can start grouping the different containers according to attributes like image name, image tags, container names… But this is laborious, error prone and remember all that information is dynamic and constantly changing, it will always be an uphill battle.
Why reinvent the wheel when you already have all the metadata you need to reason about network communications and security at the Kubernetes level? The Kubernetes API contains all the up-to-date information about namespaces, services, deployments, etc. It also provides you a tool to create policies based on the labels assigned to those entities (KNPs).
Creating a Kubernetes network policy
Your developers team met with your ops team to create the ultimate network policy for one of your apps.
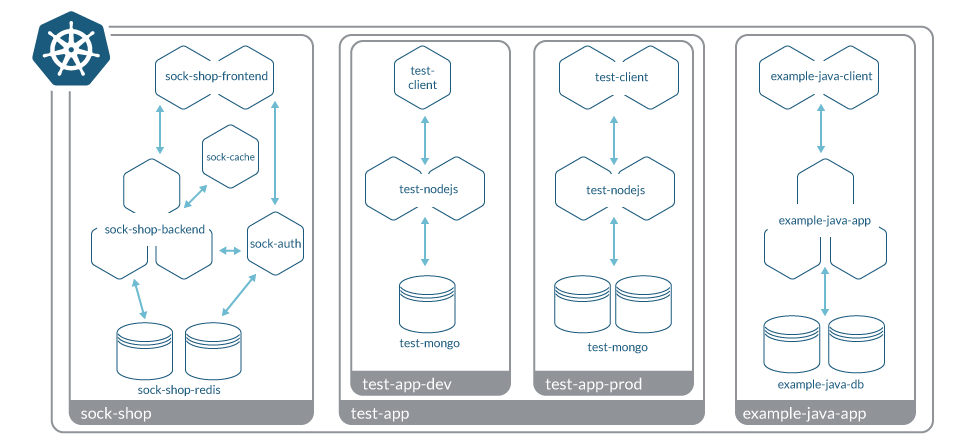
After one hour of meeting, this is how developers defined the app:

- The "example-java-app" queries two mongoDB databases, one local to the cluster another external, it also needs a redis cache.
- It receives requests from an "example-java-client" app.
And this is the network policy they came up with.
Let's start the policy with the usual metadata. This is a NetworkPolicy:
apiVersion: networking.k8s.io/v1
kind: NetworkPolicy
metadata:
  name: generated-network-policy
  namespace: example-java-app
Then the network rules. Starting with an ingress rule so our example-java-app can accept requests from the client app on port 8080:
spec:
  ingress:
    - from:
        - namespaceSelector:
            matchLabels:
              app: raw
              chart: raw-0.2.3
              heritage: Helm
              release: namespaces
          podSelector:
            matchLabels:
              app.kubernetes.io/instance: example-java-app
              app.kubernetes.io/name: example-java-app-jclient
      ports:
        - port: 8080
          protocol: TCP
Then egress rules so our app can connect to our databases: mongodb, and redis.
  egress:
    - to:
        - namespaceSelector:
            matchLabels:
              app: raw
              chart: raw-0.2.3
              heritage: Helm
              release: namespaces
          podSelector:
            matchLabels:
              app.kubernetes.io/instance: example-java-app
              app.kubernetes.io/name: example-java-app-mongo
      ports:
        - port: 27017
          protocol: TCP
    - to:
        - namespaceSelector:
            matchLabels:
              app: raw
              chart: raw-0.2.3
              heritage: Helm
              release: namespaces
          podSelector:
            matchLabels:
              app.kubernetes.io/instance: example-java-app
              app.kubernetes.io/name: example-java-app-redis
      ports:
        - port: 6379
          protocol: TCP
You finish by specifying this will apply to the pod named example-java-app-javaapp:
  podSelector:
    matchLabels:
      app.kubernetes.io/instance: example-java-app
      app.kubernetes.io/name: example-java-app-javaapp
  policyTypes:
    - Ingress
    - Egress
Wow, this is a long YAML for such a simple app. A network policy for a regular app can expand up to thousands of lines.
And this is the first caveat of Kubernetes network policies, you need to learn yet another domain specific language to create them. Not every developer will be able to or want to, and the ops team doesn't know enough about your apps to create them. They need to work together.
Let's deploy this network policy in production!
After applying the policy, the app stops working 😱

And this is another caveat of the process of creating Kubernetes network policies. Troubleshooting needs several stakeholders involved, which slows down the process. It is really easy to forget about some services or common KNP pitfalls when creating a network policy by hand.
What did you miss?
- You forgot a connection to an external service, ip
192.229.173.207. - There was a deprecated connection to a Cassandra database, not fully removed.
- You forgot to allow DNS, so although services could talk to each other, they cannot resolve their service names to IP addresses.
Of course, the teams didn't find them all at once. It was a trial and error process that spanned a few hours. You fixed it by completely removing the Cassandra dependencies, and adding these egress rules:
Rule to allow traffic to an external IP:
[...]
spec:
[...]
  egress:
  [...]
    - to:
        - ipBlock:
            cidr: 192.229.173.207/32
            except: []
[...]
Rule to allow traffic for DNS resolution:
[...]
spec:
[...]
  egress:
  [...]
    - to:
        - namespaceSelector: {}
      ports:
        - port: 53
          protocol: UDP
[...]
And finally, after applying this updated policy, everything is working as expected. And our team rest assured that our app network is secured.
The challenge of creating Kubernetes network policies
Let's briefly stop to analyze why this process didn't make people happy.
Kubernetes network policies are not trivial
Ok, it's easy to start using them. KNPs come out of the box in Kubernetes, assuming you deployed a CNI that supports them, like Calico. But still, they have many implementation details and caveats:
- They are allow-only, everything that is not explicitly allowed is forbidden.
- They are based on the entities (pods, namespaces) labels, not on their names, which can be a little misleading at first.
- You need to enable DNS traffic explicitly, at least inside the cluster.
- Etc…
They are another policy language to learn and master.
The information needed is spread across teams
Developers typically have a very accurate picture of what the application should be doing at the functional level: Communicating with the database, pulling data from an external feed, etc. But are not the ones applying and managing the KNPs in production clusters.
Ops teams live and breath Kubernetes, but they have a more limited visibility on how the application behaves internally, and the network connections it actually requires to function properly.
The reality is that you need both stakeholders' input to generate the best possible network policy for your microservice.
KNPs' learning curve and the back and forth of information between teams with different scopes have traditionally been a pain point. Some organizations have settled for a very broad policy (i.e. microservices can communicate with each other if they are in the same namespace), which is better than nothing and simple enough to be followed by everyone, but definitely not the most accurate enforcement.
Enter Sysdig Kubernetes network policies
What if you could just describe what your application is doing, in your own language, and then somebody will translate this for you to KNPs (or whatever other policy language you use in the future)?
Let's see how Sysdig can help you create accurate network policies, without the pain.
Today, Sysdig announces a new Kubernetes network policies feature, which delivers:
- Out-of-the-box visibility into all network traffic between apps and services, with a visual topology map to help you identify communications.
- Baseline network policy that you can directly refine and modify to match your desired declarative state.
- Automated KNPs generation based on the topology baseline + user defined adjustments.
Hands on!
Let's see how you can use the new Kubernetes network policies feature in Sysdig to create an accurate policy for our example-java-app in a few minutes.
You can create a network policy by jumping into the Sysdig interface -> Policies -> Network Security policies
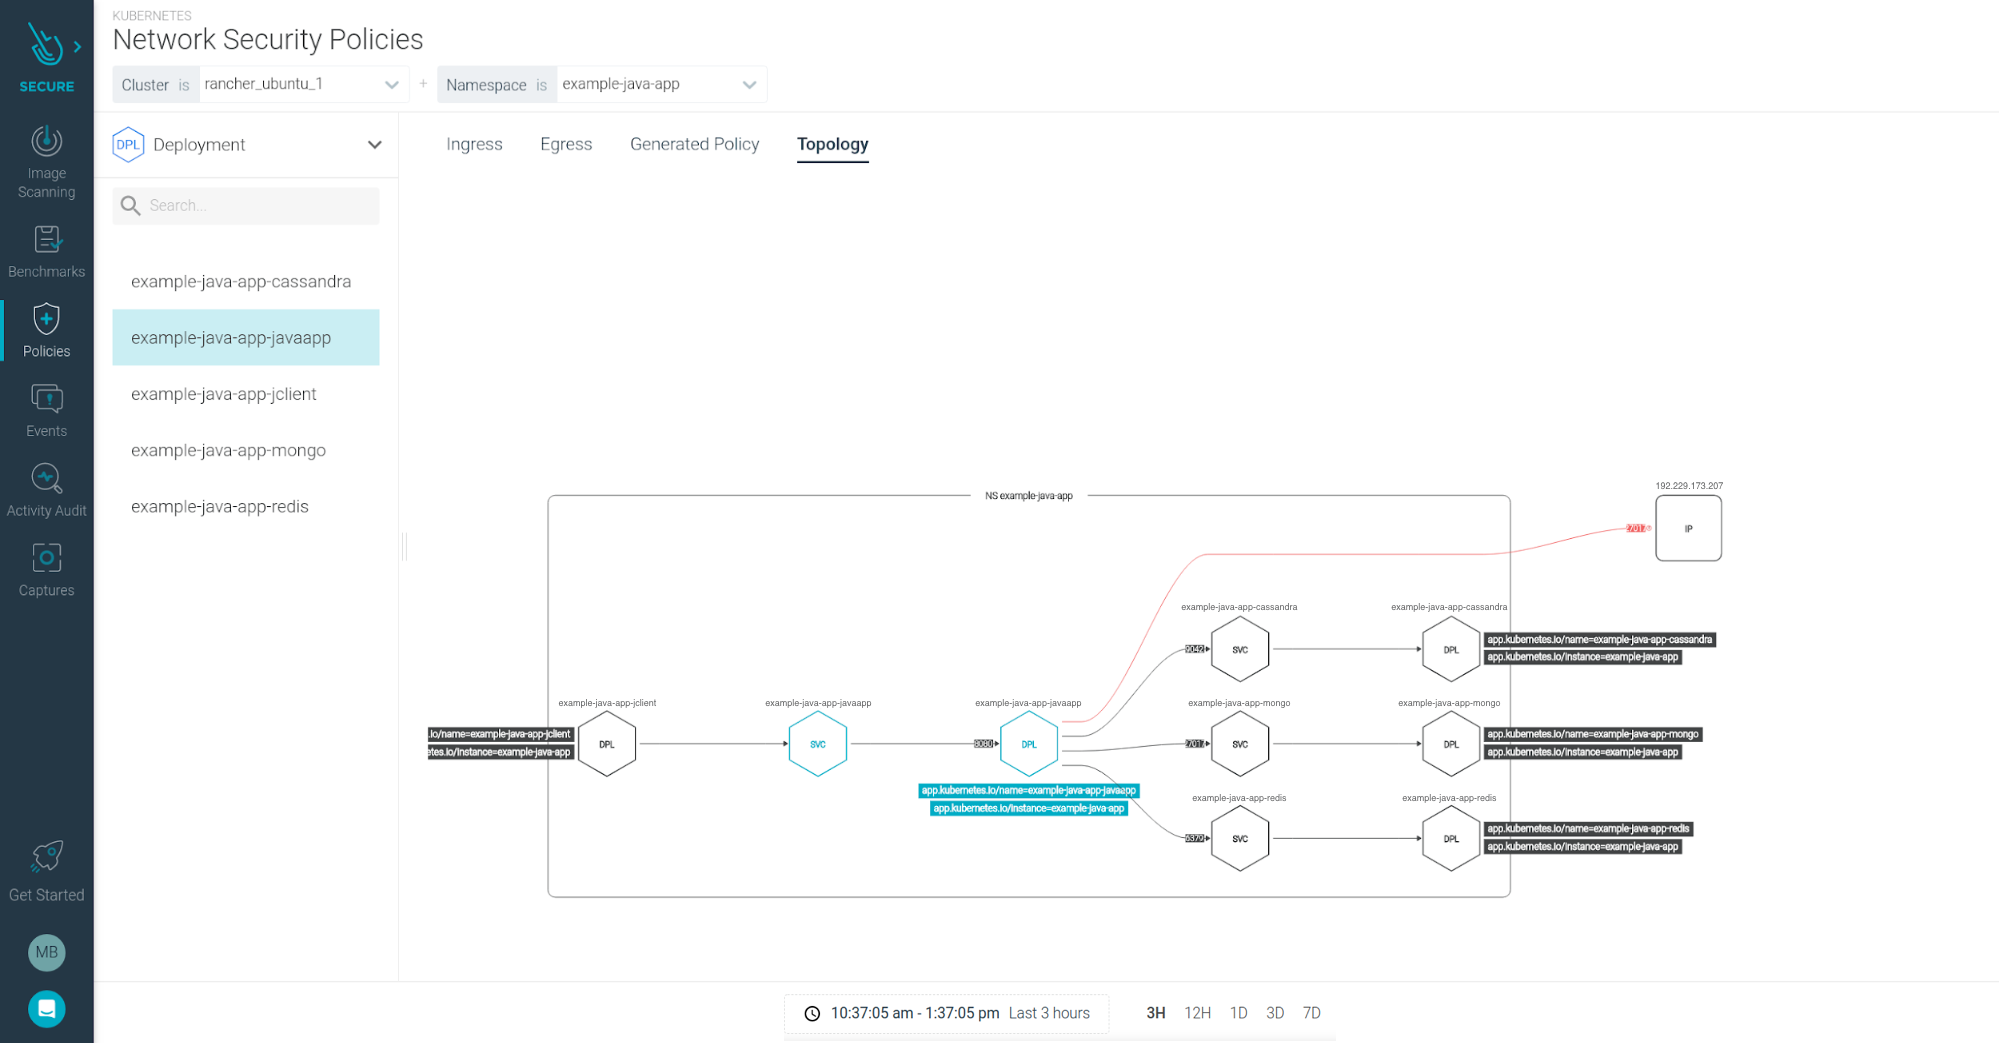
Gathering information to create a Kubernetes network policy
First, select the set of pods that you want to create a policy for.
Starting with by the cluster, and the namespace where the app lives:

Then select the Pod Owner, or the group of pods, you want to apply the policy. You can group Pods by Service, Deployment, StatefulSet, DaemonSet, or Job.
In this case let's look to our infrastructure from a Deployment perspective:
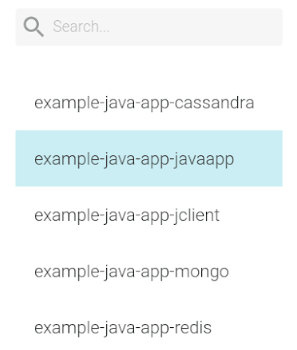
Three hours of data will be enough for Sysdig to understand the network connections from example-java-app.

You don't need to wait for Sysdig to actually collect network data. As the Sysdig agent has been deployed in this cluster for a while, Sysdig can use existing data from the activity audit.
Right after you select these parameters, Sysdig shows the observed network topology map for our app deployment:
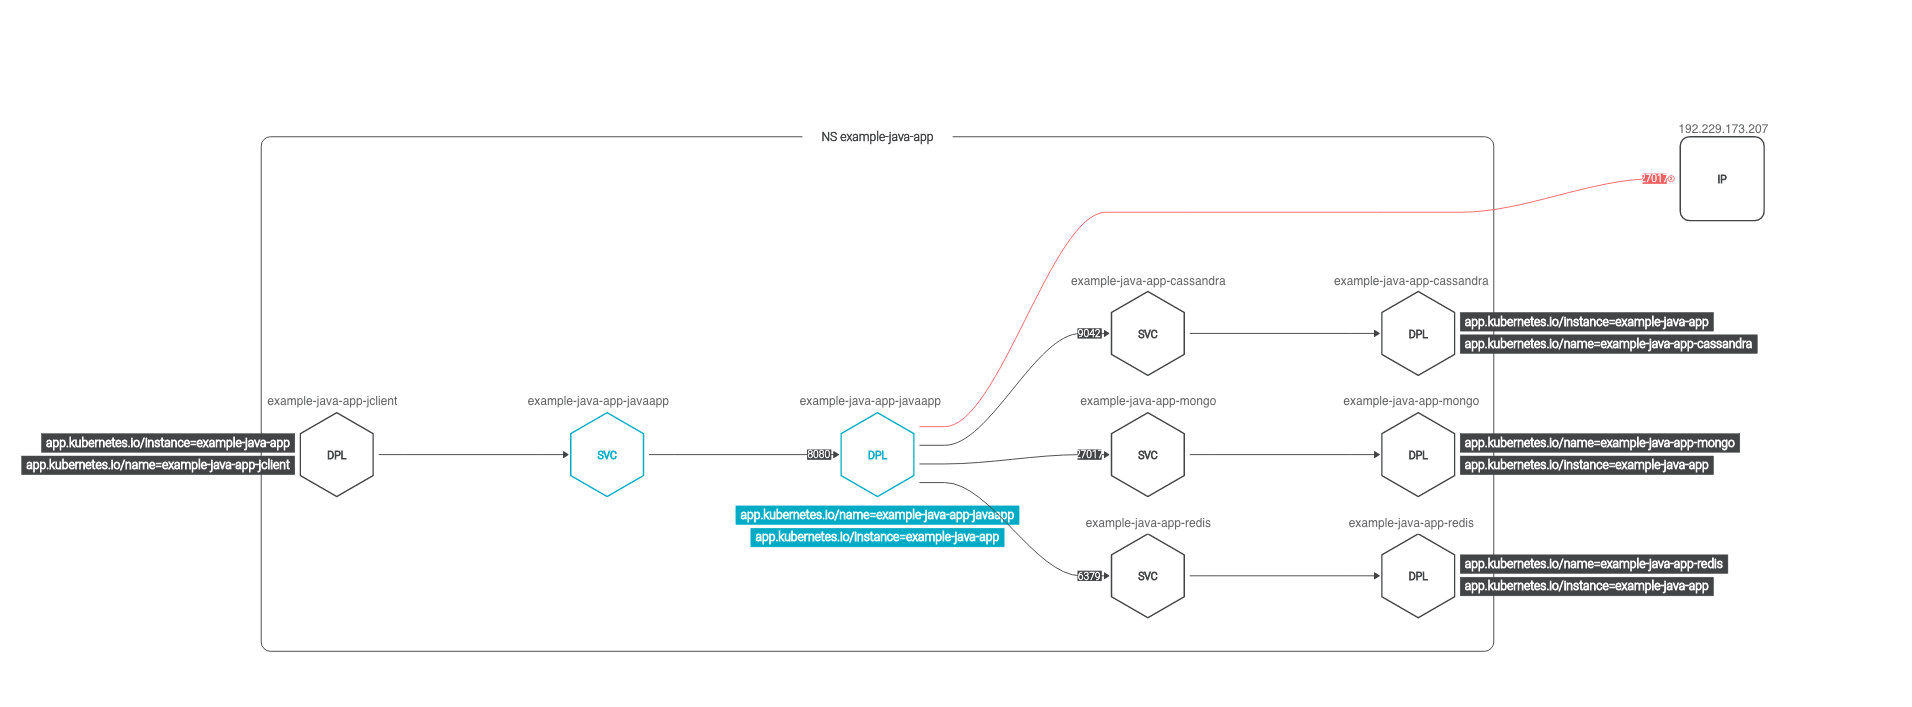
There are some interesting keys here.
This map shows all the current communications (connectors and ports). Including those that you missed in our initial approach, like the cassandra database, and the external ip.
Note that the communications are shown at the Kubernetes metadata level. You can see the "client" application pushing requests to a service, then they are forwarded to deployment pods.
It proposes a security policy, color-coded. Unresolved IPs, the entities that cannot be matched against a Kubernetes entity, are excluded by default and displayed in red.
It is clean, simple and contains all the relevant information you need.
Tweaking a Kubernetes network policy
Now, as a developer with knowledge of the application, there are a few details you'll want to tweak:
- I want to allow that specific external IP.
- There are still connections to the cassandra service that you don't want to allow moving forward.
Let's do so from the Ingress and Egress tabs on the interface.
The Ingress / Egress tables expand and detail the information found in the Topology map:
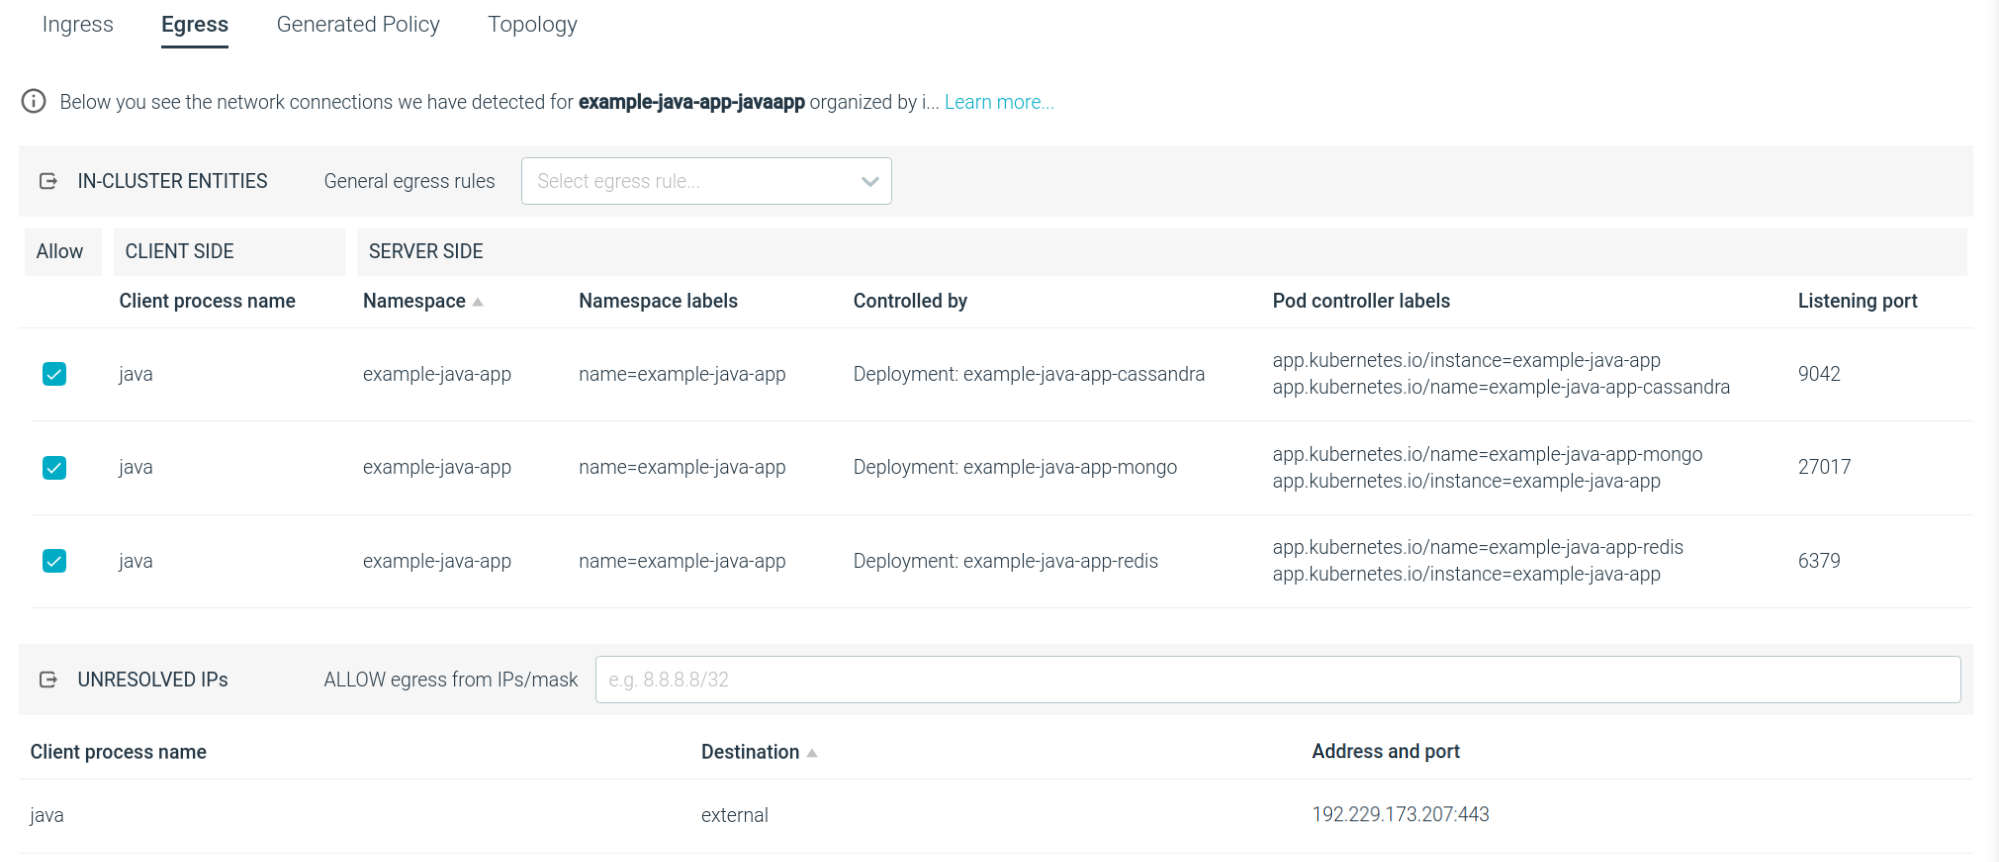

The extra information does help you identify the individual communications. For example: "Which process is initiating the egress connection?"
They are actionable:
- You can cherry-pick the communications that you want to allow from the table.
- You can look at the unresolved IPs and decide if you want to allow them moving forward.
Let's add an IP/mask combination to allow the external IP, as it belongs to a trusted service.
Let's uncheck the row for the cassandra deployment, as you no longer need that communication.
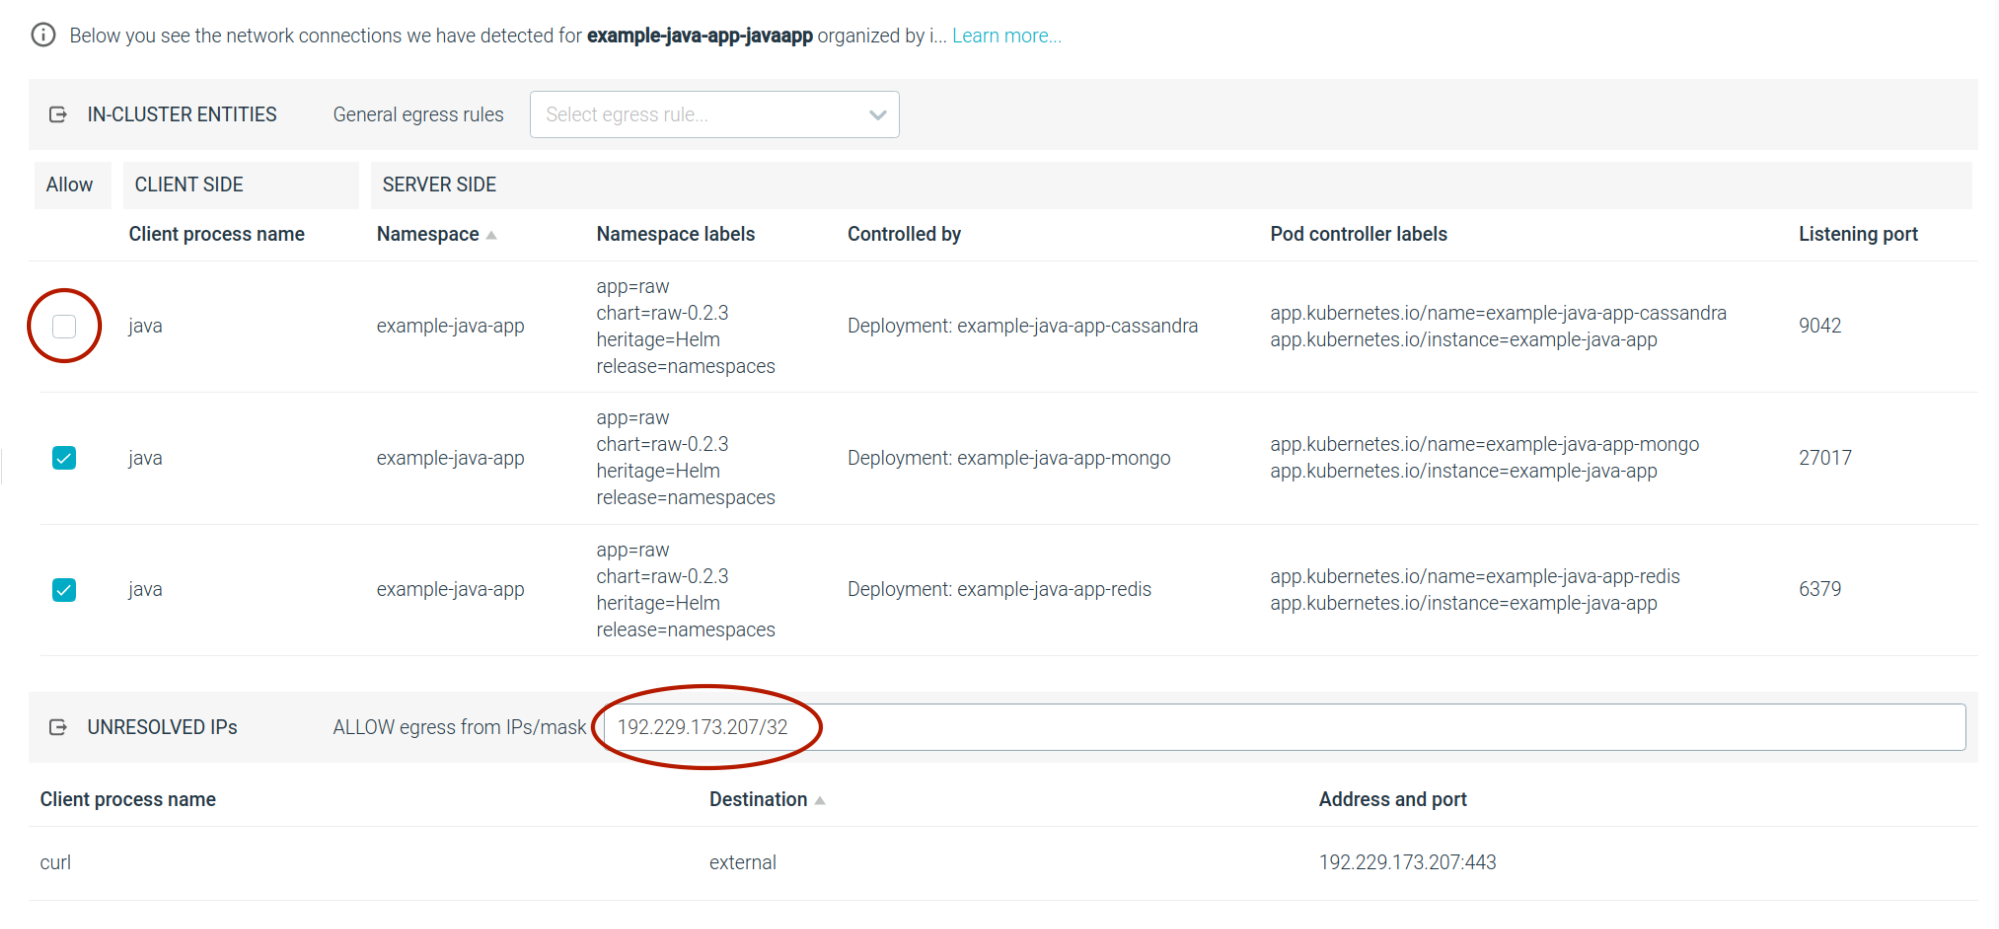
Sysdig will automatically detect that our IP belongs to a network that is external to the cluster, and flags it as such.
The network topology map will be automatically updated to reflect the changes:
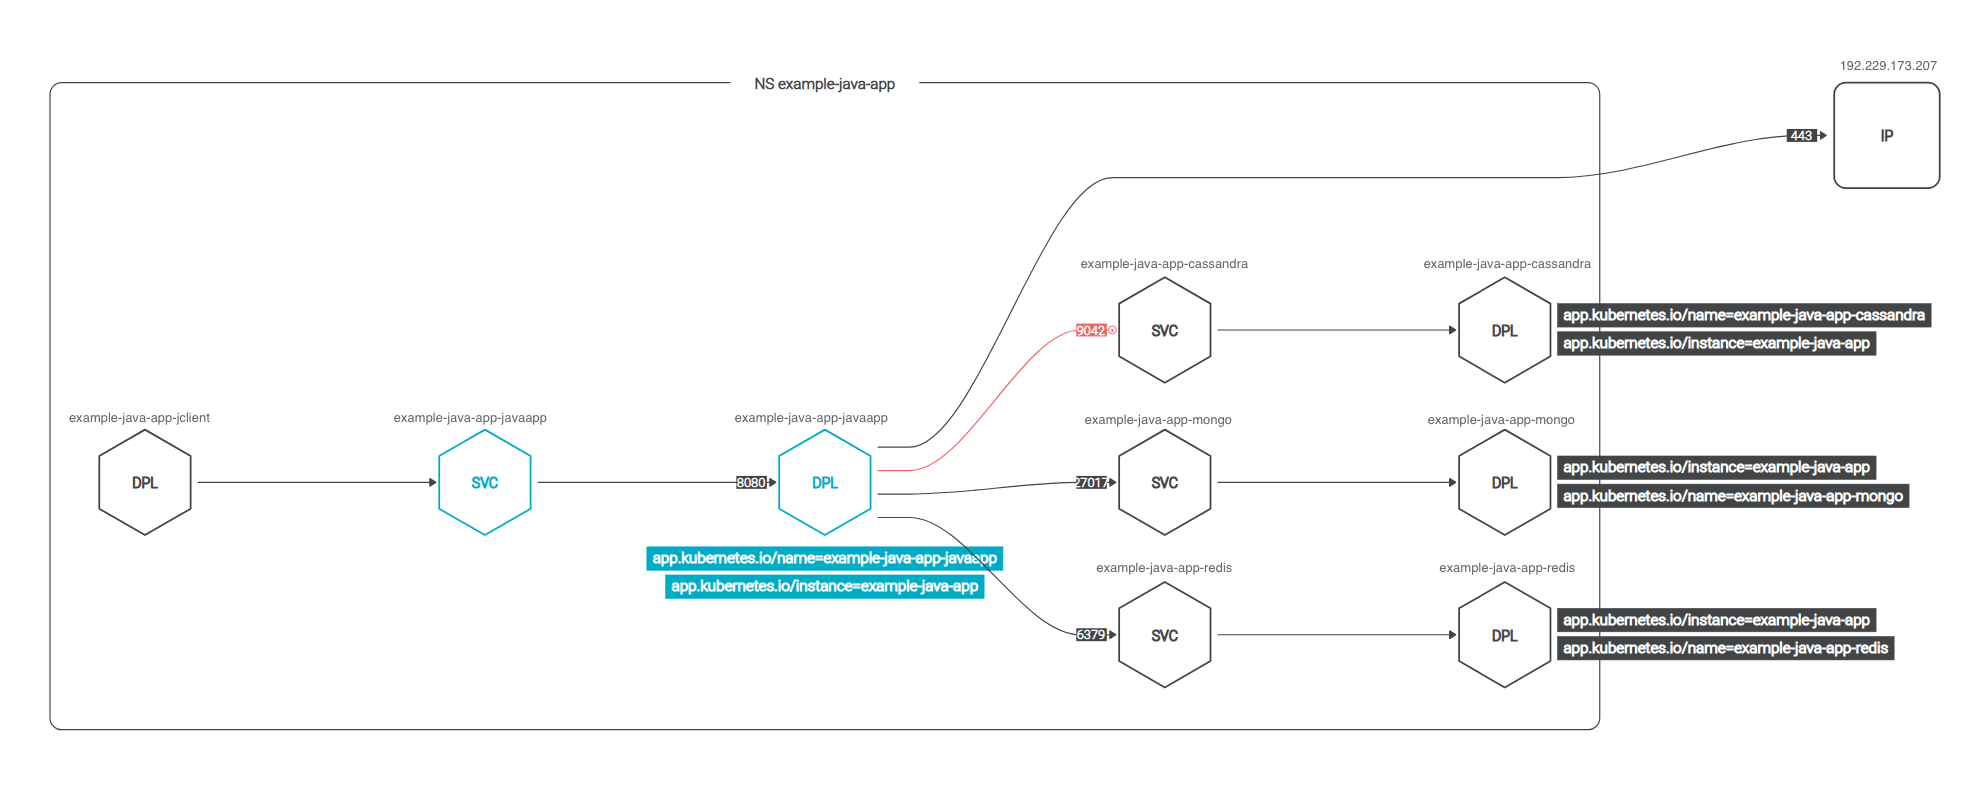
Notice the connection to the external ip is no longer red, but the connection to cassandra is.
Generating a Kubernetes network policy
Now that our policy looks exactly how you want it to look, you can generate the Kubernetes Network Policy YAML.
It will be generated on the fly just clicking on the "Generated Policy" tab:
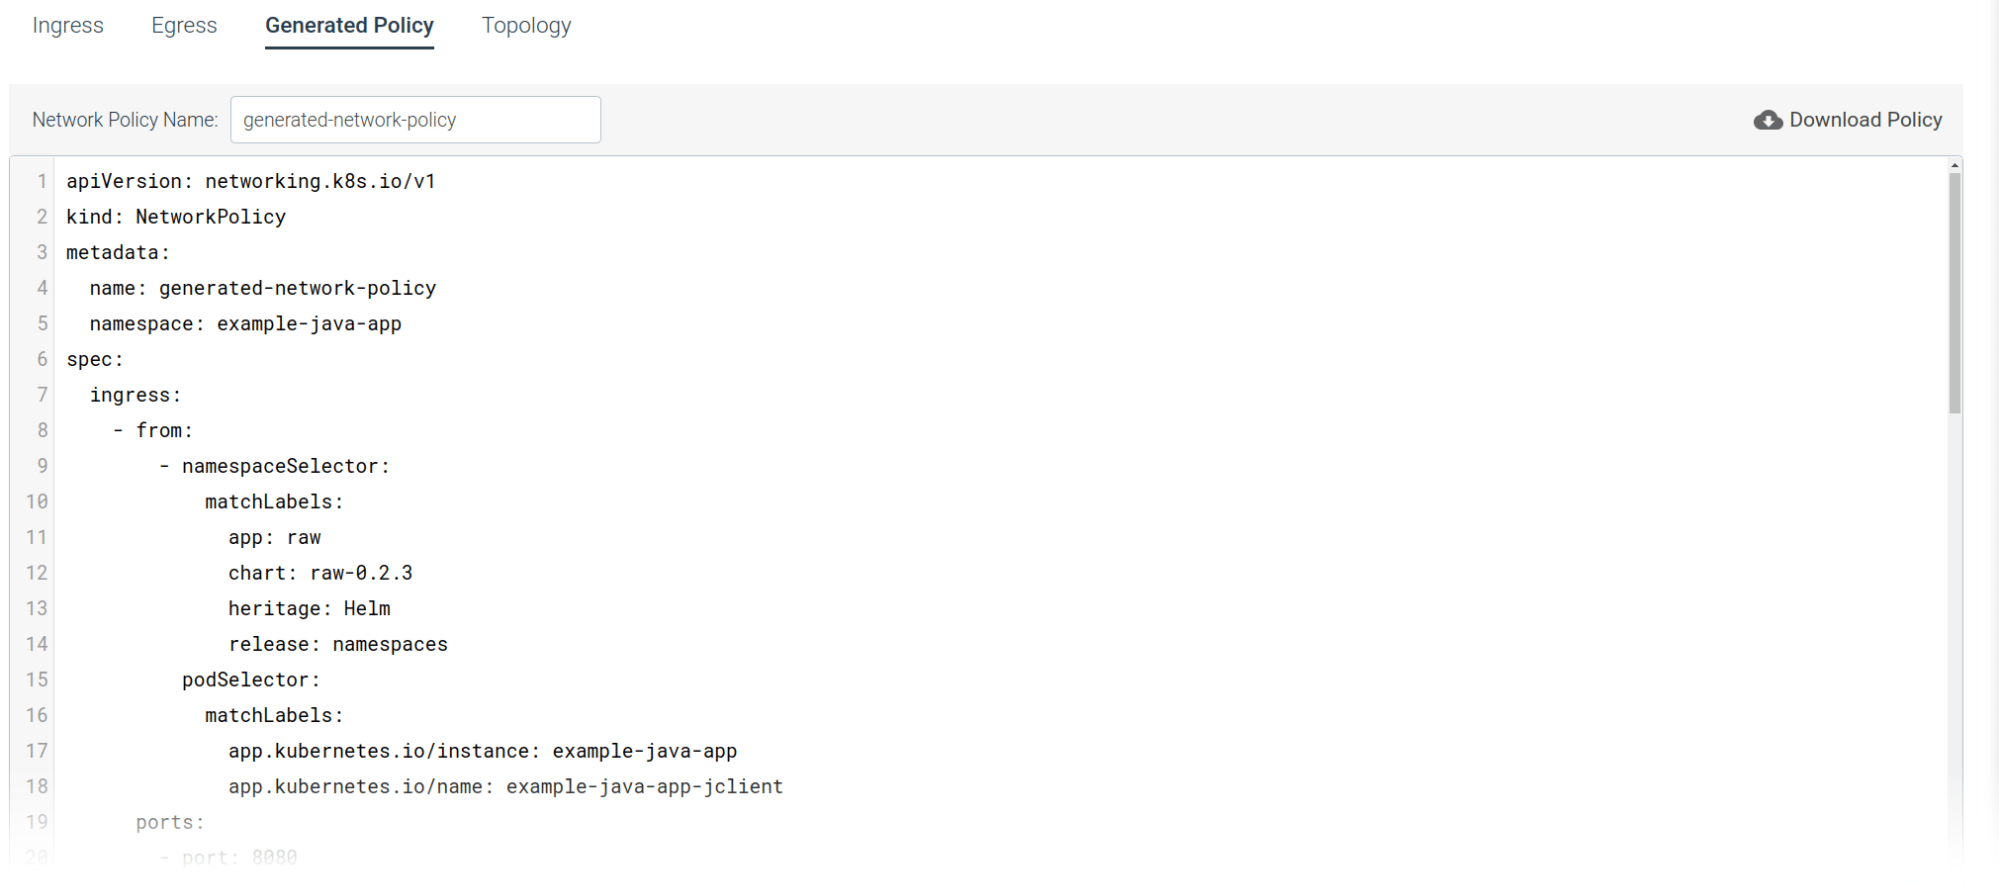
Now I can attach this policy artifact together with my application for the DevOps team.
Applying the Kubernetes network policy
As you can see in the workflow above, Sysdig is helping you generate the best policy by aggregating the observed network behavior and the user adjustments.
But you are not actually enforcing this policy.
Let's leave that to the Kubernetes control plane and CNI plugin. And this has some advantages:
- It's a native approach that leverages out-of-the-box Kubernetes capabilities.
- You avoid directly tampering with the network communications, host iptables, and the TCP/IP stack.
- It's portable. You can apply this policy in all your identical applications / namespaces, it will work on most Kubernetes flavors like OpenShift and Rancher.
What is so exciting about this feature?
First, you didn't have to understand the low level detail of how KNPs work. If you are able to describe your application network behavior using a visual flow, Sysdig will do the translation for you.
The topology map provided network visibility into all communication across a service / app / namespace / tag. So you won't forget to include any service.
You also don't start from scratch. By baselining your network policy you only perform a 10% lift, which saves you time. Then Sysdig auto generates the YAML.
Devops and security teams only need to sign off and check the policy.
Finally, it leverages Kubernetes native controls, decoupling policy definition and enforcement. As such, it is not intrusive, and it doesn't imply a performance hit. Also, if you lose connection to Sysdig your policies are still on and your network communications will stay up.
Conclusion
To address the Kubernetes network security requirements, Sysdig Secure just introduced its Sysdig Network Policy feature.
Using this feature you will:
- Get automatic visibility for your microservices and their communications, using the Kubernetes metadata to abstract away all the physical-layer noise.
- Apply least-privilege microsegmentation for your services
- Automatically generate the KNPs that derives from your input, no previous KNP expertise required.
You can check this feature today, start a free trial!


