


Falco Feeds extends the power of Falco by giving open source-focused companies access to expert-written rules that are continuously updated as new threats are discovered.

Terraform is the de facto tool if you work with infrastructure as code (IaC). Regardless of the resource provider, it allows your organization to work with all of them simultaneously. One unquestionable aspect is Terraform security, since any configuration error can affect the entire infrastructure.
In this article we want to explain the benefits of using Terraform, and provide guidance for using Terraform in a secure way by reference to some security best practices.
- Auditing Terraform configurations for security vulnerabilities and implementing security controls.
- Managing access credentials in Terraform security.
- Security best practices in the use of Terraform modules.
- DIY Terraform modules.
Let's get started!
What is Terraform?
Terraform is an open source infrastructure as code software tool that enables you to safely and predictably create, change, and destroy infrastructure. We can address the ongoing challenge of securely managing access credentials for cloud resources provisioned using Terraform.
To see a simple example, we follow the getting started of the official page and deploy an nginx container.
$> cat main.tf
terraform {
  required_providers {
    docker = {
      source  = "kreuzwerker/docker"
      version = "~> 2.13.0"
    }
  }
}
provider "docker" {}
resource "docker_image" "nginx" {
  name         = "nginx:latest"
  keep_locally = false
}
resource "docker_container" "nginx" {
  image = docker_image.nginx.latest
  name  = "tutorial"
  ports {
    internal = 80
    external = 8000
  }
}
form code for security issues using the terrascan scan command.
We could now initialize the project with terraform init, provisioning the nginx server container with terraform apply (remember to check if everything is working, and destroy the nginx web server with terraform destroy
Terraform relies on access keys and secret keys to authenticate with cloud providers and provision resources on behalf of users. In this example, no authentication was required, but most providers require credentials in some or other way. Storing credentials insecurely can lead to security vulnerabilities such as unauthorized access and data breaches. One location to be concerned with is storing credentials in Terraform state files.
The Terraform state files are files that Terraform uses to keep track of the resources it has created in a particular infrastructure. These state files are typically stored locally on the computer where Terraform is running, although they can also be stored remotely in a backend like Terraform Cloud or S3.
The state file contains a snapshot of the infrastructure at a specific point in time, including all the resources that Terraform has created or modified. This includes details like the IDs of resources, their current state, and any other metadata that Terraform needs to manage the resources.
If you want to know more about Terraform, discover our article What is Terraform?
Auditing your Terraform Manifest Files
Terraform uses the state file to determine the current state of the infrastructure and to plan changes to that infrastructure. When you make changes to your Terraform configuration and apply those changes, Terraform compares the new configuration to the existing state file and determines what changes need to be made to the infrastructure to bring it in line with the new configuration.

The benefits of scanning Terraform manifest files are significant when it comes to detecting and mitigating potential security risks in your cloud infrastructure. If you can only do one thing, make sure you scan your Terraform files thoroughly. Because the state file is so important to Terraform's operation, it's important to handle it carefully. You should always back up your state file and make sure it's stored securely, especially if you're using a remote backend. You should also be careful not to modify the state file manually, as this can cause inconsistencies between the state file and the actual infrastructure.
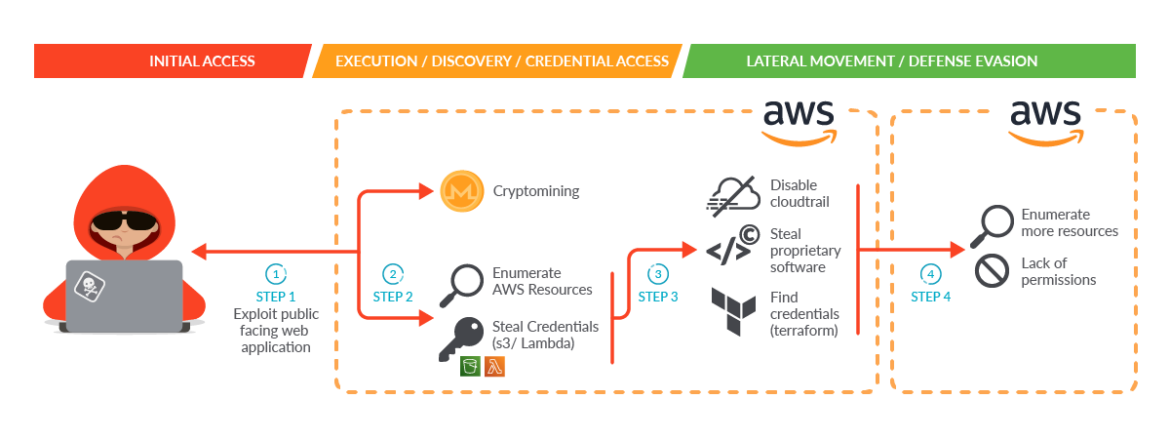
In the case of SCARLETEEL, scanning Terraform manifests could have helped detect the exposed access keys and secrets in the S3 buckets. With early detection, the incident could have been prevented, or at least contained, before the attacker had the chance to access the second AWS account – as outlined in the below diagram.
So here are some of the specific benefits provided by scanning your Terraform asset definitions:
Identifying Sensitive Information
Scanning Terraform declaration files can help identify any sensitive information, such as access keys, secrets, passwords, or tokens that might be accidentally exposed in the state files. As seen in the SCARLETEEL incident, attackers could use this information to gain unauthorized access to your cloud infrastructure and move laterally between organizations.
Network misconfigurations
Just as we set up access to our cloud by configuring VPC or AWS Security Groups, we must take into consideration the correct configuration of Terraform files to reduce the attack surface as much as possible.
Visibility into Changes
Terraform manifest files provide a history of changes made to your infrastructure, including when resources were created, updated, or destroyed. Scanning the state files can help you track changes, identify anomalies, and quickly respond to any security incidents.
Compliance and Governance
Scanning your `.tf` files can help ensure that your cloud infrastructure is compliant with regulatory and governance requirements, such as PCI DSS, HIPAA, or SOC 2. By detecting potential security risks, you can take corrective action and prevent compliance violations.
Automation vulnerability discovery
Scanning Terraformfiles can be automated, allowing you to detect and mitigate security risks in real-time. You can integrate scanning with your DevOps pipeline, allowing you to catch vulnerabilities early in the development cycle and prevent them from reaching production.
Overall, scanning Terraform definition files is an essential security practice for any organization using Terraform to manage their cloud infrastructure. It can help you identify and mitigate potential security risks, ensuring the security and compliance of your cloud environment.
Terraform scanning tools
Terraform scanning tools can help you find misconfigurations and security issues and vulnerabilities in your Terraform code. These tools are designed to help users identify and remediate issues before they are deployed to production environments. The following are some popular Terraform scanning tools:
- Terrascan – Terrascan is an open-source static analysis tool that scans Terraform code for security issues.
It provides users with policy-as-code capabilities and supports multiple cloud providers. - Checkov – Checkov is an open-source tool that scans Terraform code for security issues and best practices violations. It has a comprehensive library of built-in policies and is highly customizable.
- KICS – Keeping Infrastructure as Code Secure (KICS) is an open-source tool that scans Terraform code for security issues, compliance violations, and infrastructure misconfigurations. It supports multiple cloud providers and is highly customizable.
For the purpose of this blog, we will discuss how Terrascan is used for scanning security issues in Terraform.
It uses static code analysis to scan Terraform code and configurations for security issues and vulnerabilities. Terrascan can be used as a standalone tool or integrated into a CI/CD pipeline to automatically scan Terraform code as part of the build process. Now we will show how Terrascan is used to scan for vulnerabilities:
- Scan your Terraform code with Terrascan
Once you have initialized your Terrascan configuration file, you can scan your Terraform code for security issues using the terrascan scan command.
terrascan scan -f /path/to/terraform/code- Review Terrascan scan results
After the scan is complete, Terrascan should output a list of any security issues that were detected in your Terraform code. Each issue will include a description of the issue, the location in the Terraform code where the issue was detected, and a severity rating. Here's an example of the output from a Terrascan scan:
=== Results Summary ===
Pass: 0, Fail: 1, Skip: 0
File: /path/to/terraform/code/main.tf
Line: 15 Rule ID: AWS_001
Rule Description: Ensure no hard-coded secrets exist in Terraform configurations
Severity: HIGH- In this example, Terrascan detected a high-severity security issue in the main.tf file of the Terraform code.
- The issue is related to hard-coded secrets in Terraform configurations, which can be a serious security risk.
Using Terraform scanning tools can help improve security by identifying potential security issues and vulnerabilities before they are deployed to production environments. This can help prevent security breaches and ensure that infrastructure is configured in a secure and compliant manner. Additionally, these tools can help enforce security policies and best practices across organizations and reduce the risk of human error.
Managing Access Credentials in Terraform Security
Terraform allows you to configure cloud resources with ease, but it requires credentials to authenticate with cloud providers. The way you manage those credentials is critical to the security of your infrastructure. One best practice is to use a secure credential management system to store your credentials.
It's essential to avoid storing your credentials in plaintext or hardcoding them into your Terraform code.
Don't store secrets in Terraform state
Terraform state files should not contain any secrets, such as passwords or API keys. Instead, use Terraform's input variables or external data sources to pass sensitive information to the module. This will help ensure that your secrets are not exposed in the state file. For example, here is a Terraform state file that does not contain any secrets:
# Example Terraform state file
# This file tracks the state of our AWS EC2 instances.
terraform {
 required_version = ">= 0.12"
}
provider "aws" {
 region = "eu-west-1"
}
resource "aws_instance" "example" {
 ami = "ami-0c55b159cbfafe1f0"
 instance_type = "t2.micro"
 tags = {
  Name = "example-instance"
 }
}
output "public_ip" {
 value = aws_instance.example.public_ip
}
In the above example, there are no secrets or sensitive information stored in the state file.
- The file defines a single AWS EC2 instance, and uses the aws_instance resource type to create it.
- The provider block specifies the AWS region to use, and the output block defines an output variable that displays the instance's public IP address.
If any sensitive information was required, such as an AWS access key or secret key, it would be passed to the module using input variables or external data sources, rather than being stored in the state file.
Don't store secrets in plain text
Never store secrets in plain text in your Terraform manifests.
As we mentioned before, you can use environment variables or input variables to pass secrets to the Terraform module. For example, here is a script that uses environmental variables to pass secrets to Terraform:
provider "aws" {
 region = "eu-west-1"
}
resource "aws_db_instance" "example" {
 engine            = "mysql"
 instance_class    = "db.t2.micro"
 allocated_storage = 10
 name              = "exampledb"
 username          = "exampleuser"
 password          = "${var.db_password}"
}
variable "db_password" {}
Instead of storing the db_password in plain text within the Terraform manifest, we can pass it as an environment variable when we run the Terraform command:
export TF_VAR_db_password="supersecret"Once we have passed the environmental variable, we can simply run the Terraform script:
terraform applyThe variable db_password will be populated with the value of the TF_VAR_db_password environment variable, which is passed to the aws_db_instance resource. The password will not be stored in plain text in the Terraform manifest, making it more secure. Alternatively, we could use input variables to pass secrets to the Terraform module. Here's an example of how we would use the input variables to pass secrets to a Terraform module:
provider "aws" {
 region = "eu-west-1"
}
resource "aws_db_instance" "example" {
 engine               = "mysql"
 instance_class       = "db.t2.micro"
 allocated_storage    = 10
 name                 = "exampledb"
 username             = "exampleuser"
 password             = "${var.db_password}"
}
variable "db_password" {
 type = "string"
}
We can then pass the db_password variable to the Terraform module when we run the terraform apply command.
terraform apply -var "db_password=supersecret"This approach allows us to pass secrets to the Terraform module without storing them in plain text in the Terraform manifest.
A better approach is to use a secure credential management system, like HashiCorp Vault or AWS Secrets Manager. These tools offer a secure way to store and manage secrets, providing access control, encryption, and audit logs. The best place to start is by creating a Hashicorp Vault Secrets Engine.
resource "vault_mount" "secret" {
 path = "secret"
 type = "kv"
}
resource "vault_generic_secret" "aws_credentials" {
 path = "secret/aws/credentials"
 data_json = <<JSON  {
  "access_key": "${var.aws_access_key}",
  "secret_key": "${var.aws_secret_key}"
 }  JSON
}
The above code creates a KV secrets engine mount and a generic secret that stores AWS credentials.
Replace var.aws_access_key and var.aws_secret_key with the corresponding environment variables, or use a different method to securely pass these values to Terraform. Once you have a secrets engine configured, we can securely retrieve those AWS credentials from Hashicorp Vault via the below policy:
data "vault_generic_secret" "aws_credentials" {
 path = "secret/aws/credentials"
}
provider "aws" {
 access_key = data.vault_generic_secret.aws_credentials.data.access_key
 secret_key = data.vault_generic_secret.aws_credentials.data.secret_key
 region     = "eu-west-1"
}
The above code retrieves your AWS credentials from HashiCorp Vault and sets them as a provider configuration for the 'aws' provider configured in the first script. Now, you can use Terraform to configure AWS resources without hardcoding or storing the AWS credentials in plaintext.
Note: This is just an example script. You should modify it based on your specific requirements and the credential management system you are using. Additionally, you should configure access control and audit logs for your credential management system to ensure that secrets are protected and monitored.
Rotating Keys Frequently
Once you have a secure credential management system in place, it's crucial to rotate your keys frequently.
Rotating keys means generating new access keys periodically and revoking old ones. This practice ensures that if one of your keys is compromised, it won't be valid for long.
You can again use tools like Hashicorp Vault or AWS Secrets Manager to automate the key rotation process. Automating this process can help you avoid human error, which is one of the main causes of security breaches. Since we were already working with Hashicorp Vault, we will create the following Vault Policy example that should ensure our Terraform keys are rotated frequently to maintain the security of the system.
path "secret/data/terraform/*" {
 capabilities = ["read", "create", "update", "delete", "list"]
 allowed_parameters = {
  "max_versions": ["10"]
  "force":      ["true"]
 }
}
path "sys/leases/renew" {
 capabilities = ["create", "update"]
}
path "sys/leases/revoke" {
 capabilities = ["update"]
}
This policy includes three statements, which provide the minimum necessary permissions for managing Terraform keys:
- The first statement allows users to read, create, update, delete, and list secrets under the secret/data/terraform/* path. This path should contain the keys that Terraform uses to access other resources. The max_versions parameter limits the number of versions of a key that can be stored, while the force parameter ensures that a new key is generated even if the maximum number of versions has already been reached.
- The second statement allows users to renew leases on secrets. This is important for ensuring that keys are rotated frequently.
- The third statement allows users to revoke leases on secrets. This is useful if a key is compromised and needs to be revoked immediately.
Note: This is just an example policy; you should modify it based on your specific requirements and the resources you are managing with Terraform. Additionally, you should configure Vault to automatically rotate keys based on your organization's security policy.
Least Privilege Access Policies
Finally, it's crucial to implement the principle of least privilege when configuring your Terraform infrastructure.
The principle of least privilege means that you should grant the minimum level of access required for a particular resource to function correctly. This approach minimizes the potential damage that an attacker can do if they gain access to your infrastructure.
With Terraform, you can implement least privilege access policies by defining appropriate IAM roles, policies, and permissions reducing IAM misconfigurations. You can also use Terraform modules that have been designed with security best practices in mind. For example, the below policy provides least privilege access to Terraform resources for the specified user or group.
{
 "Version": "2012-10-17",
 "Statement": [
  {
   "Effect": "Allow",
   "Action": [
    "terraform:plan",
    "terraform:apply",
    "terraform:destroy"
   ],
   "Resource": "arn:aws:terraform:::<your-terraform-workspace>"
  },
  {
   "Effect": "Allow",
   "Action": [
    "terraform:state-push",
    "terraform:state-pull"
   ],
   "Resource": "arn:aws:terraform:::<your-terraform-state-bucket>"
  },
  {
   "Effect": "Allow",
   "Action": "terraform:state-list",
   "Resource": "arn:aws:terraform:::<your-terraform-workspace>/*"
  }
 ]
}
The above policy includes three statements, which provide the minimum necessary permissions for managing Terraform resources:
- The first statement allows the specified user or group to perform terraform:plan, terraform:apply, and terraform:destroy actions on the resources in the specified Terraform workspace. You would need to replace <your-terraform-workspace> with the Amazon Resource Names (ARN) of your Terraform workspace.
- The second statement allows the specified user or group to perform terraform:state-push and terraform:state-pull actions on the specified Terraform state bucket. Again, you'll need to replace <your-terraform-state-bucket> with the ARN of your Terraform state bucket.
- The third statement allows the specified user or group to perform terraform:state-list action on all resources in the specified Terraform workspace. As always, remember to replace <your-terraform-workspace> with the ARN of your Terraform workspace.
Note: This is just an example policy; you should modify the ARN's to match your specific environment and use case. Additionally, you should review and adjust the policy based on your specific requirements and the resources you are managing with Terraform.
Using Terraform Modules
Terraform modules are a powerful way to organize and reuse infrastructure code. However, as with any code, modules can introduce supply chain security risks if not used properly. In this section, we will discuss Terraform security with some best practices for using Terraform modules to ensure secure Infrastructure as Code.
Don't trust them blindly; double check the infrastructure being created, the security groups, etc. and always 'plan' first
Terraform modules can save a lot of time and effort, but they should not be trusted blindly. Always review the code and the plan before applying any changes to your infrastructure. This includes scan Terraform for misconfiguration or vulnerabilities and reviewing the security groups and other resources being created to ensure that they meet your security requirements.
Use Terraform's 'plan' command to review the changes before applying them.
The 'plan' command is used to generate an execution plan, which shows what Terraform will do when you apply your configuration. This allows you to review the changes and make sure they meet your expectations before actually applying them. The simplest command to generate a plan is:
terraform planTerraform will analyze your configuration files and generate a plan of what it will do when you apply your changes. The output will look something like this:
Plan: 2 to add, 0 to change, 1 to destroy.

Changes to be added:
 + aws_security_group.web
  id:                                <computed>
  name:                              "web"
  ...
 + aws_instance.web
  id:                                <computed>
  ami:                               "ami-0c55b159cbfafe1f0"
  ...
Changes to be destroyed:
 - aws_instance.db
  id:                                "i-0123456789abcdef0"
  ...
In each case, review the output to make sure the changes are what you expect. In this example, Terraform will create a new security group and a new EC2 instance, and it will destroy an existing EC2 instance. If you're satisfied with the plan, you can apply the changes using the apply command:
terraform applyBy reviewing the plan before applying the changes, you can catch any unexpected changes or errors and avoid potential problems with your infrastructure. As we mentioned at the start of this section, don't blindly trust the infrastructure. Plans ensure we can apply the exact security specifications.
Keep the modules updated
Modules should be kept up to date with the latest security patches and best practices.
Always check for updates and apply them as needed. This will help ensure that your infrastructure is secure and up to date with the latest security standards. While there are no built-in commands in Terraform for keeping modules up to date with the latest Terraform security patches and best practices, there are, however, some third-party tools that can help with module management and version control.
One such tool is Terraform's own official module registry, which is a curated collection of pre-built modules for common infrastructure needs. The modules in the registry are maintained by Terraform's community and are updated regularly to ensure that they are up to date with the latest security patches and best practices.
To use a module from the registry, you can include its source URL in your Terraform configuration file. For example:
module "my_module" {
 source = "terraform-aws-modules/s3-bucket/aws"
 ...
}
To update a module to the latest version available in the registry, you can use the terraform get command with the -update flag:
terraform get -updateThe above 'terraform get -update' command will update all the modules in your Terraform configuration to the latest versions available in the registry. In addition to the module registry, there are also third-party tools like Terraform Cloud and Atlantis that provide more advanced module management and version control features, such as:
- Automatic updates
- Version locking
- Collaboration tools
These tools can help you keep your modules up to date and ensure that your infrastructure is secure and compliant with the latest security standards.
Don't store the state file locally; save it encrypted somewhere else that can be pulled later
Terraform state files contain sensitive information about your infrastructure, such as resource IDs and secrets. Do not store them locally or publicly in version control systems. Instead, save them in a secure location that can be pulled later when needed. You should also encrypt the state file to protect it from unauthorized access. For example, we created the below Terraform script that uses remote state storage in an S3 bucket to avoid storing those state files locally or in a version control system:
terraform {
 backend "s3" {
  bucket         = "my-terraform-state-bucket"
  key            = "my-terraform-state.tfstate"
  region         = "eu-west-1"
  dynamodb_table = "my-terraform-state-lock"
  encrypt        = true
 }
}
resource "aws_instance" "example" {
 ami           = "ami-0c55b159cbfafe1f0"
 instance_type = "t2.micro"
 ...
}
In this example, the terraform block at the beginning of the file specifies that the state file should be stored in an S3 bucket called my-terraform-state-bucket, with a key of my-terraform-state.tfstate.
- The region parameter specifies the AWS region where the S3 bucket is located.
- The dynamodb_table parameter specifies the name of a DynamoDB table to use for locking.
- The encrypt parameter tells Terraform to encrypt the state file before storing it in S3.
- The aws_instance resource block specifies the infrastructure resources to create, but does not include any sensitive information.
When you run terraform apply, Terraform will create the resources and store the state file in the S3 bucket.
When you run subsequent terraform commands, Terraform will use the remote state file in the S3 bucket rather than a local file.
By storing the state file in a secure location like an S3 bucket, you can ensure that it is not stored locally or in version control systems. And by encrypting the state file, you can protect it from unauthorized access.
Don't modify Terraform state manually
Manual modifications to the Terraform state file can cause issues and introduce security risks.
Always use Terraform commands to manage the state file. If you need to make changes to the state file, use Terraform's import command to import the resources into the state. This will ensure that the state file remains consistent with the actual infrastructure.
Let's assume you have an EC2 instance running on AWS and want to start managing it via Terraform. First, you need to create a new Terraform configuration file that describes the existing resource. Here's a simple example:
# Example Terraform configuration file to import an existing EC2 instance

provider "aws" {
 region = "eu-west-1"
}
resource "aws_instance" "example" {
# We'll fill in these details in the next step
}
You can then run the terraform import command followed by the resource type, a unique identifier for the resource, and the name of the resource in the Terraform configuration file.
terraform import aws_instance.example i-0123456789abcdefgIn the above example, i-0123456789abcdefg is the unique identifier for the EC2 instance in AWS, and aws_instance.example is the resource name in the Terraform configuration file. After running the terraform import command, Terraform will now create a new state file and import the existing resources into it. We would then use Terraform's normal commands, such as terraform plan and terraform apply, to manage the resources going forward.
If you want to learn more about EC2 security, don't forget to check out Securing SSH on EC2 and How to Secure Amazon EC2.
Creating Terraform Modules
Terraform modules provide a way to organize and reuse infrastructure code. When creating Terraform modules, it is important to follow Terraform security best practices to ensure secure infrastructure as code.
In this section, we will discuss some best practices for creating Terraform modules.
Use git to store the Terraform manifests
Store the Terraform manifests in version control systems like Git. This makes it easier to track changes, revert changes, and collaborate with others. Always use version control for your Terraform modules to ensure that changes are tracked and auditable.
Let's initial Git in our current directory to understand how to store Terraform manifests:
git initYou'll need to create a new Terraform configuration file, such as main.tf, and add some resources to it. You can then add the file to Git and commit the changes:
git add main.tfgit commit -m "Initial commit"Make some changes to the Terraform configuration file and add and commit them to Git:
git add main.tfgit commit -m "Added new resource"If you need to revert to a previous version of the Terraform configuration file, you can use Git to checkout the previous commit:
git checkout HEAD~1 main.tfThis command will check out the version of main.tf from the previous commit. You can also use Git to collaborate with others on the Terraform project. For example, you can push your changes to a remote Git repository that others can clone and work on:
git remote add origin <remote-repository-url>git push -u origin masterUsing Git, you can:
- Track changes to your Terraform manifests, such as who changed a particular resource or when the last time something was modified.
- Revert changes in the event of a failure, you can go back to the previous known working version.
- Collaborate with others more easily via Pull Requests to discuss the changes.
Terraform signing
Terraform signing would be a cool feature that allows users to sign their Terraform manifests with a private key.
This would vastly improve Terraform security since it could help users ensure that their Terraform manifests have not been tampered with. Unfortunately, Terraform doesn't have a built-in feature for signing Terraform manifests with a private key. However, you can use external tools, such as GPG or Hashicorp's Plugin Signing tool, to sign your Terraform manifests and verify their integrity. For example, here's a script that can sign your Terraform manifests with GPG and verify their integrity:
#!/bin/bash

# Set the path to your Terraform code
TERRAFORM_PATH="./my-terraform-code"

# Set the path to your GPG private key
GPG_PRIVATE_KEY_PATH="/path/to/your/gpg/private/key"

# Set the GPG key ID
GPG_KEY_ID="your-gpg-key-id"

# Set the GPG key passphrase
GPG_KEY_PASSPHRASE="your-gpg-key-passphrase"

# Set the output file for the signed Terraform manifest
SIGNED_MANIFEST_FILE="./signed-terraform-manifest.tf"

# Set the output file for the verified Terraform manifest
VERIFIED_MANIFEST_FILE="./verified-terraform-manifest.tf"

# Sign the Terraform manifest with GPG
gpg --yes --batch --passphrase="$GPG_KEY_PASSPHRASE" --local-user="$GPG_KEY_ID"
--output="$SIGNED_MANIFEST_FILE" --sign "$TERRAFORM_PATH"

# Verify the integrity of the signed Terraform manifest with GPG
gpg --verify "$SIGNED_MANIFEST_FILE"

# Extract the signed Terraform manifest from the GPG signature
gpg --output="$VERIFIED_MANIFEST_FILE" --decrypt "$SIGNED_MANIFEST_FILE"
As always, you will need to execute the above script and sign your Terraform manifest with GPG using your private key, verify the integrity of the signed manifest, and extract the signed manifest for further use.
By signing your Terraform manifests with GPG and verifying their integrity, you can ensure that your Terraform manifests have not been tampered with and that they are the same as when they were originally signed. This helps improve the security of your infrastructure code and reduce the risk of unauthorized changes.
Automate the whole process
Automate the entire process of creating, testing, and deploying your Terraform modules. Use tools like GitLab CI/CD or Jenkins to automate the process, making it easier to manage your infrastructure code and ensure that it is secure.
For example, at a large financial services company, the infrastructure team had a number of Terraform modules that were used to manage their cloud infrastructure. However, they were facing challenges with managing and deploying these modules manually, which led to errors and inconsistencies.
To address this, the team decided to implement GitLab CI/CD to automate the process of creating, testing, and deploying Terraform modules. Here's an example of how they structured their GitLab CI/CD pipeline:
# .gitlab-ci.yml

stages:
 - build
 - test
 - deploy

# Build stage: Compile and package the Terraform code
build:
 stage: build
 script:
  - terraform init -backend-config="bucket=${TF_STATE_BUCKET}" ./path/to/terraform/module
  - terraform validate ./path/to/terraform/module
  - terraform fmt -check ./path/to/terraform/module
  - terraform plan -out=tfplan ./path/to/terraform/module

# Test stage: Run automated tests on the Terraform code
test:
 stage: test
 script:
  - terraform init -backend-config="bucket=${TF_STATE_BUCKET}" ./path/to/terraform/module
  - terraform validate ./path/to/terraform/module
  - terraform fmt -check ./path/to/terraform/module
  - terraform plan -out=tfplan ./path/to/terraform/module
  - terraform apply -auto-approve tfplan
# Deploy stage: Apply the Terraform code to the target environment
deploy:
 stage: deploy
 script:
  - terraform init -backend-config="bucket=${TF_STATE_BUCKET}" ./path/to/terraform/module
  - terraform validate ./path/to/terraform/module
  - terraform fmt -check ./path/to/terraform/module
  - terraform apply -auto-approve ./path/to/terraform/module
In this example, the pipeline consists of three stages: build, test, and deploy.
- In the build stage, the Terraform code is compiled and packaged, and a plan is generated.
- In the test stage, automated tests are run on the Terraform code, including validating the code, formatting it correctly, and applying the plan to a test environment.
- Finally, in the deploy stage, the Terraform code is applied to the target environment, ensuring that the infrastructure is configured according to the code.
From a security standpoint, by automating the process of creating, testing, and deploying your Terraform modules through GitLab CI/CD, you can improve the security of your infrastructure code and reduce the risk of unauthorized changes.
Don't abuse output
Do not abuse output variables to store sensitive information like Secrets.
Use a secrets management tool like Vault or AWS Secrets Manager to store sensitive information. In the below script, we will use Hashicorp Vault to store and retrieve secrets for use in Terraform:
# main.tf
provider "vault" {
 address = "https://vault.example.com"
 token   = var.vault_token
}
resource "vault_generic_secret" "my_secrets" {
 path = "secret/myapp"
 data_json = jsonencode({
  db_username = vault_generic_secret.my_secrets.data["db_username"]
  db_password = vault_generic_secret.my_secrets.data["db_password"]
  api_key     = vault_generic_secret.my_secrets.data["api_key"]
 })
}
data "vault_generic_secret" "my_secrets" {
 path = "secret/myapp"
 depends_on = [vault_generic_secret.my_secrets]
}

# Use the secrets in your Terraform code
resource "aws_instance" "nigel_instance" {
 ami           = "ami-0c55b159cbfafe1f0"
 instance_type = "t2.micro"
 key_name      = var.key_name
 tags = {
  Name = "nigel-instance"
 }
 connection {
  user        = data.vault_generic_secret.my_secrets.data["db_username"]
  private_key = file(var.key_path)
  timeout     = "2m"
 }
 provisioner "remote-exec" {
  inline = [
   "echo ${data.vault_generic_secret.my_secrets.data["api_key"]} > /tmp/api_key",
   "sudo apt-get update",      "sudo apt-get install -y nginx",
   "sudo service nginx start"
  ]
 }
}
In this case, you could use the vault_generic_secret resource to store your secrets in Vault, and then retrieve those secrets using the data.vault_generic_secret data source and use them in our Terraform code.
By using a secrets management tool like Hashicorp Vault or AWS Secrets Manager to store sensitive information, you can easily avoid the need to store secrets in output variables or other parts of our Terraform code, therefore reducing the associated risk of unauthorized access or exposure from those sensitive credentials/secrets.
Use prevent-destroy for "pet" infrastructure
Use the prevent-destroy option to prevent accidental deletion of "pet" infrastructure resources. From a security perspective, the prevent_destroy lifecycle meta-argument was designed to prevent accidental deletion of any "pet" infrastructure resources that are created on a whim, therefore helping to avoid costly mistakes and ensure that your infrastructure remains stable and consistent.
# main.tf
resource "aws_instance" "nigel_instance" {
 ami           = "ami-0c55b159cbfafe1f0"
 instance_type = "t2.micro"
 key_name      = var.key_name
 lifecycle {
  prevent_destroy = true
 }
 tags = {
  Name = "nigel_instance"
  Environment = "staging"
  Pet = "true" # LOL
 }
}
We intend on using prevent-destroy to prevent accidental deletion of the "nigel_instance" resource. By setting prevent_destroy to true, Terraform will prevent the resource from being deleted through the terraform destroy command or through the Terraform web UI. By using prevent-destroy, we highlight the criticality of this lab/staging environment, but also ensure that even if it's not a production environment, it should still remain stable and consistent. Therefore, we are reducing the risk of accidental deletion by a colleague that would otherwise lead to potential downtime.
When using Terraform to create infrastructure, it is crucial to ensure that the infrastructure is secure.
Conclusion
Terraform is a powerful tool that enables infrastructure as code, but it's crucial to prioritize security when using it.
By following Terraform security best practices that we presented in this guide, you can minimize the risk of security breaches and keep your infrastructure safe. To summarize:
- Scan your Terraform files to discover misconfigurations or vulnerabilities.
- Use a secure credential management system and never store secrets inside Terraform files.
- Implement least privilege access policies.
- Apply the same security practices to cloud providers.
Whether you're a DevOps engineer, security analyst, or cloud architect, these guidelines make it easy to manage and secure your cloud-native infrastructure.