Falco Feeds extends the power of Falco by giving open source-focused companies access to expert-written rules that are continuously updated as new threats are discovered.
"Security doesn't slow us down, and we're here to prove that."
This is how Maya, a devSecOps team lead at one of the prominent software development companies, started her presentation in front of Security leaders to show how the Agentless vulnerability management approach helped her:
- Streamline the onboarding of new deployments.
- Significantly cut down complexity and setup time.
In this blog post, we'll introduce you to Sysdig's new Agentless scanning for vulnerability management. We'll explore its functioning and how Sysdig has overcome the limitations of traditional agentless methods by combining the strengths of both agent and agentless approaches.
Team agentless: Balancing agility and security
Maya's team, deeply rooted in DevOps practices, hesitated at the thought of adding more operational complexity. Their mantra was efficiency and agility. The agentless approach emerged as an appealing alternative to agent-based, promising security without encumbering their fast-paced development processes.
Given the fact that they have many applications managed by a third party where they can't deploy agents, in addition to many traditional applications that they are very hesitant to touch or install any agents on, this approach appealed to the security leaders.
However, in some cases, using Agentless scanning alone comes with certain limitations in system visibility. For example, it does not provide insights into whether vulnerable packages are already in use and loaded into the system memory. Additionally, Agentless scanning lacks real-time visibility, potentially causing it to miss information about intermediate states of the system between scans.
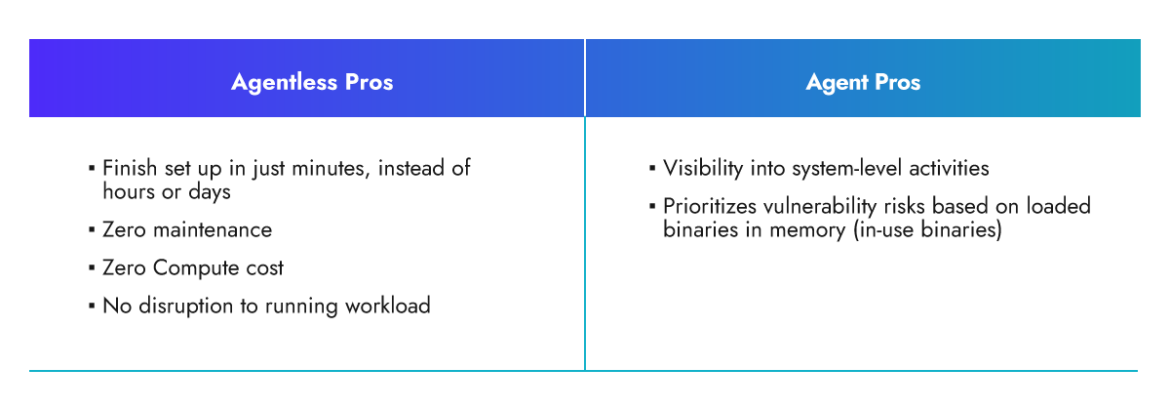
Maya deploys Agentless in minutes, and starts protecting her infrastructure right away. Over time, they implement agents where possible to have better insights.
Introducing Vulnerability Management Agentless Scanning in Sysdig Secure
Sysdig has developed a comprehensive scanning solution by integrating both agentless and agent-based deployments:
- Sysdig Agentless scanning leverages existing cloud providers' APIs to discover and scan resources very fast.
- The Sysdig agent is a lightweight package that operates at the kernel level, utilizing eBPF (extended Berkeley Packet Filter) technology to provide minimal overhead and real-time visibility.
- And they work together. For example, the Sysdig runtime agent creates a profile for each workload, which the agentless scanner can utilize to identify in-use packages and prioritize remediation efforts based on the presence of vulnerable packages already in use.
Let's jump into the world of Agentless scanning and find out how it operates.
How Agentless Scanning Works
Agentless security tools generally rely on leveraging existing interfaces and APIs provided by the cloud service providers to collect information and perform vulnerability assessments.
The Agentless scanning process begins with identifying cloud assets within the account. Subsequently, a snapshot of the root volume associated with each instance is generated. This snapshot is then mounted to a dedicated scanner instance operating within an isolated environment. Within this secure environment, the scanner instance proceeds to execute the VM analyzers on the designated mount point. The outcome of this execution is the generation and preservation of the Software Bill of Materials (SBOM). Upon the conclusion of this procedure, the volume is dismounted and the snapshot is subsequently removed. Lastly, we send the scan results to Sysdig UI and it becomes available through API as well.
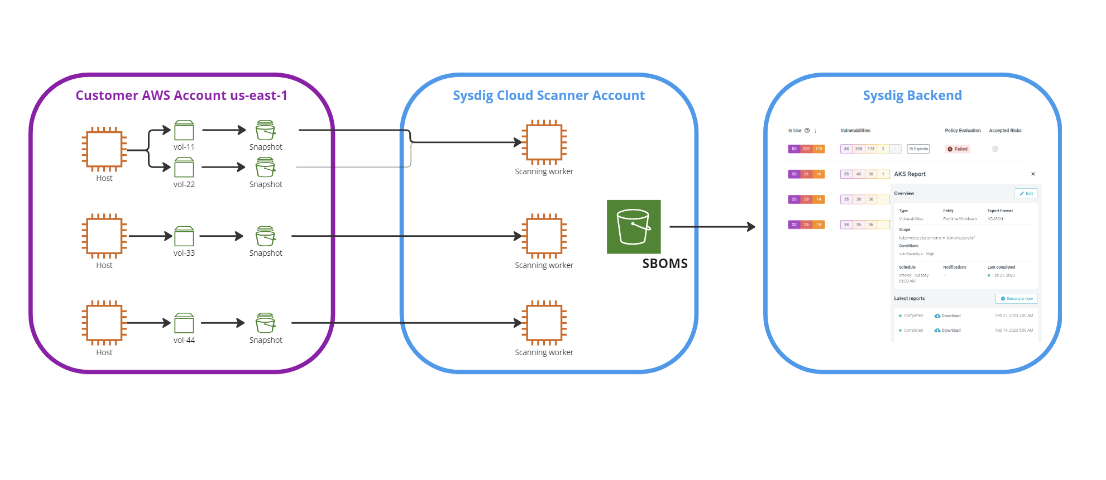
Sysdig's Agentless scanning solution is designed with the principle of least privilege in mind. This means that we only request the specific permissions that are necessary for the scanning process. By doing so, we greatly reduce the attack surface and potential risks associated with excessive permissions.
You can use tags to exclude particular virtual private cloud (VPC) or hosts in your account from being scanned
Let's dive into the onboarding of the scanning flows.
Onboarding cloud account
The onboarding phase primarily entails creating permissions in the customer's account to enable the discovery, scanning, and assessment of various workloads.
Part of the onboarding is to create the following resources:
- Global resources
aws_iam_roleaws_iam_policy
- Regional resources
aws_kms_keyaws_kms_alias
These roles/policies provide the minimal set of permission to scan the running hosts.
An example of these permissions would include the ability to discover EC2 instances and create/delete snapshots to facilitate scanning and assessment. Refer to our documentation for the list of required permissions.
Permissions
    ec2:Describe*
    ec2:CreateSnapshot
    ec2:CopySnapshot
    ec2:DeleteSnapshot (with the additional constraint to restrict deletion to only volumes created by Sysdig)
The great news is that you won't have to configure any of these permissions manually. In Sysdig UI, choose your cloud provider, provide the account details, and all of the required permissions will be set up in minutes.
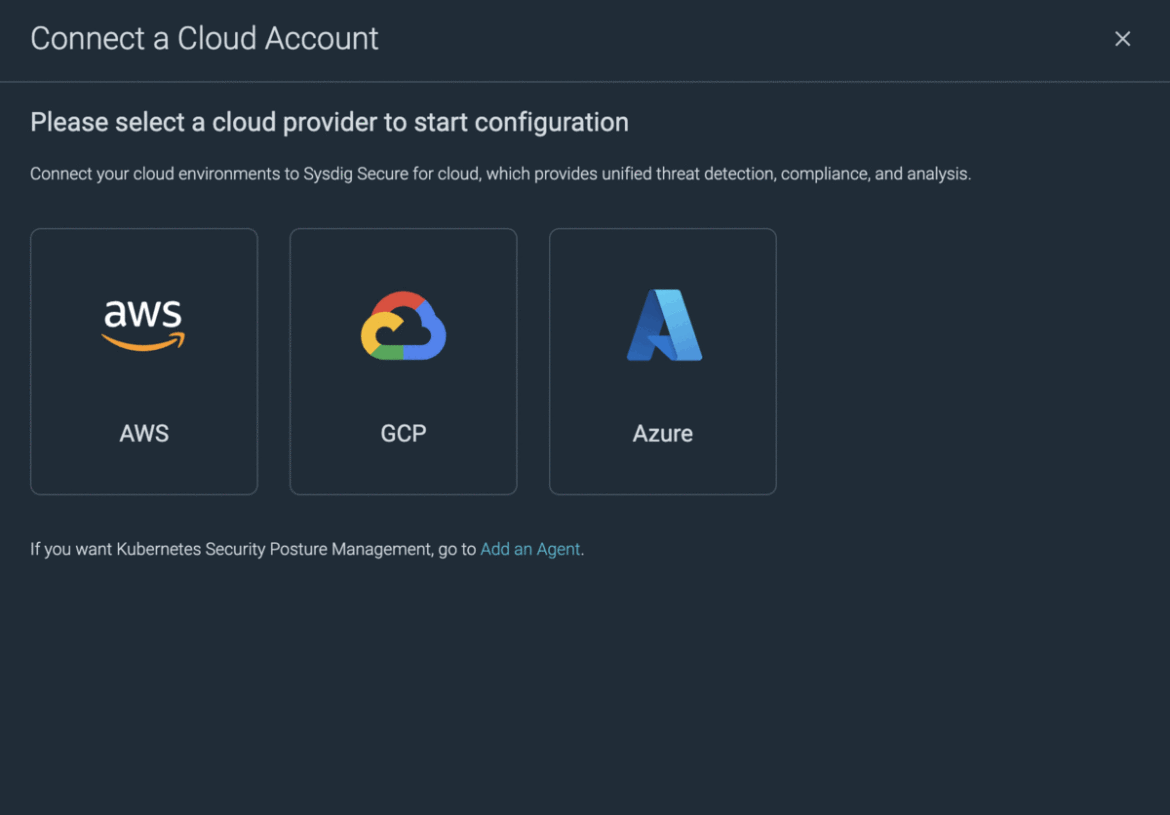
The swiftness of the onboarding process is a significant advantage of the agentless approach. It typically completes within 10 to 15 minutes, ensuring the security of all your workloads in no time.
Scanning mechanism and flow
The Agentless scanning process encompasses multiple stages. Each stage requires a certain level of permission. Sysdig emphasizes the minimum permission required at each stage and communicates this clearly to all stakeholders. Now, let's delve into each phase of the process.
1) Discovery: Agentless scanning starts by discovering the cloud assets within the cloud environment. It accesses the cloud service provider's API to obtain information about the assets. For each onboarded account, Sysdig has to detect running instances. Here are the required permissions for this stage:
ec2:DescribeVpcs
ec2:DescribeInstances to detect running (?) instances
ec2:DescribeVolumes
2) Snapshot creation: For each volume of running instances, we have to create/take snapshots. Here are the required permissions for this stage:
ec2:CreateSnapshot
ec2:DescribeSnapshots
3) Attach snapshot: Create a volume from the shared snapshot and then attach it to the scanner instance:
ec2:CreateVolume
ec2:AttachVolume
4) Extract SBOM: Execute the VM analyzers over that mount point, produce the SBOM, and save SBOM to S3 bucket.
5) Remove volume: Unmount the volume, then delete the volume.
ec2:DetachVolume
ec2:DeleteVolume
6) Report results: Push scan results to Sysdig UI and it becomes available through API as well.
Once the scan is completed, you will be able to see all the scanned hosts via agent or agentless in one place.
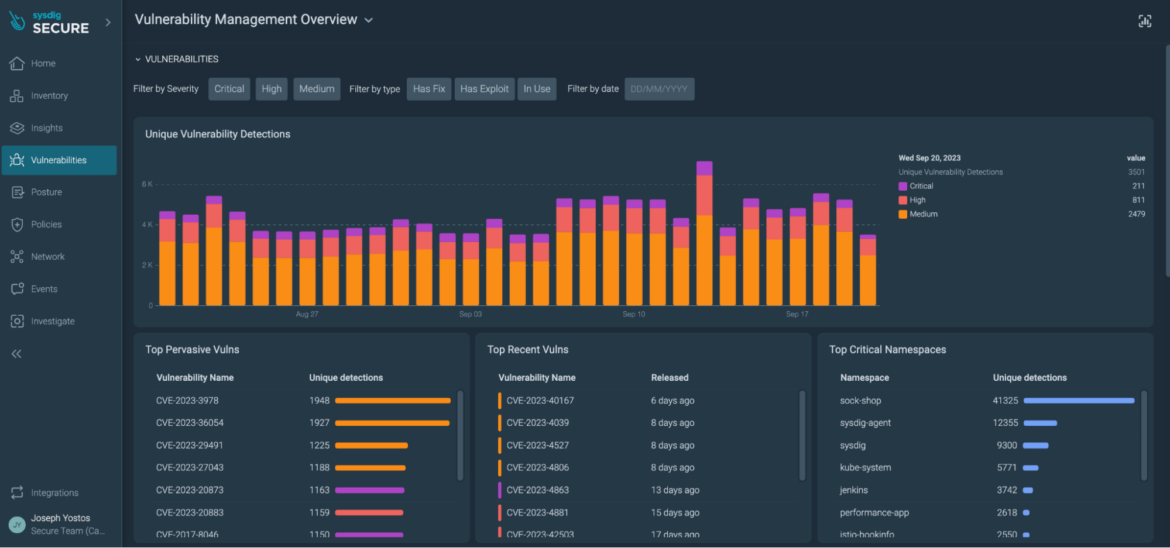
Vulnerability management overview page
All in one place, you can easily select vulnerabilities with fixes available and exploits discovered.

If you also install the Sysdig agent, both agent and agentless approaches work together to provide more Runtime Insights. For example, you can prioritize based on vulnerable packages in-use. By doing this, Sysdig reduces up to 95% of the vulnerability noise.

Conclusion
At the end, Maya's adept implementation of the agentless approach fortified infrastructure without hindering rapid deployments. Her strategic use of lightweight agents, when required, illuminated runtime insights.
Sysdig synergizes the benefits of both agent-based and Agentless scanning methodologies. Through agentless instrumentation, you can swiftly secure your environment within minutes and reduce management and maintenance efforts. Simultaneously, the lightweight agent offers deep runtime insights with minimal overhead and real-time visibility. This combination empowers you to strengthen your security posture and effectively stay ahead of vulnerabilities.
If you want to learn more about the new Agentless scanner:
- Learn more about our newest CNAPP features in this article.
- Don't miss our webinar: Elevating Cloud Security with a Shift-Left and Shield-Right Strategy.
- If you want to see it in action, you can request a live personalized demo with a Sysdig expert.


