GKE Security: Best Practices Guide
With the increase of cyber security threats and attacks, cloud security becomes an increasingly pivotal aspect of Cloud Infrastructure. There are two actors that play an important role in securing the infrastructure. They are Cloud Providers and Customers.
- Cloud Providers are responsible for securing their infrastructure and addressing security issues in their software.
- Customers are responsible for the security of their own applications. They must also correctly use the controls offered to protect their data and workloads within the Cloud Provider Infrastructure.
This article focuses on one of the main providers, Google Kubernetes Engine, or GKE for short. Kubernetes is a complex system, it is always improving its features, including security best practices, adding new features, removing existing ones (such as PSP), and replacing them with new ones. We will discuss Google Kubernetes Engine (GKE) security and best practices in detail.
Cloud Native Security
Cloud Native Computing Foundation (CNCF) defines cloud native stack as composed of the layers of foundation, lifecycle, and environment; while lifecycle itself is composed of develop, distribute, deploy, and runtime. All these layers should be included in cloud security, including GKE security.
These layers are depicted in the following image.
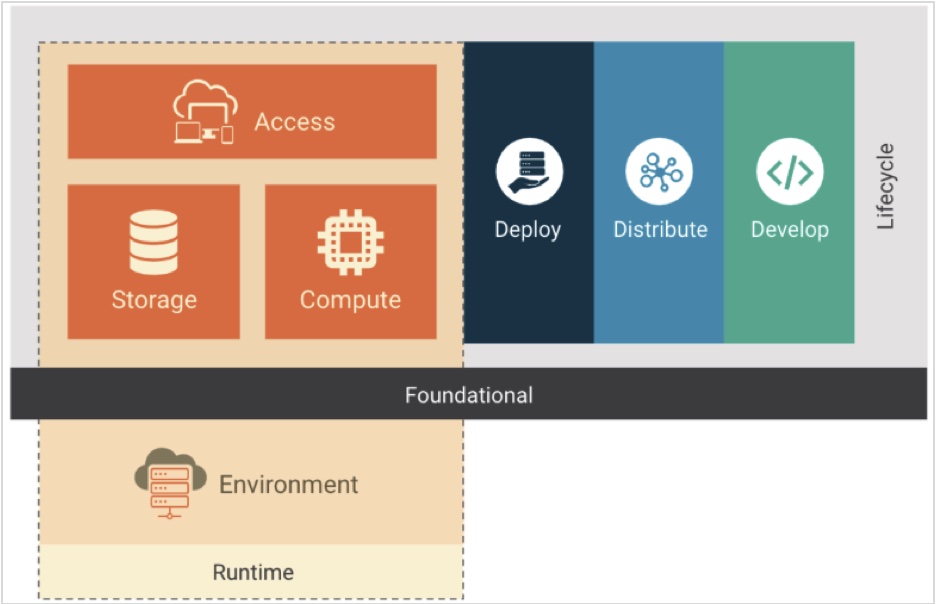
Figure 1 – Cloud Native Stack – Cloud Native Security Whitepaper
Lifecycle
Lifecycle consists of develop, distribute, deploy, and runtime.
Develop
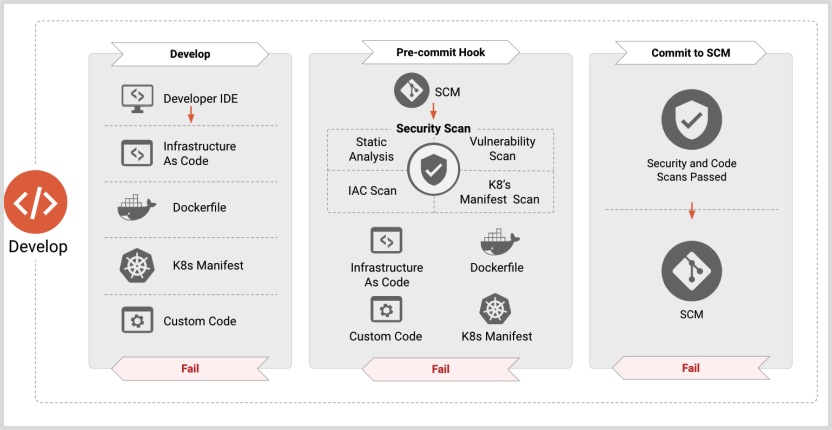
Figure 2 – Develop – Cloud Native Security Whitepaper
“Develop” is the first in this cycle relating to artifact creation. It includes having Infrastructure as Code, valid container and/or manifests files, etc. This is the step prior to committing new changes to SCM, Source Control Management.
In “Develop” phase, Google Cloud provides the following tools:
- Cloud Code helps you to focus on writing code/application rather than spending your time on working configuration files when developing Kubernetes applications.
- Center of Internet Security (CIS) Benchmark provides development teams and organizations with a guide for creating secure-by-default workloads. Google Cloud offers these best practice security recommendations: CIS Benchmarks.
Other important considerations:
- Use Google Cloud’s Container-Optimized OS, COS.
- Keep your images up to date.
- Only install applications that are needed by the container.
- Use any linting tools to validate your K8s manifest files.
Distribute
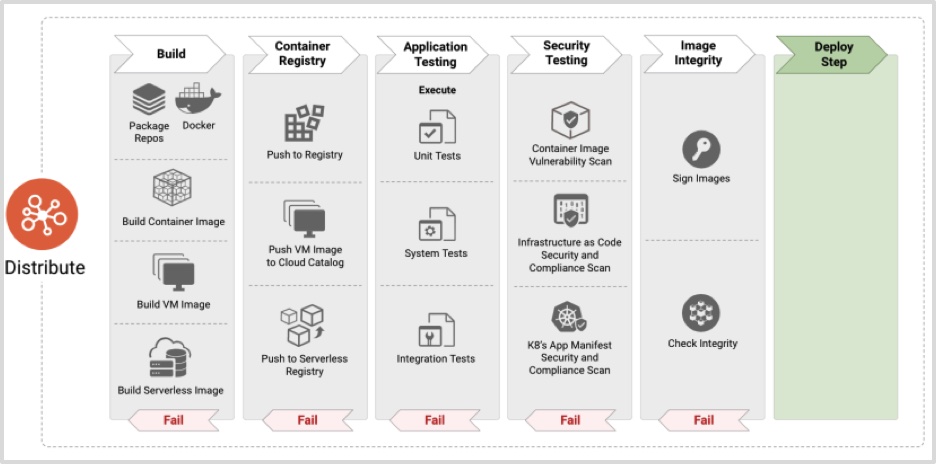
Figure 3 – Distribute – Cloud Native Security Whitepaper
The next step is to use those manifests or artifacts that were prepared in the previous step. You need to build that manifest or artifact, send it to the registry. Then, execute for different kinds of tests, scan the images, and sign it and apply the policy to these newly created resources.
In “Develop” phase, Google Cloud provides the following tools:
- Cloud Build allows you to focus on writing code rather than configuring files while developing the Kubernetes application.
- Google Artifact Registry and Google Container Registry can be used to securely store build artifacts and dependencies. These will be automatically scanned using a deep scanning feature, to identify any new vulnerabilities. You can create triggers to detect any upstream changes to your packages, and force them to be rebuilt and scanned creating new attestations that can be used for further policy enforcement.
Deploy
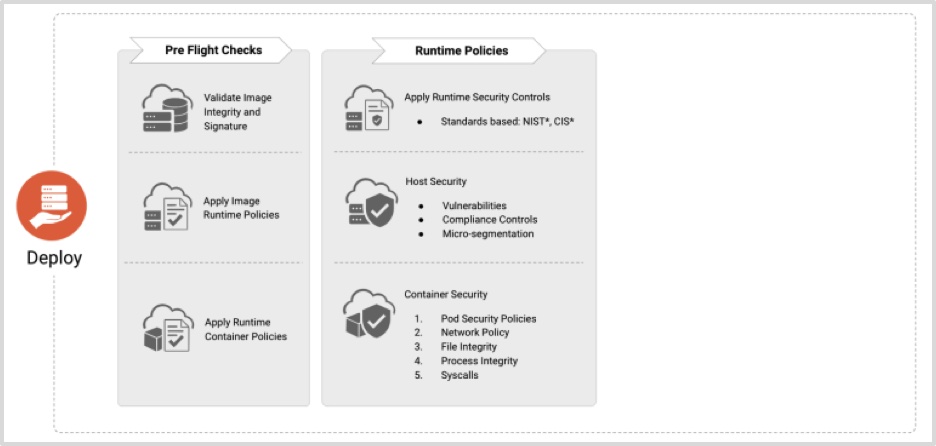
Figure 4 – Deploy – Cloud Native Security Whitepaper
This is where the checks are performed prior to shipping the application to the targeted runtime environments. The checks should satisfy all the policies and compliances that are in place.
Google Cloud provides the Binary Authorization tool. This is where it ties together the registry and the policy. You can define deployment policies based on container image metadata. This policy can be based on the scan results in the previous step, or any in-place QA process that you have.
Runtime
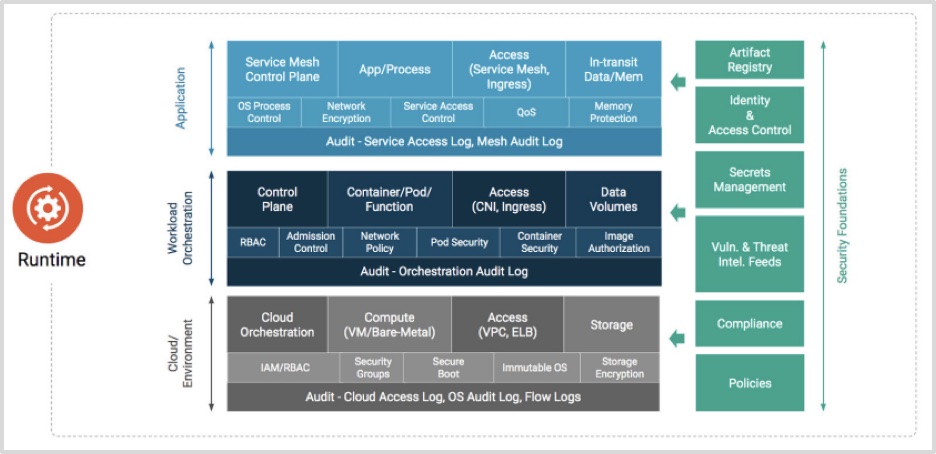
Figure 5 – Runtime – Cloud Native Security Whitepaper
This phase, as depicted in Figure 1, consists of compute, access, and storage.
Compute is the important foundation in GKE infrastructure that lets you create and run your application on Google Cloud’s global infrastructure. But before you can do that, you need to make sure they are secured.
- Namespaces provide the ability to logically isolate your resources from each other. This can help you and your teams with organization, security, and even performance. You can have multiple namespaces inside a single GKE cluster.
The following is a simple way to create a namespace:
$> kubectl create namespace online-web-development

$> cat >> online-web-staging.yaml <<EOF
apiVersion: v1
kind: Namespace
metadata:
  name: online-web-staging
EOF

$> kubectl apply -f online-web-staging.yaml- RBAC enables you to have more fine-grained and specific sets of permission that allow you to set up Google Cloud users or groups of users that can interact with any Kubernetes objects in the cluster, or in specific namespace in the cluster. It is good practice to always follow the principle of least privilege, and to also do regular audits on existing roles to remove unused or inactive roles. Role and RoleBinding are Kubernetes objects that are applicable on namespace level, while ClusterRole and ClusterRoleBinding are on the cluster level.
# Role
apiVersion: rbac.authorization.k8s.io/v1
kind: Role
metadata:
  Name: cluster-metadata-viewer
  Namespace: default
rules:
apiGroups:
“”
  resources:
configmaps
  resourceNames:
cluster-metadata
  verbs:
get

# RoleBinding
apiVersion: rbac.authorization.k8s.io/v1
kind: RoleBinding
metadata:
  Name: cluster-metadata-viewer
  Namespace: default
roleRef:
  apiGroups: rbac.authorization.k8s.io
  Kind: Role
  Name: cluster-metadata-viewer
subject:
apiGroups: rbac.authorization.k8s.io
  Kind: Group
Name: system: authenticated- Pod Security Policy (PSP), is a policy that allows you to control security and configure authorization of pod creation or update, at a cluster level. This can be applicable to running privileged containers (field name: privileged), usage of host namespace (field name: hostPID, hostIPC), allocating an FSGroup that owns the pods’ volumes (field name: fsGroup), etc. You can find the complete information here. It should be noted that PSP is deprecated as of Kubernetes v1.21, and will be removed in v1.25.
- Pod Security Policy can be optionally implemented and enforced by enabling the Admission Controller. Pay attention, however. Enforcing it without authorizing any policies will prevent you from creating any pods in your cluster. GKE recommends applying PSP by using Gatekeeper, which uses Open Policy Agent (OPA).
- Workload Identity is Google’s recommended way to authenticate to Google’s suite of services (Storage Buckets, App Engine, etc.) from pods running in GKE. It is accomplished by linking Kubernetes Service Accounts (KSA) to Google Cloud IAM Service Account (GSA). This, in turn, allows you to use Kubernetes native resources to define workload identities and control access to service in GCP, without needing to manage Kubernetes secrets or the GSA keys. This is handled by the Workload Identity Pool that creates a trusted relationship between IAM and KSA credentials.
- Resource Requests and Limits are very important properties to be configured to prevent your Kubernetes nodes and cluster level resources from being exhausted – either intentionally (by hacking) or unintentionally (by misconfiguration).
# Pod definition
apiVersion: v1
kind: Pod
metadata:
  name: frontend
spec:
  containers:
name: app
    image: busybox
    resources:
      requests:
        memory: “32Mi”
        cpu: “200m”
      limits:
        memory: “64Mi”
cpu: “250m”Code language: PHP (php)- Cluster upgrades should also be implemented as part of GKE security best practices. Regular upgrades fix critical security flaws or other bugs, and introduce new features. GKE offers a release channel that manages the version and upgrades cadence for the cluster and its nodepool upgrade. It is always recommended to have automatic upgrades on the lower level (such as sandbox and pre-production), and do the review after the upgrade. Once everything is working as expected on the level, the next auto upgrade can be applied to the next level of the environment; i.e., production.
Access is the other important aspect of security, which is part of Runtime, as depicted in Figure 1.
- When Google Cloud Project is created, by default, only you can access your project or its resources. In order to manage who can access that project and what they are allowed to do, Identity Access Management (IAM) gives you the ability to manage Google Cloud resources and its access. While Role-Based Access Control (RBAC) controls access on a cluster and namespace level, IAM works on the project level.
- The other GKE security best practice is to segment out or isolate your network. This can be done through Virtual Private Cloud (VPC) Networks. GKE clusters can communicate to each other over internal IPs even though they are in different regions (e.g., us-east1 and europe-west1), as long as they are on the same network.
- In GKE, a Private Cluster is a cluster that makes your Control Plane node inaccessible from the public Internet. In a private cluster, nodes do not have public IP addresses; only private addresses. This allows your workloads to run in an isolated environment. Control Plane and Worker nodes communicate with each other using VPC peering.
- By default, network traffic in Kubernetes clusters is open, which means pods and services can communicate between each other. Creating restrictions between pod communication, or limiting to allow only necessary service-to-service can be enforced through Networking Policy. Network Policy uses labels to select pods and defines the network traffic that is directed toward those pods using rules.
# Deny all traffic in the default namespace
apiVersion: networking.k8s.io/v1
kind: NetworkPolicy
metadata:
  name: deny-all
  namespace: default
spec:
  podSelector: {}
  policyTypes:
Ingress
Egress

# NetworkPolicy that selects pods with label app=hello,
# and specifies Ingress policy to allow traffic only from Pods
# with the label app=foo: (GitHub repo)
apiVersion: networking.k8s.io/v1
kind: NetworkPolicy
metadata:
  name: hello-allow-from-foo
spec:
  policyTypes:
  - Ingress
  podSelector:
    matchLabels:
      app: hello
  ingress:
  - from:
    - podSelector:
        matchLabels:
          app: foo
Network Policy can also be used to control network access to sensitive ports, such as port 10250 and 10255 that are used by kubelet.
- Authorized networks allow you to specify CIDR ranges and allow IP addresses in those ranges to access your cluster control plane end point using HTTPS. Once you enable Master Authorized Networks, adding authorized networks allows you to further restrict access to specified sets of IP addresses, which, in fact, can help you to protect access to your cluster in case of vulnerability in the cluster’s authentication or authorization.
- When you create a service type of LoadBalancer, Google Cloud configures a network load balancer in your project that has a stable IP address accessible from outside of your project. If you want this service to be accessible within the GKE cluster, you can add an annotation in your Kubernetes service manifest. But if you need an Internet-facing load balancer and you do not want to have it open to all IP addresses, you can add loadBalancerSourceRanges to the service specification to limit the IP address blocks that are allowed to connect.
# Internal LB and Limit IP address on loadBalancerSourceRanges
# Resource internal load balancing.
apiVersion: v1
kind: Service
metadata:
  name: internal-load-balancer
  annotations:
    networking.gke.io/load-balancer-type: “Internal”
  labels:
    app: hello
spec:
  type: LoadBalancer
  selector:
    app: hello
  ports:
port: 80
targetPort: 8080
protocol: TCP
  loadBalancerSourceRanges:
10.88.0.0/16
35.35.35.10/32Code language: PHP (php)- GKE also introduces container-native/Layer 7 load balancing. This ingress option enables several kinds of load balancers to target pods directly, and to evenly distribute their traffic to pods. This allows pods to be considered as first-class citizens for load balancing. This can be accomplished with a Google Cloud data model called network endpoint groups (NEG). NEGs are collections of network endpoints that are represented by IP-port pairs. When NEGs are used with GKE Ingress, a Google managed Kubernetes ingress controller is employed to facilitate the creation of all aspects of the L7 load balancer. This includes creating the virtual IP address, forwarding rules, health checks, firewall rules, and more.
# Ingress Resource
apiVersion: networking.k8s.io/v1
kind: Ingress
metadata:
  name: my-ingress
  labels:
    app.kubernetes.io/name: sre-devops
  annotations:
    # To force https which requires the secretName
    kubernetes.io/ingress.allow-http: “false”
    # Annotation for an internal L7 load balancer
    kubernetes.io/ingress.class: gce-internal
    # Annotation for an external L7 load balancer
    kubernetes.io/ingress.class: “gce”
spec:
  tls:
hosts:
“my-example.foo.com”
    secretName: foo.com
  rules:
host: “my-example.foo.com”
    http:
      paths:
path: /*
          pathType: ImplementationSpecific
          backend:
            service:
              name: my-service
              port:
                number: 443

# Service Resource
# To bind the service to ingress, Type: ClusterIP is needed and
# annotation: cloud.google.com/neg: ‘{“ingress”: true}’
apiVersion: v1
kind: Service
metadata:
  name: my-service
  annotations:
  # Required annotation
  cloud.google.com/neg: ‘{“ingress”: true}’
  # To force https from the LB to the backend
  cloud.google.com/app-protocols: ‘{“my-https-port”: “HTTPS”}’
  # Applies backend-config named allowed-ingress-acls
  cloud.google.com/backend-config: ‘{“default”: allowed-ingress-acls}’
spec:
  # Make sure this is set and not LoadBalancer
  type: clusterIP
  ports:
Name: my-https-port
    Port: 443
    Protocol: TCP
    targetPort: 8080
  selector:
Storage is where you store your data for the application you’re running on GKE. You have a few options to choose from.
- For database, Cloud SQL, Datastore, or Cloud Spanner.
- For object storage, Cloud Storage.
- For private container images, helm charts, build artifacts you can definitely use Artifact Registry
- For applications that require Network Attached Storage (NAS), use Filestore.
- For applications that require block storage, use persistent disk. This disk can be provisioned manually, or dynamically by GKE.
- PersistentVolume (PV) is a cluster resource that pods can use for its storage, while PersistentVolumeClaim (PVC) can be used to dynamically provision a PersistentVolume backed by Compute Engine persistent disks for use in your cluster.
- You can create an encrypted StorageClass that will be used by your application using Google Key Management Store (KMS).
Google Cloud Audit Logs
The other important aspect of GKE security is Audit Logging. This is important for:
- Audit trails for evaluating a cluster’s security.
- Analyzing existing or future threats.
- To update existing Network Policy and Security Policy based on the prior incident and/or future threats.
GKE provides an excellent Google Cloud’s operations suite, which consists of Cloud Monitoring and Cloud Logging.
Cloud Logging allows you to configure dashboards and alerts that will help you and your team identify any threats. This helps you to continuously monitor and also update your existing Security policy based on what is reported by Cloud Logging.
Conclusion
Kubernetes is a technology that keeps on growing and expanding. Hence, GKE security needs to be aligned with it. It is, sometimes, overwhelming to protect and secure your system. With the help of GKE security as mentioned in this article, this can be accomplished.
For example, here are several ways to get started:
- Shift left – Security should be started from the left side of the Software Development Life Cycle, which is development. Using Cloud Code, scanning the image and storing your artifact on Artifact Registry are a good start.
- Upgrade your system – This can be your container applications, Kubernetes, etc. GKE offers a release channel to help you in this area.
- Limit Access – Access to compute, Kubernetes resources, storage, workloads/services etc., should be restricted. For this, GKE offers RBAC, IAM, Load Balancing, Network Policy, Private Cluster, Service Mesh, etc. You just need to make sure you start with something that is easy to understand and implement, such as RBA and IAM.
- Least privilege, resource and request limit – This is important to not allow root user running any process in the pod (a good start). Also, to prevent nodes or clusters from being overused, the resource and request limit should be set accordingly.
- Continuous audit using Cloud Logging – That will help you identify any threats and allows you to update your existing Network or Security Policy.
Resources
- Add authorized networks for control plane access – https://cloud.google.com/kubernetes-engine/docs/how-to/authorized-networks
- GKE Ingress for HTTP(S) Load Balancing – https://cloud.google.com/kubernetes-engine/docs/concepts/ingress
- Storage overview – https://cloud.google.com/kubernetes-engine/docs/concepts/storage-overview

