


Falco Feeds extends the power of Falco by giving open source-focused companies access to expert-written rules that are continuously updated as new threats are discovered.

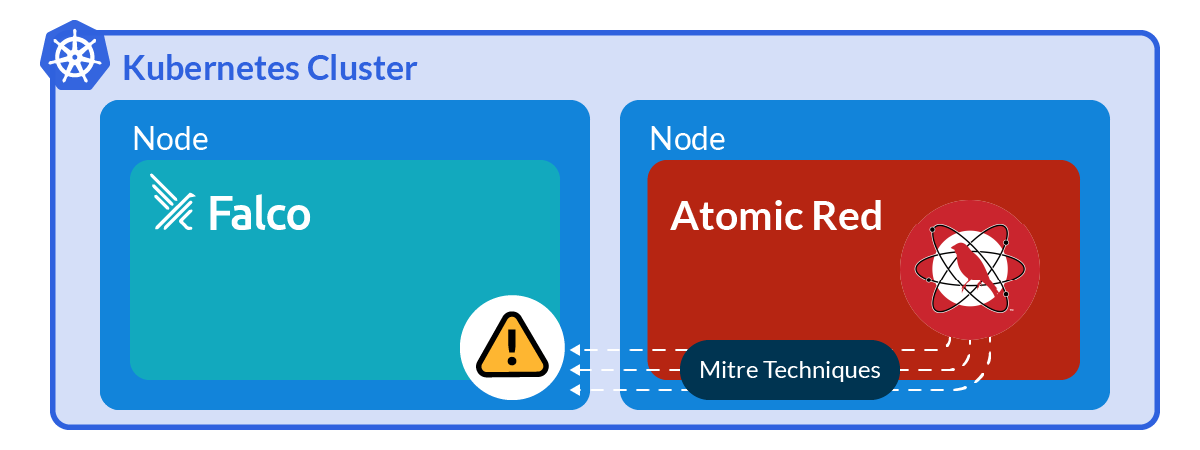
The best way to know if something works is to try it out. Ensuring that your security products are actually working is a fundamental task of routine maintenance. This is why it is so useful to use tools like Atomic Red Team that generate suspicious events based on ATT&CK techniques and see how Falco triggers alerts.
In this blog, we will cover how to install and run the Atomic Red Team environment on a Kubernetes system for testing Falco rules.
What is Atomic Red Team?
Red Canary maintains the Atomic Red Team repository for testing ATT&CK techniques on various platforms. Mitre ATT&CK (Adversarial Tactics, Techniques, and Common Knowledge) is a guideline for classifying known tactics and techniques based on real-world observations of cyberattacks.
They also released the Invoke-AtomicRedTeam framework for running the tests using Powershell. Yes, Powershell is not just for Windows and can be run on Linux.
Each ATT&CK technique is identified by a "T" followed by an integer identifier (T1611 "Escape to Host"). The Atomic Red Team denotes different tests for each technique by appending a period followed by an ordered number (T1611.002). Each test can have different methods identified by order of definition by a dash and the order number. So, technique T1560 is "Archive Collected Data," T1560.002 is the "Archive Collected Data: Archive via Library" test, and T1560.002-001 is specifically the "Compressing data using bz2 in Python (Linux)" method.
Requirements to start Atomic Red Team in Kubernetes
For this test environment, we'll need a Kubernetes cluster and Falco installed. We won't cover how to install a standard Kubernetes instance in this blog, but we'll go through how to create an Atomic Red Team Docker image and install the necessary dependencies to carry out the tests.
To learn how to install a quick lab environment with Minikube and Falco, see this article.
Root or test user?
In our initial investigations, we created a non-privileged test user with sudo access for running the tests. However, we found the vast majority of the tests required elevated privileges to carry out the commands. Running as a regular user would mean needing to do bulk updates to test cases in order to use sudo.
For ease of testing using the source material, the Docker image will run as root.
Mining test metadata
To benchmark and track the successes and failures of your tests, you'll need to first extract and document test metadata.
Luckily, Python has a nice YAML file parsing module that reads YAML files into an easy to use dictionary, similar to how JSON files are parsed. Here is a quick Python script to generate the data. The output atomic-parsed.tsv file can be imported to your choice spreadsheet program.
Building a Atomic Red Team Dockerfile
If you're unfamiliar with building your own Docker images, we'll go over it here. First, we need to create the Dockerfile, which are the instructions for Docker on how to build the image. Many of the Atomic Red Team tests require additional software packages to be installed. To save on test time and bandwidth, we'll install the package dependencies up front in the Docker image.
Fortunately for you, we have already navigated the Linux package dependencies and will install them with the image.
If you need to tweak an Atomic Red test YAML, we'll overwrite the test during the build process. We'll go over why you might want to do that in the next section. Copy the test's YAML under atomic-red-team/atomics to an appropriate atomic-overrides sub-directory in your image build directory, and then make your modifications. Files in the atomic-override/ directory will replace the source material.
Here is the Dockerfile for building an Ubuntu-based image. You'll also want to download the support files to your build directory.
Note, tshark is not installed due to problems automating its installation, so test T1040 can use tcpdump instead. Functionally, they are equivalent for testing purposes.
Now that we have our Dockerfile, it's time to build the image. Run the build command from your build directory (sudo access may be necessary to run docker):
docker build -t atomic_red_docker:latest .
If you have a docker.io account (it's free) and want to store your image remotely, you'll need to tag the image appropriately before pushing:
docker login
docker tag atomic_red_docker:latest MyRemoteRepo/atomic_red_docker:latest
docker push MyRemoteRepo/atomic_red_docker:latest
If all goes well, the image will upload and be available for Kubernetes to use.
Troubleshooting known test issues
Like most software, bugs and environment variations can cause issues executing certain test cases. Some of the tests provided in the Atomic Red Team repository may contain code issues or cause undesirable effects. The above Dockerfile allows you to make local tweaks and add them into your Docker image from the atomic-overrides directory.
For instance, we found T1574.006 "Hijack Execution Flow: LD_PRELOAD" had an expression issue using sed in its -CleanUp function. We submitted a fix which got merged.
One test that you may want to tweak or avoid is T1070.004-4. In this test, the entire filesystem is deleted. Simply put, rm -fr /*. While a container can be recreated to reset its file system to its original state, it may cause an unexpected interruption in a test sequence with multiple test cases. You can simply replace the rm command with an echo statement in the YAML definition for this one as a test override. Similarly, Technique T1529 has various methods that shutdown or reboot the system under test. So, you may also want to skip that one for routine testing.
Exfiltration, file transfer, and credential stuffing tests like T1048, T1048.002, T1048.003, T1105, and T1110.004 require a remote host to communicate with. You may need a secondary system to conduct these tests. Some test configurations may be required and can be defined with a parameter from within pwsh.
Some tests may require packages that are no longer available or require system features that are not available in distros like Ubuntu, such as auditd and systemd. Tests T1053.001, T1053.006, T1543.002, and T1562.001 rely on these features for testing.
Build Kubernetes YAML
There are two ways to run this image from Kubernetes: as a Deployment, or as a Job. If you want to manually run tests and generally play around with Atomic Red Team, you'll need to use a deployment object type. If you simply want to automate the test runs routinely, you can use a Job kind and a simple frontend script to execute the tests you want.
For the Deployment object (manual testing), copy this YAML file and update it with your remote Docker image location. Note, the privileged security context is intentional for use with T1611.002.
For Automated testing, a simple Powershell front end script was added to the Dockerfile to automate the tests by ID reference. Now, simply supply the tests you want to run in your Job kind YAML. When the YAML is applied, Kubernetes will create the container and begin the selected tests.
How to test Atomic Red Team manually
To manually run the tests, execute a shell in the running container (get the pod name first):
kubectl exec -ti -- /bin/bash
Once in the container, start Powershell with "pwsh." Next, load the Atomic Red Team module:
Import-Module "~/AtomicRedTeam/invoke-atomicredteam/Invoke-AtomicRedTeam.psd1" -Force
Now, check the spreadsheet for the test ID you want to run. For this example, we'll use T1037.004 "Boot or Logon Initialization Scripts." You can also get more information on a test by using the -ShowDetails option.
Invoke-AtomicTest T1037.004 -ShowDetails
The first step is to get any prerequisites to ensure the test conditions are right:
Invoke-AtomicTest T1037.004 -GetPreReqs
Once complete, execute the test. This particular test will attempt to modify the /etc/rc.common and /etc/rc.local files.
Invoke-AtomicTest T1037.004
Some tests require configuration parameters to be set. When manually testing, you can set the module prompt for any parameters with the -PromptForInputArgs option.
Invoke-AtomicTest T1037.004 -PromptForInputArgs
When you're ready to move on to the next test or wrap things up, you'll want to -CleanUp the test to avoid potentially having problems running other tests.
Invoke-AtomicTest T1037.004 -CleanUp
Hands-on Falco
Falco can be installed as its own container and monitor activity in the Atomic Red Team container environment. There are various ways to install Falco and we found success with installing it via Helm. The Falco GitHub repository details installation instructions or you can follow the instructions on the Falco blog. In short, you need three commands:
helm repo add falcosecurity https://falcosecurity.github.io/charts
helm repo update
helm install falco falcosecurity/falco
That's it. The Falco container will start installing and begin logging without additional required interaction.
Checking that Falco's rules are triggered
Once some tests have been completed from Invoke-AtomicTest, check the Falco logs to see any detected events.
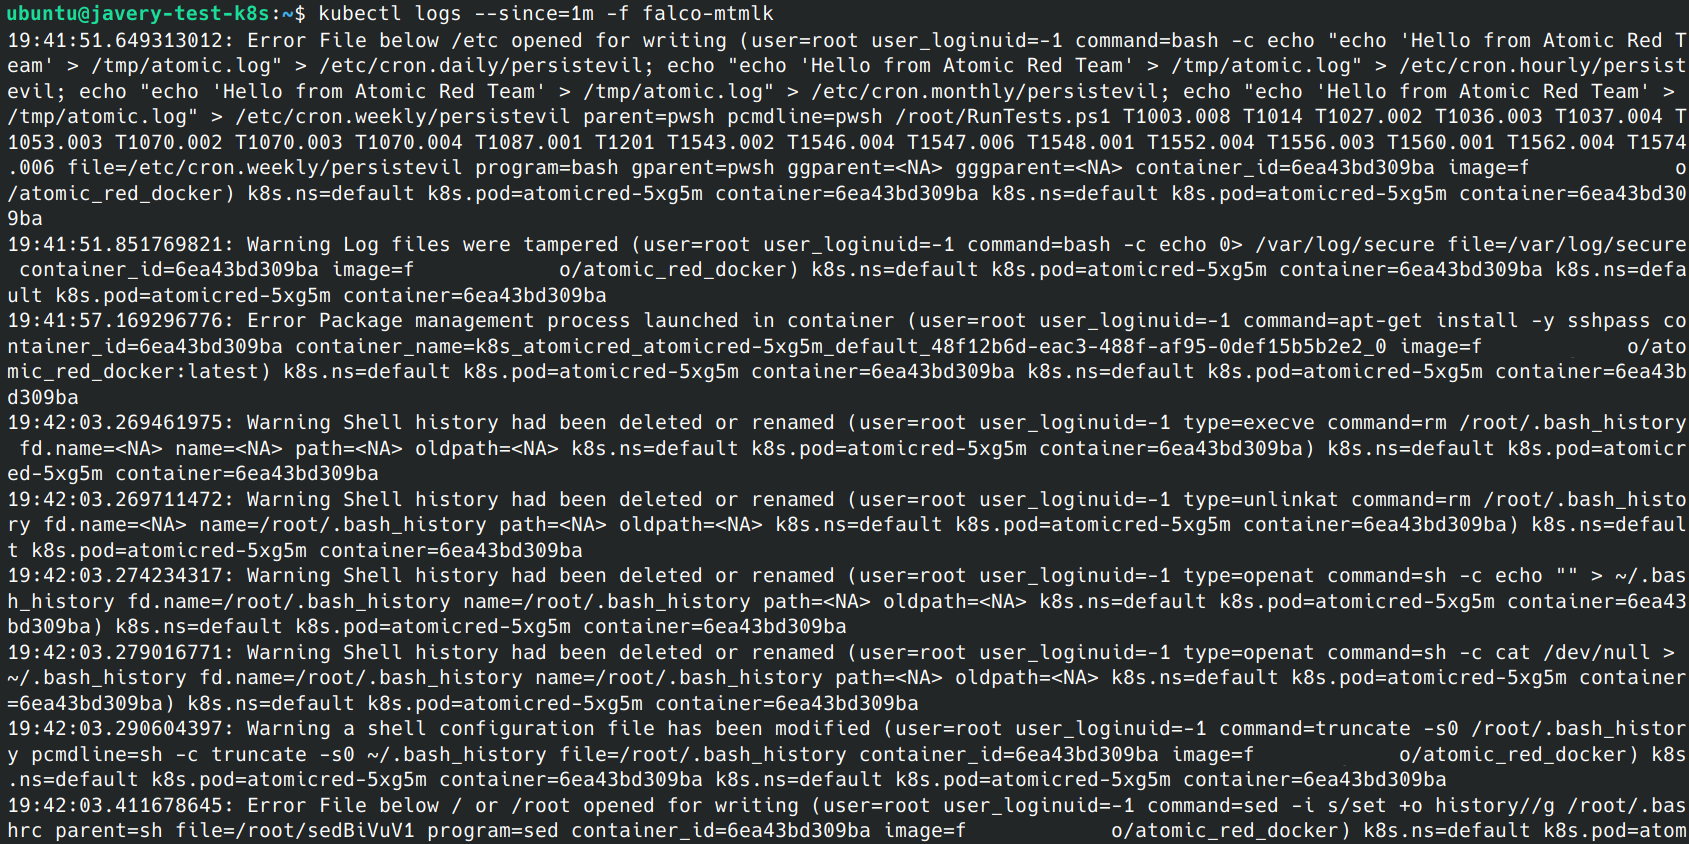
Depending on how Falco logs were configured, the logs may go to a log aggregator or other notification system. If unsure, you can always check for local Falco logs directly with kubectl logs . It may take several minutes for logs to appear and they may show up in bursts due to how Falco log queuing behaves.
Running additional tests can help push logs through the queue. If the Falco logs are still empty after running tests, you can try using the Falco event generator to test the functionality and performance of your Falco installation.
Happy testing
While an organization may have the best tools and tech to catch the bad guys, it's always a good idea to test the environment to ensure protection is working and to find any coverage gaps.
The Atomic Red Team's Mitre ATT&CK technique replication suite in a container can help you test your Falco installation in a safe way.
After that, if you would like to find out more about Falco:
- Get started at Falco.org.
- Check out the Falco project on GitHub.
- Get involved with the Falco community.
- Meet the maintainers on the Falco Slack.
- Follow @falco_org on Twitter.