Do you like detective series? Have you ever thought about them actually taking place in cybersecurity? What do you think of CSI on containers? Are you interested in how to apply Digital Forensics and Incident Response (DFIR) to containers and clusters? If all your answers are YES, you will love this article.
The CloudNative SecurityCon occurred in early February 2023, where leading security experts gathered to present their latest research and projects. In this article, we are going to take a closer look at the CSI Containers: Can you DFIR it?.
Like any police investigation, it is necessary to follow a series of steps to find the suspect. In this case:
But first of all, what is Digital Forensics and Incident Response?
DFIR = DF + IR
Before deep diving into tools, let’s start with a quick intro to DFIR. As we know, DFIR puts together two areas:
- Digital Forensics
- Incident Response
Digital Forensics (DF) focuses on collecting and analyzing system data, user activity, and other pieces of digital evidence to determine what happened on a machine and who may be behind the activities recorded. All the activities need to be done following best practices and methodologies to maintain the chain of custody, so that evidence is legitimate and can be used and presented to the court for legal proceedings.
Incident Response (IR) focuses on preparing, detecting, containing, and recovering from a data breach. IR techniques not only cover closing gaps in security coverage, but also how to avoid repeating incidents of the same type in the future. Lessons learned from the investigation can enlighten gaps in security coverage that led to the data breach.
In the early days, these two processes were split since they have different goals. However, processes and methodologies were pretty similar. New tools like EDR or XDR evolved and now give the power to incident responders to start investigating what happened and perform further activities. So, it makes sense to put the two areas under the DFIR hat.
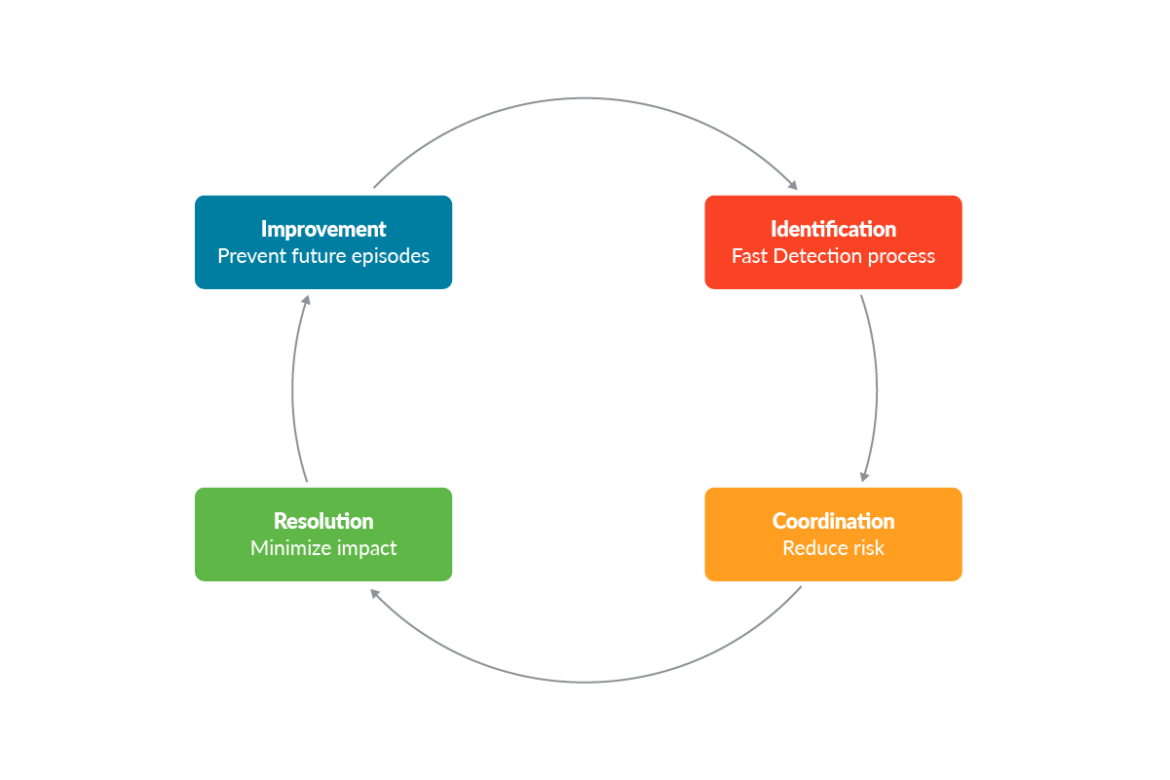
DFIR – NIST IR life cycle
When we talk about DFIR and its steps, we refer to the NIST incident response life cycle steps. In the following schema, we can see the four main steps.

Without going too much into the details of each category of the well-known NIST lifecycle, it is worth remembering that an incident response plan needs to be prepared in advance.
Have a response plan
What is the main takeaway we want to emphasize? Attackers aren’t waiting for you to create and update your incident response plan! Knowing the tools you need to use is fundamental, especially in the container world. Be prepared!

As we know, technical aspects aren’t all we need to care about. There are also processes that need to be set, people from different teams need to be involved and they need to know exactly what to do at that moment.
Even if your incident response plan is set, make sure this is up to date! People can change in the organization, and tools change pretty frequently due to new technologies adopted. As we will see, specific tools are required to perform DFIR activities. It’s really important to stay up to date.
Let’s now focus on technical aspects, tools, and procedures, and how to perform those steps in the container world.
Step 1 – Preparation
Preparation is one of the main aspects of Incident Response methodologies.
A good preparation process allows you to not only prevent incidents by hardening your environments, but also enforce incident response capabilities so that an organization is ready to respond to incidents. For this purpose, it can be enforced: Communications and Facilities, Hardware and Software, or more generic Analysis Resources.
In this preparation process, one of the main points is to collect all the data logs useful for a possible investigation to have full visibility on the overall infrastructure, and aggregate all the information in a single point so that it would be possible to search and aggregate data.
Here are some open source tools you may want to consider:
- Container Runtime Security
- Falco + Falcosidekick (CNCF Incubated)
- Monitoring system:
- Prometheus (CNCF graduated)
- Logging solution:
- Fluent-bit/Fluentd (CNCF graduated)
- Log management platform:
- ELK Stack, Opensearch, etc…
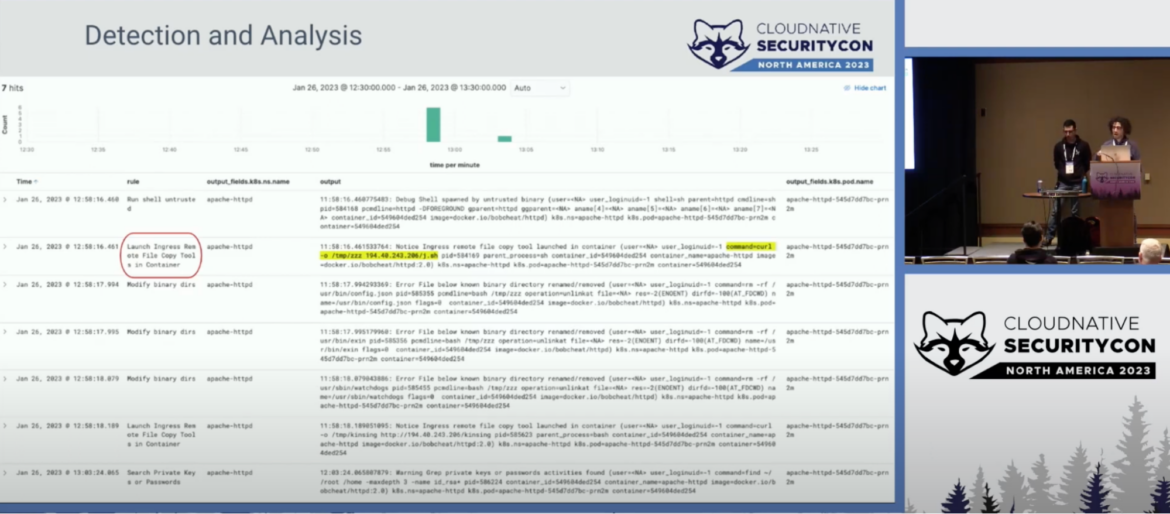
Step 2 – Detection & Analysis
The main purposes of this phase are to understand whether the incident actually happened and analyze its nature. These are not easy tasks. This isn’t the time to eradicate the incident yet.
In this phase, we typically check alerts and events generated by the tools mentioned before to see if there are Indicators of Compromises (IoCs) of malicious behaviors or suspicious activities that could lead to a possible compromise. To do this, you need to survey the logs collected over time, examining for anything that might be suspicious, from application logs to container orchestrator or cloud logs. You may also want to monitor the resources you have in place, comparing them with planned or expected resources, so that you can distinguish anomalies and spikes from average loads.

All the information gathered through detection, logging, and alarm notification tools must then be analyzed to assess whether or not any of this may have been caused by a real incident.
Step 3 – Containment, Eradication, and Recovery
At this point, you already know that the analysis conducted in the previous step revealed a real breach and that something has occurred. You have to take all the required actions.
If you don’t know what the root cause was, then you should apply all the available mitigations. But before doing this, consider that any delayed containment strategy is dangerous because an attacker could escalate unauthorized access or compromise other systems.
Here some tools you can use in this phase for containers:
- docker/ctr/crictl/nerdctl/podman: To interact with the involved container engine.
- kubectl: To communicate with the kube-apiserver.
- docker-explorer/container-explorer (by Google): Open source projects that can do offline forensic analysis on a snapshotted volume.
- container-diff (by Google): A tool for analyzing and comparing container images. It allows you to detect any changes within an image.
- cloud-forensics-utils: An open source project that provides tools to be used by forensics teams to collect evidence from cloud platforms. Currently, Google Cloud Platform, Microsoft Azure, and Amazon Web Services are supported.
Containment
The main goal is to isolate the attack by assessing which resources have been impacted and taking actions to quarantine the impacted pod/container.
In the meantime in this phase, it is important to store and collect all the attack’s evidences like:
- Snapshot the worker node volume where the impacted pod/container was scheduled (manually from you cloud provider console or with tools that can automate this step, like cloud-forensics-utils).
- Commit and push the infected container for further analysis.
- If possible, checkpoint the container (best option).
- If possible, use ephemeral containers for live investigation of distroless containers.
Eradication
Once the threat has been sufficiently contained, we now need to eradicate the attack. In other words, at this stage it is necessary to remove malware and threats that have been introduced during the incident, and also anything that might have granted attackers persistence or privilege escalation in the affected environment. In addition, it is crucial to identify which entry points were exploited during the breach, or what additional paths and permissions might have been exploited by attackers, in order to adopt the necessary remediation techniques.
For this reason, before proceeding with the eradication step, it is critical to understand how far the attack has spread.
In container environments where the resources are shared, this is a very tricky task which requires specific knowledge on what to look at. Here some focal points you need to focus on:
- Check whether the affected pod was designed and deployed with sensitive mounts, or excessive privileges or capabilities. If so, there may have been pod escaping or access to host privileged information.
- Monitor the Kubernetes audit logs with runtime tools, such as Falco, to detect any unwanted actions in the cluster. Examples include the creation of new clusterroles/pods in the cluster, reading secrets, and so on
- If the cluster is hosted on cloud, Inspect Cloud logs monitor any lateral movement attempts. Sometimes, impacted pods may leverage cloud metadata (IMDS) to access sensitive data and try to escalate the privilege inside the cloud account. This would cause damage to all of your cloud infrastructure.
The last action is to make sure to fix the misconfiguration or patch the vulnerability used by the attacker to get into your environment. In case fixing wouldn’t be possible, it’s important to find the right mitigation.
Recovery
At the recovery stage, any production systems affected by a threat will be brought back online. This includes any data recovery or restoration efforts that need to take place in order to bring systems and services to normal operations.
In this stage, it is also required to implement a permanent fix of the previously identified entry points. This might include patching and reconfiguring systems and application architecture, or rebuilding systems for production environments. The main goal is to eliminate the entry point(s) that the threat actor used to obtain access to the environment, and to prevent similar incidents in the future.
In case fixing wouldn’t be possible, it’s important to find the right mitigation techniques in order to reduce the attack surface and take measures to respond to future incidents. For example, you may want to delete the affected workload or run a playbook of actions if malicious executions/exploits are detected at runtime.
Step 4 – Post-Incident Activity
We are now at the last step of our incident response plan: post-incident activities. We took all the action needed to contain and eradicate the threat from our environment, and it is recovered and working as normal.
Yes, the incident happened, but we should take this as an opportunity to do better in the future.

It’s time to analyze what happened, what worked, what didn’t work, and why it didn’t work. The output of these post-incident activities should be used to update our incident response plan accordingly, to be sure to avoid the same incident in the future.
Conclusion
Nowadays, performing DFIR Kubernetes or in containers is much more complicated than it used to be traditionally in production environments. Containers are ephemeral, and even if they were built to run specific workloads, performing DFIR on them may be much more complex than that.
Logging all the necessary information, enforcing detection mechanisms, and adopting the right tools might help the incident response and forensics team to identify real breaches and gather all the evidence needed to assess the impact such incidents may have had in production environments.
Do you want to know more about DFIR?


