


Falco Feeds extends the power of Falco by giving open source-focused companies access to expert-written rules that are continuously updated as new threats are discovered.

My son has started to show interest in programming so I've been looking for a way to get him started. He loves Minecraft so I picked him up a copy of "Learn to Program with Minecraft" which shows you how to programmatically control and build in Minecraft using the Python library py3minepi. Unfortunately, my son immediately got stuck on trying to setup his development environment on his Mac, so we took the time to recreate the instructions leveraging modern tools such as Docker and Visual Studio Code.
\r\r
The books instructions were written to locally install Minecraft, Python 3.6, Spigot, and py3minepi. There's a url to use to download the versions of software that you need, and fairly detailed guides to installing it all. The challenge he had was if he hit an error, he was stuck in a debugging mess, trying to make changes to his local system to get things to work. This of course creates a bespoke local dev environment that's hard to recreate. Additionally, one of the first problems he hit was a conflict between the operating system's version of Python and the Python we needed to install, version 3.6. We could have used tools like virtual environments to manage which version of Python we were using, but I wanted to reduce changes to the local system and wanted something that was a little more first timer friendly. So we looked at how we could run this all in Docker. You can grab all the code you need to run this environment in this Github repository.
\r\r Get started programming with Minecraft quickly by leveraging @Docker and #containers. Click to tweet \r\r
Architecture and Setup
\r\r
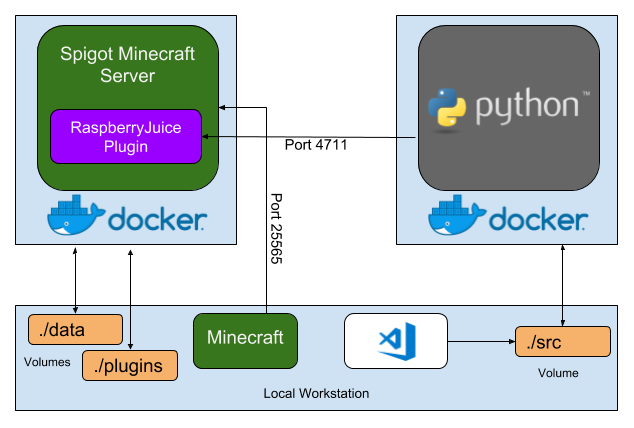
\rThe architecture of the development environment is shown above. We will leverage Docker to run the server instance of Minecraft that we need to develop against. This gives us a quick and easy way to create disposable server instances, and it's simple to completely reset the Minecraft state if needed (delete everything in ./data). While we could install Python 3.6 locally, we can also run a Docker container running Python 3.6 to run our code. Our Python client connects to the Spigot Minecraft server and then issues commands to control the game. Also on our local workstation we're using Visual Studio Code as an IDE, and Minecraft to see the results of our Python scripts (like blocks or buildings we create). Note that we are doing this all on MacOS, but the experience should be similar on Windows (thanks to containers).
\r\r
The first thing to do is install Docker and Visual Studio Code. Both provide the standard MacOS "drag to Applications" installation method. When you launch Docker, it will need to perform some additional steps to configure itself, thus you'll need to provide your password to finish the installation.
\r\r
If you're using Visual Studio Code, you might want to have it installed in your $PATH so it's easy to launch from a command line. Open Code, and then open the command palette (Cmd+shift+P). Type in 'shell' and choose Install code command in PATH. This is a nice time saver because now you can run code . and automatically open Code in that directory.
\r\r
Creating our Python Development Container
\r\r
Instead of installing Python 3.6 locally, we can leverage a prebuilt Docker container to provide the language runtime. The Python maintainers publish container images we can us for this purpose, as well as instructions for how add in your own code base. We will need to add in the py3minepi library that will allow us to communicate with the Minecraft server. To do this we created a small Dockerfile based on the python:3.6 image, and run pip to install our client library.
\r\rFROM python:3.6\r\r\r
\r
WORKDIR /usr/src/app\r
\r
RUN git clone https://github.com/py3minepi/py3minepi && pip install --no-cache-dir py3minepi/ && rm -fr py3minepi\r
\r
CMD [ "python" ]\r
We've published this Docker image on Docker Hub for anyone to use, or you can find the complete Dockerfile in our Github repo. If you want to build your own Docker image, you can do so by running docker build -t mc-pi-dev . in the directory where you've placed the Dockerfile.
\r\r
Creating our Minecraft Server Instance
\r\r
Now that we've created our Docker image for our development container, we can create the server container. Luckily there's already a container image that can be used to run various types of Minecraft servers. We'll want to create three directories – data, plugins, and src – that we will use with the server and later the development container we created previously (if you're using the Github repo we provided, we've already created the directories for you).
\r\r$ mkdir data plugins src\r\r\r
Next we should create a docker-compose.yml file to allow us to more easily stand up our server in a repeatable fashion. Docker Compose allows us to define settings we'll need to run the server, and we can avoid entering a long command line everytime we want to create a new server instance. We can also create an instance of our development container we created previously, and connect the to containers together via a private network.
\r\r
To create our docker-compose.yml file we cribbed from an example we found on Github. We modified this example to include the development container running python, as well as creating a link between the two containers.
\r\rversion: '3'\r\r\r
services:\r
dev-workstation:\r
image: "sysdiglabs/mc-pi-dev"\r
container_name: "mc-pi-dev"\r
volumes:\r
- "./src:/usr/src/app"\r
tty: true\r
stdin_open: true\r
restart: always\r
links:\r
- minecraft-server\r
minecraft-server:\r
image: "itzg/minecraft-server"\r
container_name: "mc-pi-srv"\r
ports:\r
- "25565:25565"\r
- "4711:4711"\r
volumes:\r
- "./data:/data"\r
- "./plugins:/plugins"\r
environment:\r
EULA: "TRUE"\r
TYPE: "SPIGOT"\r
VERSION: "1.11.2"\r
MEMORY: "1G"\r
tty: true\r
stdin_open: true\r
restart: always\r
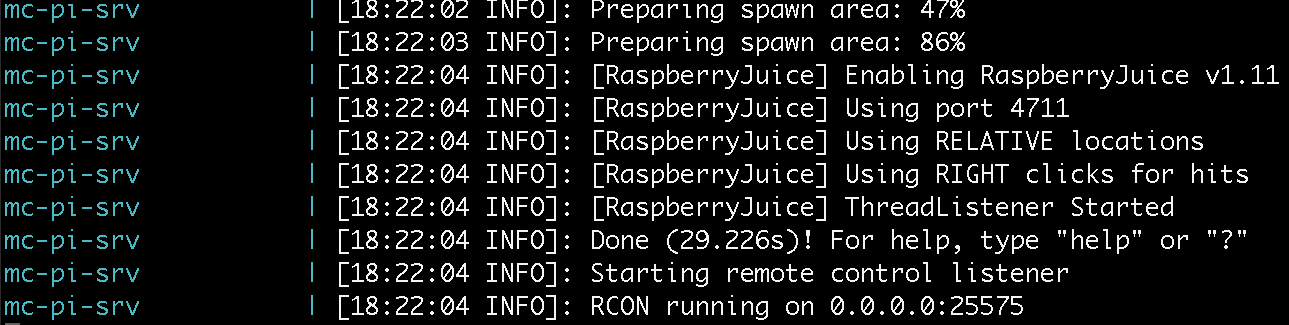
The last bit to set up our server is to install a required plugin. In order to provide an API to the Minecraft server, a plugin called RaspberryJuice must be downloaded and installed in the plugins directory we created earlier. You can get a precompiled version on the Gtihub repo for the RaspberryJuice plugin. We downloaded version 1.11, as we are using version 1.11.2 for our Minecraft/Spigot server, and placed the jar in the plugins folder. Once the plugin is installed, we can start our containers by running docker-compose up. You should see the console output of your Minecraft server, and you'll know the server is up and running if you see messages such as below
\r\r
\r\r
We can test the that the server is working by posting a simple message to the server's chat. We created a file called hello.py in the src directory. Any python source code you want to be able to run will need to be stored in the src directory, as this directory is mounted into the python development container. We added the below to the hello.py file.
\r\rfrom mcpi.minecraft import Minecraft\r\r\r
\r
mc = Minecraft.create("minecraft-server")\r
\r
mc.postToChat("Hello World!")\r
You can open a shell on the python container by running docker run -it mc-pi-dev bash in another terminal. You can then execute the hello.py script by running python hello.py. You should see Hello World posted to the Minecraft server's console output.
\r\r
Specifying the Correct Minecraft Server
\r\r
Throughout the code examples in the book "Learn to Program with Minecraft" the author calls the Minecraft.create method without any arguments. When using this Dockerized setup you'll need to specify the name (or IP) of the Minecraft server to connect to. Docker compose gives us an easy name that we can use to do just that. As shown in the above example, simply replace any calls to Minecraft.create() method listed in the book with Minecraft.create("minecraft-server").
\r\r
Installing Minecraft
\r\r
My son already had Minecraft installed locally on his laptop, so we didn't need to go through that process. If you do need to install Minecraft, I also highly recommend using MultiMC instead of the default Minecraft launcher. MultiMC makes it much easier to have multiple instances of Minecraft configurations, including difference versions or mods.
\r\r
It's pretty amazing how easy Docker makes things for creating disposable development environments. My son now has a development environment he can use, easily reset, and, if he decides he doesn't want it any more, destroy. We didn't have to go through all the steps of installing lots of software on his laptop, and all the problems that we could have encountered throughout that process. Hopefully this guide will help you and your kid get programming with Minecraft quickly and easily.