


What is Policy-as-Code?
Policy-as-code is a way to manage your infrastructure rules, requirements, procedures, methodologies, and policies in a repeatable and idempotent manner. It also helps you secure your organization's infrastructure.
What is a Policy?
Before we look into policy-as-code in detail, we should explain what a policy is. In the wider world, a policy is essentially a set of rules, requirements, or procedures that need to be followed to lead to a certain desired state or condition.
For example, there are policies and rules that apply to driving a car, such as having a valid driver's license, meeting the minimum age and vision requirements, and refraining from driving under the influence of alcohol, among other things. These policies are necessary to achieve a desired state or condition — in this case, safety on the roads. Similarly, in the IT world, we have policies for networking, security, repositories, infrastructure, and more.
Why use Policy-as-Code?
As you can probably tell from the definition above, policy-as-code helps organizations in the following areas:
- Managing Policies — Having your policies in one centralized location rather than having different IT teams with their own policies in different locations allows for a much more flexible way to manage policies.
- Versioning — Once these policies are in a central location, it makes sense to have them in version control (such as GitHub, GitLab, Bitbucket, etc.). Versioning policies gives organizations more control, and they can also run checks and see the history of the policies.
- Repeatability — After you've moved your policies to a centralized location and implemented versioning, you can execute your code repeatedly.
- Idempotence — When the code is repeatable, executing the same code again and again will result in the same output. This is very important and will help ensure that your operators are not hesitant or afraid to perform a deployment.
- Automation — Once you have achieved all of the above, you can automate the process.
- Decoupling — Decoupling is the ability to separate the policy from the application logic. This will help you avoid spaghetti code. For example, you don't want your CSS code intermingled with your programming language (like PHP, Ruby, Go, or Python), which is the application logic.
- Security — The most important of all of these things is security. After all, the main purpose of policy-as-code is to secure your infrastructure.
Policy-as-Code use cases
Above, we gave you a real-life example to help you understand what a policy is and how policies can be implemented for IT infrastructure or resources. Let's dig into it a bit more.
Organizations might have network or security policies or even policies for their public-facing web application configured in their infrastructure. As we mentioned earlier, these policies are configured to secure your IT infrastructure or resources.
Now, let's take a look at several different types of use cases.
Authorization control
Authorization is a way to determine which resources users can access. Using policy-as-code, you can implement access control for an application, including specifying the allowed methods (among other things). Let's take a look at a few examples:
- You can limit user access with the following policy, which only allows the user type admin to access your application URL, https://yourapplication.com/admin. In addition, only the method type POST is allowed.
- To secure your organization's infrastructure, you can use a policy that will deny all services that are a type of LoadBalancer. This will give you a good start toward improving your organization's security posture.
- Only allow HTTPS connections. While it's very common to allow external requests to reach your application through Ingress, it's a good practice to allow only HTTPS connections. As with the previous example, you can see how this policy helps organizations improve their security posture.
Infrastructure provisioning
Most of the policies that fit into this category are related to infrastructure creation. This can include mandatory tagging of resources, firewall and networking settings, and resource provisioning. Let's take a look at some of them in detail:
- Annotations/Tags — Most organizations have business units, multiple development teams, SRE/DevOps teams, platform/cloud engineering teams, accounting and HR teams, and more. Tagging the resources based on teams and/or units will definitely help organizations manage their resources.
- Allowed IPs — Sometimes your applications require access from certain external IP addresses. This can be granted by creating a policy that has a list of allowed IP addresses.
- Provisioning Certain Types of Resources — When organizations introduce different types of infrastructure environments (such as sandbox, development, staging, pre-production, and production environments), it is ideal to have certain types of machines configured for these environments.
Kubernetes control
If your organization uses Kubernetes, you'll ideally want to configure policies as part of your policy-as-code. You can have policies to manage Kubernetes resources such as Pods, namespaces, nodes, and resources. You can also configure policies to ensure that you only use containers from trusted registries (and much more).
- Trusted Registries — To secure your containers, you might want to create a policy that only allows images from trusted registries. You can have a specific list of registries from which you can pull containers.
- Container Limits and Requests — These policies force memory and CPU limits for container creation as well as memory and CPU requests. This is very important for preventing resource hogging and the OOM Killer (Out of Memory).
- Limiting Replicas — When deploying your application, you want to guarantee that it will always be up and running. This can be accomplished by setting up a number of replicas. If the application requires more resources, the number of replicas can be increased automatically. But again, this can also lead to false assumptions if it turns out that the application itself was not properly developed and is therefore causing high resource consumption. To prevent this, you can configure a policy that forces your organization to set a minimum and maximum number of replicas.
Cost control
Another important aspect of managing infrastructure is controlling costs. One option is to use policy-as-code. For example, you can implement policies for resource labeling and annotations, assigning specific machine types, and more.
- Annotations/Tags and Required Labels — Labeling resources based on departments or teams (etc.) helps organizations create reports that show how much is being spent on each one.
- Specific Machine Types — Organizations can create a report to help stakeholders decide how to optimize resource consumption by either optimizing the application code or using a certain machine type. We'll discuss this in more detail below.
- Limit Spending to a Certain Amount — You can limit the cost of each project by creating policies for your infrastructure environments (including sandbox, development, staging, pre-production, and production environments). Creating a policy that limits spending to a certain dollar amount for specific resources in your sandbox environment makes a lot of sense, for example.
How to implement a Policy-as-Code
Now that we've discussed specific use cases for policy-as-code (including authorization control, infrastructure provisioning, Kubernetes control, and cost control), you might be wondering how to implement it in your organization. Should you start by trying to address all of these use cases at once? Are there applications that can help you create and implement policies?
Well, we have good news. You can use OPA (pronounced "oh-pa"), which stands for Open Policy Agent. OPA is an open-source, general-purpose policy engine that unifies policy enforcement across the stack
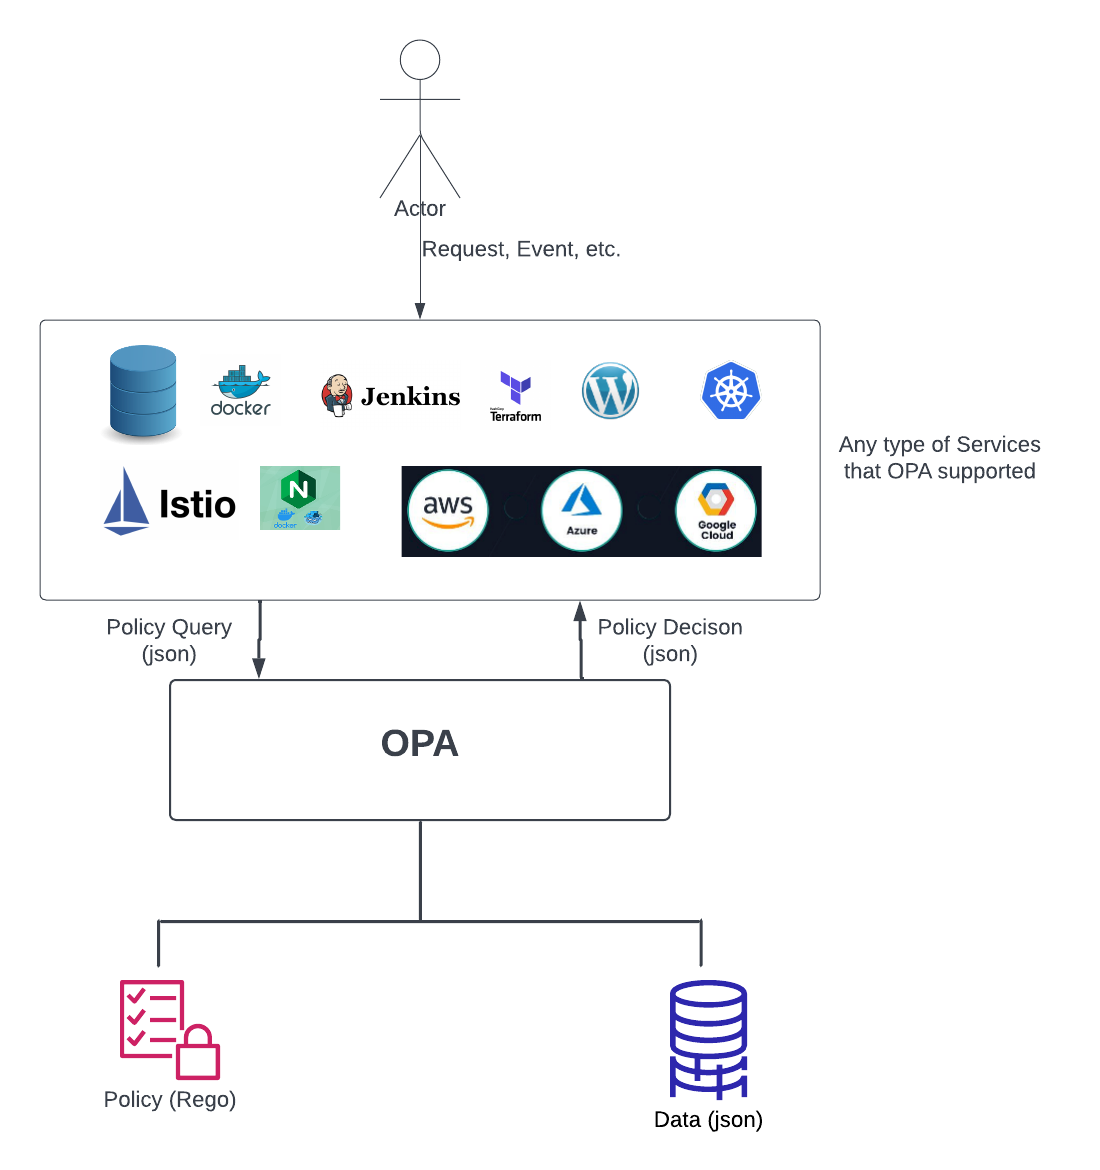
As you can see in the diagram above, all requests that users initiate to an OPA-supported service can be evaluated by OPA based on defined policies.
There are several OPA-supported services in the OPA ecosystem (you can find a complete list here). Some of the most notable are:
- Kubernetes Admission Control and Authorization
- Terraform
- Envoy
- Docker
- Google Kubernetes Engine (GKE)
- Istio
- AWS CloudFormation
- Ceph
- SSH and Sudo Auth with Linux
As shown in the diagram above, the data that the service and its users publish can be inspected and transformed using OPA's native query language, Rego. Don't worry, Rego is just another programming language. You don't need to know advanced Rego in order to implement OPA.
Before we show you how to use OPA, there is one more important thing to highlight from the diagram above. As you can see, the services (which can be considered application logic) are far away from the policy. That's because OPA decouples policy decisions from policy enforcement, which is the beauty of policy-as-code.
OK, enough of that. Let's take a look at a few simple examples of OPA in action.

As you can see in the image above, this is how OPA works:
- A user sends a request to an application or service.
- The request consists of the policy input (JSON) with the value
"role": "admin". - OPA receives the input and processes it.
- Based on the policy defined in OPA, the output is returned with the value
"admin_allowed": true, which means that this user is allowed to access any admin pages.
In this scenario, there is a mapping between the input document and the output document that represents the correct policy decision based on the defined policy. This mapping is defined by an OPA policy. Let's take a closer look at the input, policy, and output from the example above:
The input (JSON). According to the diagram above, the input has to be in JSON format. Based on Figure 2 (above), we can assume that the input was generated when the user clicked the button to log in to the admin page. Once the button was clicked, this input information was sent to the OPA engine. Then, the policy processed it.
{
  "method": "POST",
  "role": "admin"
}Code language: JSON / JSON with Comments (json)
The policy (Rego). To declare a source file to be part of the package, we used package play. Then, we declared the variable admin_allow and assigned the value false. (If there is no further overriding of this variable, the default will be used.) The next line (admin_allow = true) has two conditions which are defined inside a pair of brackets ({ }): the first condition is input.role = "admin", and the second is input.method = "POST". This is how you define an AND condition in Rego.
package play

default admin_allow = false

admin_allow = true {
  input.role = "admin"
  input.method = "POST"
}Code language: JSON / JSON with Comments (json)
And the output (JSON). When the input shown above was run against our policy, the output was "admin_allow": true. So, what would happen if we changed the input to "method": "GET"? In that case, the output would be "admin_allow": false. These are the types of outputs that will be returned to the application or service after the input is processed. In the example above, the user would be able to log in to the admin section of the application.
{
  "admin_allow": true
}Code language: JSON / JSON with Comments (json)
For those who want to learn OPA and Rego, the OPA official site has kindly provided a playground where you can try out your input, policy, and output.
For example, you can find a playground for the above scenario here. There are 3 cases that you can try out to see the output that will be generated when you modify the input. Enjoy!!!
Conclusion
Patrick Debois, who coined the term "DevOps," wrote an excellent blog post called "In-depth research and trends analyzed from 50+ different concepts as code." One of the concepts he discussed is policy-as-code. In this post, he defined policy-as-code as "writing code in a high-level language to manage and automate policies."
As we explained in this article, policy-as-code can benefit organizations in many ways, including access control, resource provisioning, cost control, and, most important of all, security. In addition, Patrick Debois included policy-as-code as part of his section on DevSecOps.
With the increase in cybersecurity threats, adding one more layer of security to your organization — such as policy-as-code — is a win-win situation. In fact, the popular new Zero Trust model approaches security with the motto, "never trust, always verify" — and adding policy-as-code to your infrastructure can be a great first step toward doing just that.