


Falco Feeds extends the power of Falco by giving open source-focused companies access to expert-written rules that are continuously updated as new threats are discovered.

This is part two in our series on building honeypots with Falco, vcluster, and other assorted open source tools. For the previous installment, see Building honeypots with vcluster and Falco: Episode I.
When Last We Left our Heroes
In the previous article, we discussed high-interaction honeypots and used vcluster to build an intentionally-vulnerable SSH server inside of its own cluster so it couldn't hurt anything else in the environment when it got owned. Then, we installed Falco on the host and proceeded to attack the SSH server, watching the Falco logs to see the appropriate rule trigger when we read /etc/shadow.
This is all great, but it's just a start. This time around, we'll be adding additional functionality to our honeypot so we can react to what is happening inside it. Some of these additional pieces will also be laying down the infrastructure for adding additional functionality down the road.
We'll be going beyond the basics, and this is where things start to get fun.
Our Shortcomings
The setup from the previous article had two major shortcomings. There are a few more, but we'll get to those later.
First, the previous iteration of our honeypot required being run directly on an OS sitting on an actual hunk of hardware. This is of limited utility as it really doesn't scale well unless we want to set up an army of hardware to support our eventual sprawl of honeypot bits. At the time, this was the only way we could do this with Minikube and Falco, as the Falco of yore didn't have the kernel modules we needed to do otherwise. Fortunately, this is no longer the case. We can now take a more cloud-native approach and build this on an EC2 instance in AWS, and everything will be satisfactory. To the cloud!
| NOTE: We're going to be building a honeypot which is, by definition, an intentionally vulnerable system. We won't have much in the way of monitoring built out just yet, so we don't suggest that you expose it to the internet. |
Second, the old honeypot didn't do much other than complain into the Falco logs when we went poking around in the pod's sensitive files. This, we can also fix. We're going to be using Falcosidekick and Falco Talon to make our honeypot actually do something when we go tripping Falco rules.
Response Engines
Response engine is a term often used in the context of EDR (Endpoint Detection and Response), SIEM (Security Information and Event Management), SOAR (Security Orchestration, Automation and Response), and XDR (Extended Detection and Response). See EDR vs. XDR vs. SIEM vs. MDR vs. SOAR for more information.
It's a component that executes an automated response to security threats. This is exactly the tool we need in this case.
When we trip one of the Falco rules by interacting with our honeypot, we need to take automatic action. In our particular case, we're going to be shutting down the pod that the attackers have owned so we can spin a clean one back up in its place. We'll be using a tool called Falco Talon for this. We're also going to include another tool, Falcosidekick, that will allow us some additional flexibility down the road to do other things in response to the events that happen in our environment.
Falco Sidekick

Falcosidekick is a great tool that enables us to connect Falco up to many other interesting bits and pieces. We can use it to perform monitoring and alerting, ship logs off to different tools, and all sorts of other things. This is the glue piece that we will use to send the events to Falco Talon.
Falco Talon
Falco Talon is the piece that will be performing the actual responses to the Falco rules that get tripped. Talon has its own internal set of rules that defines which Falco rules it should respond to and what it should do when they are triggered.
Getting Our Hands Dirty
Let's jump right in and build some things.
This time around, we'll be building our honeypot on an Ubuntu Server 22.04 t3.xlarge EC2 instance on AWS. You may be able to go with a smaller instance, but there is a point at which the instance won't have sufficient resources for everything to spin up. Very small instances, such as the t2.micro, will almost certainly not have sufficient horsepower for everything to function properly.
In theory, you should be able to build this on any of the similar cloud services and have it work, as long as you have all the proper application bits in place.
As a prerequisite, you will need to have installed the following tools, at the noted version or higher:
The rest we'll install as we work through the process.
Fire Up Minikube
1 – First we want to start up minikube using the docker driver. We'll see it go through its paces and download a few dependencies.
21 – Next, we'll enable the ingress addon for minikube. This will allow us to reach the SSH server that we'll be installing shortly.
$ minikube start --vm-driver=docker

😄  minikube v1.32.0 on Ubuntu 22.04
✨  Using the docker driver based on user configuration
📌  Using Docker driver with root privileges
👍  Starting control plane node minikube in cluster minikube
🚜  Pulling base image ...
💾  Downloading Kubernetes v1.28.3 preload ...
    > preloaded-images-k8s-v18-v1...:  403.35 MiB / 403.35 MiB  100.00% 51.69 M
🔥  Creating docker container (CPUs=2, Memory=3900MB) ...
🐳  Preparing Kubernetes v1.28.3 on Docker 24.0.7 ...
    ▪ Generating certificates and keys ...
    ▪ Booting up control plane ...
    ▪ Configuring RBAC rules ...
🔗  Configuring bridge CNI (Container Networking Interface) ...
    ▪ Using image gcr.io/k8s-minikube/storage-provisioner:v5
🔎  Verifying Kubernetes components...
🌟  Enabled addons: storage-provisioner, default-storageclass
🏄  Done! kubectl is now configured to use "minikube" cluster and "default" namespace by default

$ minikube addons enable ingress

💡  ingress is an addon maintained by Kubernetes. For any concerns contact minikube on GitHub.
You can view the list of minikube maintainers at: https://github.com/kubernetes/minikube/blob/master/OWNERS
    ▪ Using image registry.k8s.io/ingress-nginx/kube-webhook-certgen:v20231011-8b53cabe0
    ▪ Using image registry.k8s.io/ingress-nginx/kube-webhook-certgen:v20231011-8b53cabe0
    ▪ Using image registry.k8s.io/ingress-nginx/controller:v1.9.4
🔎  Verifying ingress addon...
🌟  The 'ingress' addon is enabled


Code language: Perl (perl)
Install Falco
1 – Next, we need to add the falcosecurity helm repo so we can access the helm chart for Falco.
4 – Once we have the repo added, we'll update to get the latest chart.
11 – We'll use kubectl to create a namespace for Falco to live in. We'll also use this same namespace later for Sidekick and Talon.
14 – Now, we'll kick off the Falco install. You'll notice here we have a few additional arguments to disable buffering for the Falco logs so we get events more quickly, install Sidekick during the Falco install, enable the web UI, and set up the outgoing webhook for Sidekick to point at the URL where Talon will shortly be listening.
$ helm repo add falcosecurity https://falcosecurity.github.io/charts
"falcosecurity" has been added to your repositories

$ helm repo update
Hang tight while we grab the latest from your chart repositories...
...Successfully got an update from the "falcosecurity" chart repository
...Successfully got an update from the "securecodebox" chart repository
...Successfully got an update from the "stable" chart repository
Update Complete. ⎈Happy Helming!⎈

$ kubectl create namespace falco
namespace/falco created

$ helm install falco falcosecurity/falco --namespace falco
--set tty=true
--set falcosidekick.enabled=true
--set falcosidekick.webui.enabled=true
--set falcosidekick.config.webhook.address="http://falco-talon:2803"
NAME: falco
LAST DEPLOYED: Wed Dec  0 19:38:38 2023
NAMESPACE: falco
STATUS: deployed
REVISION: 1
NOTES:
Falco agents are spinning up on each node in your cluster. After a few
seconds, they are going to start monitoring your containers looking for
security issues.


No further action should be required.


Code language: Perl (perl)
💡Note: If you want to dig deeper into Falco, take a look at the course Falco 101.
Update the Falco Rules
Later on, we'll be setting up a port forward for the SSH server so we can reach it. Falco is going to be vocal about this and it will trigger the "Redirect STDOUT/STDIN to Network Connection in Container" rule a LOT, which will make it difficult to see the rule we actually care about in the Falco logs, as well as send quite a lot of extra events to Talon. Let's just disable that rule.
If you want to take a look at the rule we're disabling, you can find it in the Falco rules repo here.
1 – We're going to make a temporary file to hold our rule modification, into which we will insert a customRules section.
2 – Next, we'll add the override.yaml.
3 – Then, the existing rule from the Falco rules file that we're going to override.
4 – And, tell Falco that we want to disable it.
6 – Then, we'll use helm to upgrade Falco and feed it the file we made, telling it to reuse the rest of the values it previously had.
21 – Lastly, we'll kill off the existing Falco pods so we get new ones with the rule disabled in their rulesets.
echo "customRules:" > /tmp/customrules.yaml
echo "  override.yaml: |-" >> /tmp/customrules.yaml
echo "    - rule: Redirect STDOUT/STDIN to Network Connection in Container" >> /tmp/customrules.yaml
echo "      enabled: false" >> /tmp/customrules.yaml

$ helm upgrade falco falcosecurity/falco --namespace falco --values /tmp/customrules.yaml --reuse-values
Release "falco" has been upgraded. Happy Helming!
NAME: falco
LAST DEPLOYED: Wed Dec  0 23:56:23 2023
NAMESPACE: falco
STATUS: deployed
REVISION: 2
NOTES:
Falco agents are spinning up on each node in your cluster. After a few
seconds, they are going to start monitoring your containers looking for
security issues.


No further action should be required.

$ kubectl delete pods -n falco -l app.kubernetes.io/name=falco
pod "falco-94wsk" deleted


Code language: Perl (perl)
Install Falco Talon
Now let's install Falco Talon.
1 – As it's currently an alpha, Talon isn't published in the standard helm repos. We'll clone the Talon repo from GitHub to get a copy of the helm chart.
12 – If we take a quick look at the Talon repo, we can see the helm chart for it, as well as a couple yaml files that hold its configuration. We'll be changing the rules.yaml in the next set of steps.
16 – Now, a quick helm install of Talon into the falco namespace alongside Falco and Sidekick.
git clone https://github.com/Issif/falco-talon.git /tmp/falco-talon

Cloning into '/tmp/falco-talon'...
remote: Enumerating objects: 1599, done.
remote: Counting objects: 100% (744/744), done.
remote: Compressing objects: 100% (349/349), done.
remote: Total 1599 (delta 473), reused 565 (delta 338), pack-reused 855
Receiving objects: 100% (1599/1599), 743.58 KiB | 2.81 MiB/s, done.
Resolving deltas: 100% (866/866), done.


ls /tmp/falco-talon/deployment/helm/
Chart.yaml  rules.yaml  templates  values.yaml


$ helm install falco-talon /tmp/falco-talon/deployment/helm --namespace falco

NAME: falco-talon
LAST DEPLOYED: Thu Dec  0 00:01:53 2023
NAMESPACE: falco
STATUS: deployed
REVISION: 1
TEST SUITE: None

Code language: Perl (perl)
Update the Talon Rules and Configuration
As we discussed earlier, we need to set up the rules for Talon separately. Let's take a quick peek at what we have in the rules.yaml now.
1 – Each rule in the file is designated with '- name' and we have a few examples to look at.
21 – This is a rule along the lines of what we want to replicate, though we can drop the parameters section.
$ cat /tmp/falco-talon/deployment/helm/rules.yaml

- name: Rule Labelize
  match:
    rules:
      - Terminal shell in container
    output_fields:
      - k8s.ns.name!=kube-system
  action:
    name: kubernetes:labelize
    parameters:
      labels:
        suspicious: "true"
- name: Rule NetworkPolicy
  match:
    rules:
      - "Outbound Connection to C2 Servers"
  action:
    name: kubernetes:networkpolicy
  before: true
- name: Rule Terminate
  match:
    rules:
      - "Outbound Connection to C2 Servers"
  action:
    name: kubernetes:terminate
    parameters:
      ignoreDaemonsets: true
      ignoreStatefulsets: true


Code language: Perl (perl)
This will work very similarly to how we edited the Falco rules earlier.
1 – We'll echo a series of lines into the /tmp/falco-talon/deployment/helm/rules.yaml file. We need to name the Talon rule (this is an arbitrary name), tell it which Falco rule we want to match against (this is the specific name of the Falco rule), and then tell it what action we want it to take on a match. In this case, we'll be terminating the pod.
15 – We need to comment out one of the outputs in the values.yaml in the Talon chart directory while we're in here, since we won't be configuring a Slack alert. If we didn't do this, it wouldn't hurt anything, but we would see an error later in the Talon logs.
17 – Once again, we'll do a helm upgrade and point at our updated files. Note that we aren't using the –reuse-values argument to tell helm to keep the rest of the existing settings this time. If we did this, our changes to the values.yaml would not be included.
27 – Then, we need to kill the existing pods to refresh them.
$ echo -e '                                                                                                                                                           ' >> /tmp/falco-talon/deployment/helm/rules.yaml

$ echo -e '- name: Sensitive file opened                                                                                                                                                             ' >> /tmp/falco-talon/deployment/helm/rules.yaml

$ echo -e '  match:                                                                                                                                                                                  ' >> /tmp/falco-talon/deployment/helm/rules.yaml

$ echo -e '    rules:                                                                                                                                                                                ' >> /tmp/falco-talon/deployment/helm/rules.yaml

$ echo -e '      - "Read sensitive file untrusted"                                                                                                                                                   ' >> /tmp/falco-talon/deployment/helm/rules.yaml

$ echo -e '  action:                                                                                                                                                                                 ' >> /tmp/falco-talon/deployment/helm/rules.yaml

$ echo -e '    name: kubernetes:terminate ' >> /tmp/falco-talon/deployment/helm/rules.yaml

sed -i 's/^s*-s*slack/ # - slack/' /tmp/falco-talon/deployment/helm/values.yaml

$ helm upgrade falco-talon /tmp/falco-talon/deployment/helm --namespace falco

Release "falco-talon" has been upgraded. Happy Helming!
NAME: falco-talon
LAST DEPLOYED: Thu Dec  0 00:10:28 2023
NAMESPACE: falco
STATUS: deployed
REVISION: 2
TEST SUITE: None

$ kubectl delete pods -n falco -l app.kubernetes.io/name=falco-talon

pod "falco-talon-5bcf97655d-gvkv9" deleted
pod "falco-talon-5bcf97655d-wxr4g" deleted


Code language: Perl (perl)
Install vcluster
So that we can run our SSH server in isolation, we'll download vcluster and set it up.
1 – Here, we'll set an environment variable to fish out the latest vcluster version from the GitHub repository.
3 – Now, we'll use that environment variable to construct the download URL.
5 – We'll use curl to download the file and move it to /usr/local/bin.
11 – Now, let's check the vcluster version to make sure we got everything installed properly.
14 – We'll finish up by creating a vcluster namespace for everything to live in.
$ LATEST_TAG=$(curl -s -L -o /dev/null -w %{url_effective} "https://github.com/loft-sh/vcluster/releases/latest" | rev | cut -d'/' -f1 | rev)

$ URL="https://github.com/loft-sh/vcluster/releases/download/${LATEST_TAG}/vcluster-linux-amd64"

$ curl -L -o vcluster "$URL" && chmod +x vcluster && sudo mv vcluster /usr/local/bin;
  % Total    % Received % Xferd  Average Speed   Time    Time     Time  Current
                                 Dload  Upload   Total   Spent    Left  Speed
  0     0    0     0    0     0      0      0 --:--:-- --:--:-- --:--:--     0
100 61.4M  100 61.4M    0     0  80.7M      0 --:--:-- --:--:-- --:--:--  194M

$ vcluster version
vcluster version 0.18.0

$ kubectl create namespace vcluster
namespace/vcluster created


Code language: Perl (perl)
Install the SSH Server in vcluster
Now that we have vcluster working, we can get our target SSH server installed.
1 – We'll start off by creating a virtual cluster named SSH in the vcluster namespace. It's also important to note that we have now switched contexts to the SSH cluster.
14 – Now, we'll create a namespace called SSH inside our virtual cluster.
17 – We'll add the securecodebox repo so we can get the chart for the SSH server.
20 – And, do a quick update to pull the latest chart.
27 – Here, we'll use helm to install the intentionally vulnerable SSH server.
42 – Last, we'll disconnect from the vcluster, which will switch our context back to minikube.
$ vcluster create ssh -n vcluster

05:36:45 info Detected local kubernetes cluster minikube. Will deploy vcluster with a NodePort & sync real nodes
05:36:45 info Create vcluster ssh...
05:36:45 info execute command: helm upgrade ssh /tmp/vcluster-0.18.0.tgz-1681152849 --kubeconfig /tmp/2282824298 --namespace vcluster --install --repository-config='' --values /tmp/654191707
05:36:46 done Successfully created virtual cluster ssh in namespace vcluster
05:36:46 info Waiting for vcluster to come up...
05:37:11 info Stopping docker proxy...
05:37:21 info Starting proxy container...
05:37:21 done Switched active kube context to vcluster_ssh_vcluster_minikube
- Use `vcluster disconnect` to return to your previous kube context
- Use `kubectl get namespaces` to access the vcluster

$ kubectl create namespace ssh
namespace/ssh created

$ helm repo add securecodebox https://charts.securecodebox.io/
"securecodebox" already exists with the same configuration, skipping

$ helm repo update
Hang tight while we grab the latest from your chart repositories...
...Successfully got an update from the "falcosecurity" chart repository
...Successfully got an update from the "securecodebox" chart repository
...Successfully got an update from the "stable" chart repository
Update Complete. ⎈Happy Helming!⎈

$ helm install my-dummy-ssh securecodebox/dummy-ssh --version 3.4.0 --namespace ssh
--set global.service.type="nodePort"

NAME: my-dummy-ssh
LAST DEPLOYED: Fri Dec  0 05:38:10 2023
NAMESPACE: ssh
STATUS: deployed
REVISION: 1
TEST SUITE: None
NOTES:
Demo SSH Server deployed.

Note this should used for demo and test purposes.
Do not expose this to the Internet!

$ vcluster disconnect

05:38:19 info Successfully disconnected from vcluster: ssh and switched back to the original context: minikube


Code language: Perl (perl)
Test Everything Out
Okay! Now we have everything built. Let's give it a test.
You may recall the vcluster reference diagram from the previous article:
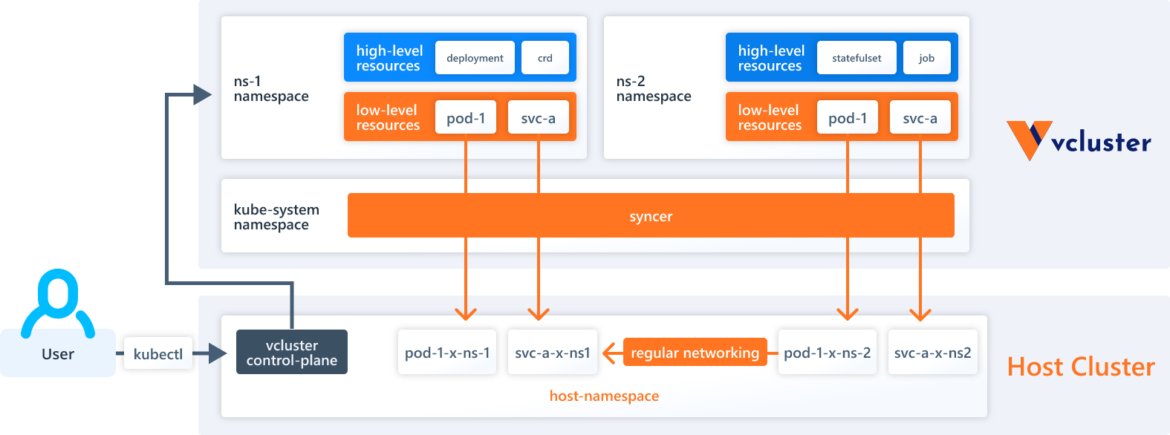
This will be helpful to keep in mind when visualizing the architecture as we work through this.
1 – Let's take a quick look at the pods in the vcluster namespace. We can see our SSH server here called my-dummy-ssh-7955bc99c8-mwqxg-x-ssh-x-ssh. We'll note that for future reference.
10 – Here, we'll set up a port forward to expose the SSH server.
18 – Now, we'll kick off the rest of the events by using sshpass to SSH into the server and read the /etc/shadow file. Right now we're doing this manually, so we don't strictly need sshpass, but we're going to be automating this later and we'll need it then.
22 – Here, we can see the contents of the file.
$ kubectl get pods -n vcluster

NAME                                           READY   STATUS    RESTARTS   AGE
coredns-68bdd584b4-dwmms-x-kube-system-x-ssh   1/1     Running   0          4m43s
my-dummy-ssh-7955bc99c8-mwqxg-x-ssh-x-ssh      1/1     Running   0          3m42s
ssh-0                                          1/1     Running   0          5m7s

$ sleep 30

$ kubectl port-forward svc/"$SSH_SERVICE" 5555:22 -n vcluster &

[1] 1196783
$ Forwarding from 127.0.0.1:5555 -> 22
Forwarding from [::1]:5555 -> 22

$ sleep 10

$ sshpass -p "THEPASSWORDYOUCREATED" ssh -o StrictHostKeyChecking=no -p 5555
root@127.0.0.1 "cat /etc/shadow"

Handling connection for 5555
root:$6$hJ/W8Ww6$pLqyBWSsxaZcksn12xZqA1Iqjz.15XryeIEZIEsa0lbiOR9/3G.qtXl/SvfFFCTPkElo7VUD7TihuOyVxEt5j/:18281:0:99999:7:::
daemon:*:18275:0:99999:7:::
bin:*:18275:0:99999:7:::
sys:*:18275:0:99999:7:::
sync:*:18275:0:99999:7:::
games:*:18275:0:99999:7:::
man:*:18275:0:99999:7:::
lp:*:18275:0:99999:7:::
mail:*:18275:0:99999:7:::
news:*:18275:0:99999:7:::
uucp:*:18275:0:99999:7:::
proxy:*:18275:0:99999:7:::
www-data:*:18275:0:99999:7:::
backup:*:18275:0:99999:7:::
list:*:18275:0:99999:7:::
irc:*:18275:0:99999:7:::
gnats:*:18275:0:99999:7:::
nobody:*:18275:0:99999:7:::
systemd-timesync:*:18275:0:99999:7:::
systemd-network:*:18275:0:99999:7:::
systemd-resolve:*:18275:0:99999:7:::
systemd-bus-proxy:*:18275:0:99999:7:::
_apt:*:18275:0:99999:7:::
sshd:*:18281:0:99999:7:::

Code language: Perl (perl)
Checking the Logs

Let's see what all happened as a result of our attack against the SSH server.
1 – We'll set an environment variable up to find the Falco pod for us and hold its location.
3 – Now, let's have a look at those logs. The bits at the beginning are from Falco spinning up. Incidentally, we can see the override file that we created earlier loading here.
18 – This is the meaty bit. In the output, we can see "Warning Sensitive file opened for reading by non-trusted program (file=/etc/shadow)," which is exactly what we did when we poked at the SSH server.
22 – Now, let's look at the Talon logs. Here, we'll put a one-liner together that will find the Talon pods and fetch the logs for us. Note that there are two Talon pods and what we want could be in either of them, so we'll grab the logs from both. You can see that the output is interleaved from both of them.
30 – Here, we can see the Falco event coming through to Talon.
32 – And here we got a match against the Talon rule we created earlier.
33 – Here is the action from the Talon rule being executed.
$ FALCO_POD=$(kubectl get pods -n falco -l app.kubernetes.io/name=falco -o=jsonpath='{.items[*].metadata.name}')

$ kubectl logs "$FALCO_POD" -n falco

Defaulted container "falco" out of: falco, falcoctl-artifact-follow, falco-driver-loader (init), falcoctl-artifact-install (init)
Fri Dec  0 05:33:49 2023: Falco version: 0.36.2 (x86_64)
Fri Dec  0 05:33:49 2023: Falco initialized with configuration file: /etc/falco/falco.yaml
Fri Dec  0 05:33:49 2023: Loading rules from file /etc/falco/falco_rules.yaml
Fri Dec  0 05:33:49 2023: Loading rules from file /etc/falco/rules.d/override.yaml
Fri Dec  0 05:33:49 2023: The chosen syscall buffer dimension is: 8388608 bytes (8 MBs)
Fri Dec  0 05:33:49 2023: Starting health webserver with threadiness 4, listening on port 8765
Fri Dec  0 05:33:49 2023: Loaded event sources: syscall
Fri Dec  0 05:33:49 2023: Enabled event sources: syscall
Fri Dec  0 05:33:49 2023: Opening 'syscall' source with Kernel module


{"hostname":"falco-wchsq","output":"18:39:24.133546875: Warning Sensitive file opened for reading by non-trusted program (file=/etc/shadow gparent=sshd ggparent=containerd-shim gggparent= evt_type=open user=root user_uid=0 user_loginuid=0 process=cat proc_exepath=/bin/cat parent=sshd command=cat /etc/shadow terminal=0 exe_flags=O_RDONLY container_id=0f044393375b container_image=securecodebox/dummy-ssh container_image_tag=v1.0.0 container_name=k8s_dummy-ssh_my-dummy-ssh-7955bc99c8-mxshb-x-ssh-x-ssh_vcluster_e10eeedf-7ad2-4a7e-8b73-b7713d6537da_0 k8s_ns=vcluster k8s_pod_name=my-dummy-ssh-7955bc99c8-mxshb-x-ssh-x-ssh)","priority":"Warning","rule":"Read sensitive file untrusted","source":"syscall","tags":["T1555","container","filesystem","host","maturity_stable","mitre_credential_access"],"time":"2023-12-08T18:39:24.133546875Z", "output_fields": {"container.id":"0f044393375b","container.image.repository":"securecodebox/dummy-ssh","container.image.tag":"v1.0.0","container.name":"k8s_dummy-ssh_my-dummy-ssh-7955bc99c8-mxshb-x-ssh-x-ssh_vcluster_e10eeedf-7ad2-4a7e-8b73-b7713d6537da_0","evt.arg.flags":"O_RDONLY","evt.time":43012267506,"evt.type":"open","fd.name":"/etc/shadow","k8s.ns.name":"vcluster","k8s.pod.name":"my-dummy-ssh-7955bc99c8-mxshb-x-ssh-x-ssh","proc.aname[2]":"sshd","proc.aname[3]":"containerd-shim","proc.aname[4]":null,"proc.cmdline":"cat /etc/shadow","proc.exepath":"/bin/cat","proc.name":"cat","proc.pname":"sshd","proc.tty":0,"user.loginuid":0,"user.name":"root","user.uid":0}}


$ kubectl get pods -n falco -l app.kubernetes.io/name=falco-talon -o=jsonpath='{range .items[*]}{.metadata.name}{"
"}{end}' | xargs -I {} kubectl logs {} -n falco

2023-12-00T05:33:41Z INF init action_category=kubernetes
2023-12-00T05:33:41Z INF init notifier=k8sevents
2023-12-00T05:33:41Z INF init notifier=slack
2023-12-00T05:33:41Z INF init result="4 rules have been successfully loaded"
2023-12-00T05:33:41Z INF init result="watch of rules enabled"
2023-12-00T05:33:41Z INF init result="Falco Talon is up and listening on 0.0.0.0:2803"
2023-12-00T05:44:46Z INF event output="05:44:46.118305822: Warning Sensitive file opened for reading by non-trusted program (file=/etc/shadow gparent=sshd ggparent=containerd-shim gggparent= evt_type=open user=root user_uid=0 user_loginuid=0 process=cat proc_exepath=/bin/cat parent=sshd command=cat /etc/shadow terminal=0 exe_flags=O_RDONLY container_id=1536aa9c45c2 container_image=securecodebox/dummy-ssh container_image_tag=v1.0.0 container_name=k8s_dummy-ssh_my-dummy-ssh-7955bc99c8-mwqxg-x-ssh-x-ssh_vcluster_21bdc319-5566-41ee-8a64-d8b7628e5937_0 k8s_ns=vcluster k8s_pod_name=my-dummy-ssh-7955bc99c8-mwqxg-x-ssh-x-ssh)" priority=Warning rule="Read sensitive file untrusted" source=syscall
trace_id=79db4b47-0112-4a22-8068-e171702e018a
2023-12-00T05:44:46Z INF match action=kubernetes:terminate rule="Sensitive file opened" trace_id=79db4b47-0112-4a22-8068-e171702e018a
2023-12-00T05:44:46Z INF action Namespace=vcluster Pod=my-dummy-ssh-7955bc99c8-mwqxg-x-ssh-x-ssh action=kubernetes:terminate event="05:44:46.118305822: Warning Sensitive file opened for reading by non-trusted program (file=/etc/shadow gparent=sshd ggparent=containerd-shim gggparent= evt_type=open user=root user_uid=0 user_loginuid=0 process=cat proc_exepath=/bin/cat parent=sshd command=cat /etc/shadow terminal=0 exe_flags=O_RDONLY container_id=1536aa9c45c2 container_image=securecodebox/dummy-ssh container_image_tag=v1.0.0 container_name=k8s_dummy-ssh_my-dummy-ssh-7955bc99c8-mwqxg-x-ssh-x-ssh_vcluster_21bdc319-5566-41ee-8a64-d8b7628e5937_0 k8s_ns=vcluster k8s_pod_name=my-dummy-ssh-7955bc99c8-mwqxg-x-ssh-x-ssh)" rule="Sensitive file opened" status=success trace_id=79db4b47-0112-4a22-8068-e171702e018a
2023-12-00T05:44:46Z INF notification action=kubernetes:terminate notifier=k8sevents rule="Sensitive file opened" status=success trace_id=79db4b47-0112-4a22-8068-e171702e018a
2023-12-00T05:33:41Z INF init action_category=kubernetes
2023-12-00T05:33:41Z INF init notifier=k8sevents
2023-12-00T05:33:41Z INF init notifier=slack
2023-12-00T05:33:41Z INF init result="4 rules have been successfully loaded"
2023-12-00T05:33:41Z INF init result="watch of rules enabled"
2023-12-00T05:33:41Z INF init result="Falco Talon is up and listening on 0.0.0.0:2803
Code language: Perl (perl)
Now, let's go take a peek at the cluster and see what happened as a result of our efforts. As we noted earlier, the name of the SSH server pod was my-dummy-ssh-7955bc99c8-mwqxg-x-ssh-x-ssh.
1 – Let's get the pods again from the vcluster namespace. Now, we can see the name of the SSH server pod is my-dummy-ssh-7955bc99c8-k8jgl-x-ssh-x-ssh. Success!
8 – We'll take a look at the events in the vcluster namespace and grep for my-dummy-ssh to find the bits we care about.
14 – Here, we can see the new SSH server pod my-dummy-ssh-7955bc99c8-k8jgl-x-ssh-x-ssh being started up.
20 – We can see the owned pod my-dummy-ssh-7955bc99c8-mwqxg-x-ssh-x-ssh being killed off.
$ kubectl get pods -n vcluster
NAME READY STATUS RESTARTS AGE
coredns-68bdd584b4-dwmms-x-kube-system-x-ssh 1/1 Running 0 9m11s
my-dummy-ssh-7955bc99c8-k8jgl-x-ssh-x-ssh 1/1 Running 0 95s
ssh-0 1/1 Running 0 9m35s
$ kubectl get events -n vcluster | grep my-dummy-ssh
113s Normal falco-talon:kubernetes:terminate:success pod/my-dummy-ssh-7955bc99c8-mwqxg-x-ssh-x-ssh Status: success...
113s Normal Scheduled pod/my-dummy-ssh-7955bc99c8-k8jgl-x-ssh-x-ssh Successfully assigned vcluster/my-dummy-ssh-7955bc99c8-k8jgl-x-ssh-x-ssh to minikube
112s Normal Pulled pod/my-dummy-ssh-7955bc99c8-k8jgl-x-ssh-x-ssh Container image "docker.io/securecodebox/dummy-ssh:v1.0.0" already present on machine
112s Normal Created pod/my-dummy-ssh-7955bc99c8-k8jgl-x-ssh-x-ssh Created container dummy-ssh
112s Normal Started pod/my-dummy-ssh-7955bc99c8-k8jgl-x-ssh-x-ssh Started container dummy-ssh
8m28s Normal Scheduled pod/my-dummy-ssh-7955bc99c8-mwqxg-x-ssh-x-ssh Successfully assigned vcluster/my-dummy-ssh-7955bc99c8-mwqxg-x-ssh-x-ssh to minikube
8m27s Normal Pulling pod/my-dummy-ssh-7955bc99c8-mwqxg-x-ssh-x-ssh Pulling image "docker.io/securecodebox/dummy-ssh:v1.0.0"
8m18s Normal Pulled pod/my-dummy-ssh-7955bc99c8-mwqxg-x-ssh-x-ssh Successfully pulled image "docker.io/securecodebox/dummy-ssh:v1.0.0" in 9.611s (9.611s including waiting)
8m17s Normal Created pod/my-dummy-ssh-7955bc99c8-mwqxg-x-ssh-x-ssh Created container dummy-ssh
8m16s Normal Started pod/my-dummy-ssh-7955bc99c8-mwqxg-x-ssh-x-ssh Started container dummy-ssh
113s Normal Killing pod/my-dummy-ssh-7955bc99c8-mwqxg-x-ssh-x-ssh Stopping container dummy-ssh
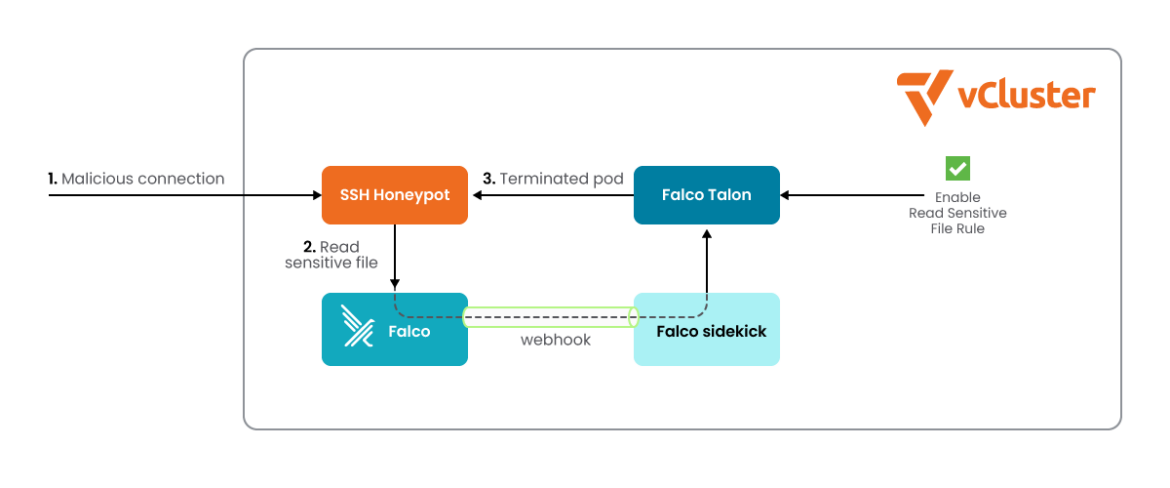
Code language: Perl (perl)And there we have it, end to end. Here's what we did:
- Attacked the SSH server pod
- Tripped the 'Sensitive file opened for reading by non-trusted program' rule in Falco
- Used a webhook from Falcosidekick to Falco Talon to ship the events over
- Tripped the 'Sensitive file opened' rule in Falco Talon
- Terminated the offending pod
And Now With Slightly More Automation
All of that above was quite a few moving parts. Wouldn't it be nice if we could just run a script to do all of this? Yes, yes it would. Fortunately, we can do just that.
In the Sysdig TRT GitHub repo, pull down the minhoney.sh file. You'll want to set it executable. To fire up the honeypot, simply run the script with the --buildit argument:
$ ./minhoney.sh --builditCode language: Perl (perl)To take everything back down again, run the script again with the --burnit argument.
$ ./minhoney.sh --burnitCode language: Perl (perl)| NOTE: When run with –burnit, the script will attempt to do some cleanup of things that may cause problems with future runs. It will uninstall anything in helm, kill off everything in minikube, and delete everything out of /tmp that the current user has permissions to delete. It is NOT recommended that you run this on anything other than a system or instance built for this specific purpose. Don't say we didn't warn you, cause we totally warned you. |
That's All (for Now) Folks
If we take a step back to see everything we have explained, there we have it, end to end:
- Attack the SSH server pod
- Activate the rule 'Sensitive file open for reading by untrusted program' in Falco
- Used a webhook from Falcosidekick to Falco Talon to send the events
- Enabled the 'Sensitive file open' rule in Falco Talon
- Terminated the offending pod
In the next part of this series, we'll add several additional pieces to this. Logging and alerting would be nice, as well as additional automation to set everything up. We'll also scale this up with some additional targets to attack.
For the previous episode with the basics, see Building honeypots with vcluster and Falco: Episode I.