Falco Feeds extends the power of Falco by giving open source-focused companies access to expert-written rules that are continuously updated as new threats are discovered.
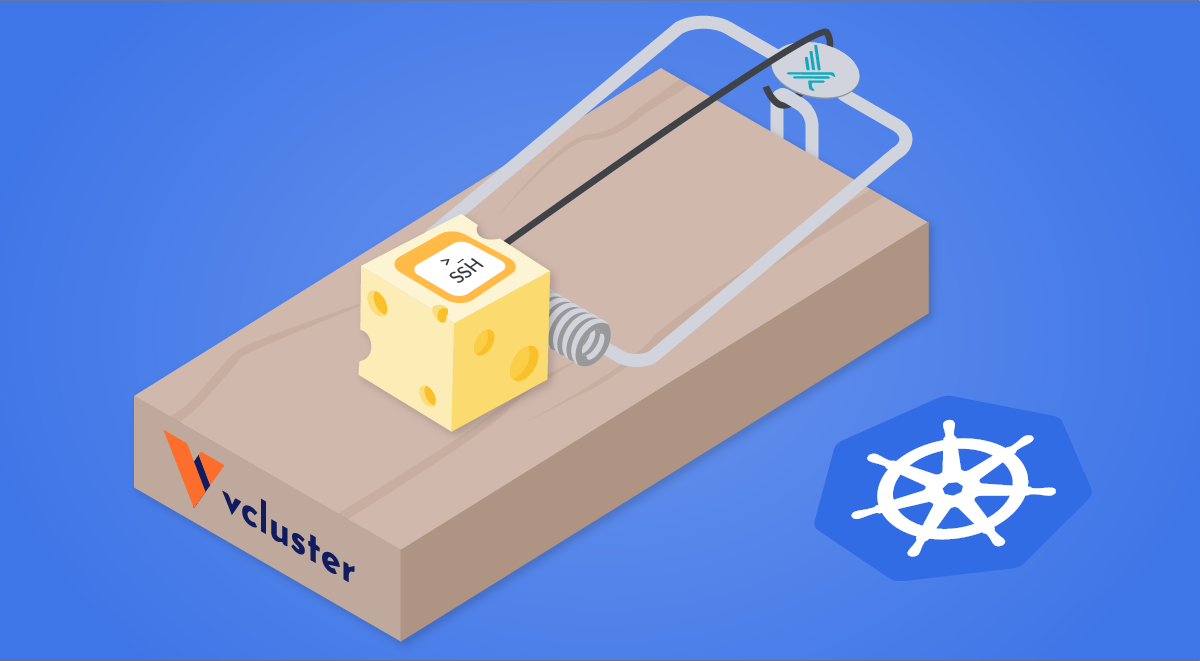
Honeypots are, at a high level, mechanisms for luring attackers in order to distract them from legitimate access or to gather intelligence on their activities. We're going to build a small example here of a honeypot using vcluster and Falco.
In this first episode, we explain how to build a simple SSH honeypot using vcluster and Falco for runtime intrusion detection.
Why honeypots?
Honeypots can be modeled on almost any type of digital asset, including applications, systems, networks, IoT devices, SCADA components, and a wide range of others. They can range in complexity, from honeytokens representing instrumented single files to honeynets representing sprawling networks of multiple systems and infrastructure.
Therefore, honeypots are of great utility for intelligence collection, as they can allow blue teams and security researchers a window into the tools, techniques, and procedures (TTPs) of attackers, as well as provide information as the basis for Indicators of Compromise (IoCs) to feed to various security tools.
One of the ways we can classify honeypots is by their level of complexity; high interaction and low interaction.
High interaction vs. Low interaction honeypots
Low interaction honeypots are the duck decoy of the honeypot world. They don't take a lot of resources to run, but they generally don't stand up to close examination. They may do something simple like respond with a relatively realistic banner message on a standard port, but this is usually about the extent of what they can do. This may briefly interest an attacker when showing up on a port and service scan, but the lack of response otherwise likely won't keep them interested for long. Additionally, low interaction honeypots don't give us much of a view into what the attacker is doing, as they don't provide a great deal of an attack surface for them to actually interact with.
If low interaction honeypots are a duck decoy, then high interaction honeypots are actual ducks. While this is much better for luring attackers in, we might lose our duck. High interaction honeypots are often composed of real systems running real applications, and are instrumented to keep close track of what an attacker is doing. This can allow us to see the full length of more complex activities, such as chained exploits, as well as obtain copies of tools and binaries uploaded, credentials used, etc. While these are great from an intelligence gathering perspective, we have also just put an actual asset directly in the hands of an attacker and need to carefully monitor what they are doing with it.
One of the primary challenges with high interaction honeypots is in keeping the attacker isolated from the rest of the environment. In the case of honeypots built using containerization tools such as Kubernetes, we have to carefully keep the attacker away from the portions of the cluster actually running the honeypot and the associated instrumentation for monitoring and maintaining it. This can be challenging and can also force us to limit what we can expose for attackers to access. Anything an attacker could use to target the cluster itself or the instrumentation would need to be excluded, or workarounds would have to be put in place to prevent unwanted tampering from happening.
Virtual clusters to the rescue
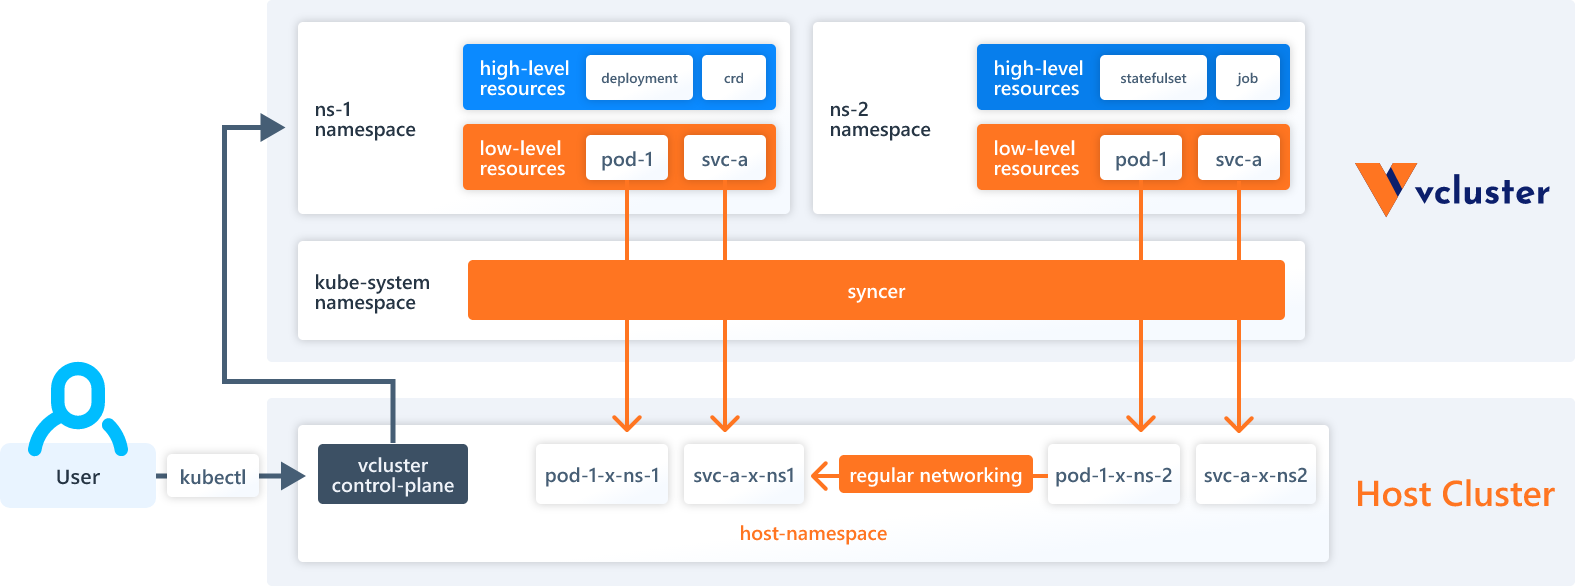
Virtual clusters are Kubernetes clusters running on top of the host Kubernetes cluster. We can run multiple virtual clusters, each in its own separate environment and unable to reach the other virtual clusters or the host cluster.
Since the virtual cluster is running inside of its own isolated space, this allows us to expose very sensitive items inside them, as attackers aren't seeing the "real" equivalents running on the host cluster. In this way, we can expose elements of the Kubernetes infrastructure, maintenance tools, and other such items without having to worry about attackers taking down the honeypot itself.
There are several virtual cluster projects we could use for this, but vcluster is currently the most polished and well-supported. The vcluster folks are very friendly and helpful, be sure to stop in and say hi to them on their Slack!
Let's build a vcluster honeypot
We're going to build a small example of a honeypot using vlcuster. This is an intentionally simple example but will provide us with a good foundation to build on for any future tinkering we might want to do.
We need tools with the following minimum versions to achieve this demo:
Minikube v1.26.1
Helm v3.9.2
kubectl v1.25.0
vcluster 0.11.2
Step-by-step installation of a vcluster honeypot and Falco
First, we'll install the vcluster binary, a very simple task.
p$ curl -s -L "https://github.com/loft-sh/vcluster/releases/latest" | sed -nE 's!.*"([^"]*vcluster-linux-amd64)".*!https://github.com1!p' | xargs -n 1 curl -L -o vcluster && chmod +x vcluster;
1 curl -L -o vcluster && chmod +x vcluster;
  % Total    % Received % Xferd  Average Speed   Time    Time     Time  Current
                                 Dload  Upload   Total   Spent    Left  Speed
  0     0    0     0    0     0      0      0 --:--:-- --:--:-- --:--:--     0
100 36.8M  100 36.8M    0     0  10.4M      0  0:00:03  0:00:03 --:--:-- 11.2M
$ sudo mv vcluster /usr/local/bin;
$ vcluster version
vcluster version 0.11.2
Code language: Perl (perl)
Provision a local Kubernetes cluster
There are a wide variety of ways to provision a Kubernetes cluster. In this particular example, we will be using minikube.
Note:For our purposes here, we can use the virtualbox, qemu, or kvm2 driver for minikube, but not the none driver. Falco will fail to deploy its driver correctly later on if we try to use none. Additionally, since we're using the virtualbox driver, we need to deploy this on actual hardware. This will not work inside of a VM, on an EC2 instance, etc.
Let's provision a cluster. After we run the start command, minikube will run for a minute or two while it builds everything for us.
$ minikube start --vm-driver=virtualbox
😄  minikube v1.26.1 on Ubuntu 22.04
✨  Using the virtualbox driver based on user configuration
👍  Starting control plane node minikube in cluster minikube
🔥  Creating virtualbox VM (CPUs=2, Memory=6000MB, Disk=20000MB) ...
🐳  Preparing Kubernetes v1.24.3 on Docker 20.10.17 ...
    ▪ Generating certificates and keys ...
    ▪ Booting up control plane ...
    ▪ Configuring RBAC rules ...
    ▪ Using image gcr.io/k8s-minikube/storage-provisioner:v5
🔎  Verifying Kubernetes components...
🌟  Enabled addons: storage-provisioner
🏄  Done! kubectl is now configured to use "minikube" cluster and "default" namespace by defaultCode language: Perl (perl)
Instrumenting our honeypot with Falco
Next, we need to install Falco:
$ helm repo add falcosecurity https://falcosecurity.github.io/charts
"falcosecurity" has been added to your repositories
$ helm repo update
Hang tight while we grab the latest from your chart repositories...
...Successfully got an update from the "falcosecurity" chart repository
Update Complete. ⎈Happy Helming!⎈
$ helm upgrade --install falco --set driver.loader.initContainer.image.tag=master --set driver.loader.initContainer.env.DRIVER_VERSION="2.0.0+driver" --set tty=true --namespace falco --create-namespace falcosecurity/falco
Release "falco" does not exist. Installing it now.
NAME: falco
LAST DEPLOYED: Thu Sep  8 15:32:45 2022
NAMESPACE: falco
STATUS: deployed
REVISION: 1
TEST SUITE: None
NOTES:
Falco agents are spinning up on each node in your cluster. After a few
seconds, they are going to start monitoring your containers looking for
security issues.
No further action should be required.
Tip:
You can easily forward Falco events to Slack, Kafka, AWS Lambda and more with falcosidekick.
Full list of outputs: https://github.com/falcosecurity/charts/tree/master/falcosidekick.
You can enable its deployment with `--set falcosidekick.enabled=true` or in your values.yaml.
See: https://github.com/falcosecurity/charts/blob/master/falcosidekick/values.yaml for configuration values.Code language: Perl (perl)
The falco pod will take a minute or so to spin up. We can use kubectl to check the status of it and have a look at the logs to make sure everything went smoothly:
$ kubectl get pods -n falco -o wide
NAME          READY   STATUS    RESTARTS   AGE   IP           NODE       NOMINATED NODE   READINESS GATES
falco-zwfcj   1/1     Running   0          73s   172.17.0.3   minikube
$ kubectl logs falco-zwfcj -n falco
Defaulted container "falco" out of: falco, falco-driver-loader (init)
Thu Sep  8 22:32:47 2022: Falco version 0.32.2
Thu Sep  8 22:32:47 2022: Falco initialized with configuration file /etc/falco/falco.yaml
Thu Sep  8 22:32:47 2022: Loading rules from file /etc/falco/falco_rules.yaml:
Thu Sep  8 22:32:47 2022: Loading rules from file /etc/falco/falco_rules.local.yaml:
Thu Sep  8 22:32:48 2022: Starting internal webserver, listening on port 8765Code language: Perl (perl)
Putting everything together to create the virtual cluster
Next, we need to create a namespace in the host cluster for our vcluster to live in, then deploy the vcluster into it.
$ kubectl create namespace vcluster
namespace/vcluster created
$ vcluster create ssh -n vcluster
info   Detected local kubernetes cluster minikube. Will deploy vcluster with a NodePort & sync real nodes
info   Create vcluster ssh...
info   execute command: helm upgrade ssh https://charts.loft.sh/charts/vcluster-0.11.2.tgz --kubeconfig /tmp/3673995455 --namespace vcluster --install --repository-config='' --values /tmp/641812157
done √ Successfully created virtual cluster ssh in namespace vcluster
info   Waiting for vcluster to come up...
warn   vcluster is waiting, because vcluster pod ssh-0 has status: ContainerCreating
done √ Switched active kube context to vcluster_ssh_vcluster_minikube
- Use `vcluster disconnect` to return to your previous kube context
- Use `kubectl get namespaces` to access the vcluster
Code language: Perl (perl)
Install the SSH honeypot target
With the vcluster instantiated, we can now create an intentionally insecure ssh server inside of it to use as a target for our honeypot, this is something we mentioned earlier in securing SSH on EC2.
We'll be deploying an intentionally insecure ssh server helm chart from sourcecodebox.io to use as a target here. The credentials for this server are root/THEPASSWORDYOUCREATED.
$ helm repo add securecodebox https://charts.securecodebox.io/
"securecodebox" has been added to your repositories
$ helm repo update
Hang tight while we grab the latest from your chart repositories...
...Successfully got an update from the "falcosecurity" chart repository
...Successfully got an update from the "securecodebox" chart repository
Update Complete. ⎈Happy Helming!⎈
$ helm install my-dummy-ssh securecodebox/dummy-ssh --version 3.14.3
NAME: my-dummy-ssh
LAST DEPLOYED: Thu Sep  8 15:53:15 2022
NAMESPACE: default
STATUS: deployed
REVISION: 1
TEST SUITE: None
NOTES:
Demo SSH Server deployed.
Note this should used for demo and test purposes.
Do not expose this to the Internet!
Code language: Perl (perl)
Examine the different contexts
Now we have something running inside our vcluster. Let's take a look at the two different contexts we have.
Note:
A context in Kubernetes is a set of parameters defining how to access a particular cluster. Switching the context will change everything we do with commands like kubectl from one cluster to another.Code language: Perl (perl)
First, let's look at all of the resources existing in our cluster by using the current vcluster perspective.
$ kubectl get all --all-namespaces
NAMESPACE     NAME                                READY   STATUS    RESTARTS   AGE
kube-system   pod/coredns-6ffcc6b58-h7zwx        1/1     Running   0          m26s
default       pod/my-dummy-ssh-f98c68f95-vwns   1/1     Running   0          m1s
NAMESPACE     NAME                   TYPE        CLUSTER-IP      EXTERNAL-IP   PORT(S)                  AGE
default       service/kubernetes     ClusterIP   10.96.112.178           443/TCP                  m26s
kube-system   service/kube-dns       ClusterIP   10.97.196.120           53/UDP,53/TCP,9153/TCP   m26s
default       service/my-dummy-ssh   ClusterIP   10.99.109.0             22/TCP                   m1s
NAMESPACE     NAME                           READY   UP-TO-DATE   AVAILABLE   AGE
kube-system   deployment.apps/coredns        1/1     1            1           m26s
default       deployment.apps/my-dummy-ssh   1/1     1            1           m1s
NAMESPACE     NAME                                      DESIRED   CURRENT   READY   AGE
kube-system   replicaset.apps/coredns-6ffcc6b58        1         1         1       m26s
default       replicaset.apps/my-dummy-ssh-f98c68f95   1         1         1       m1sCode language: Perl (perl)
We can see the normal infrastructure for Kubernetes, as well as the pod and service for my-dummy-ssh running in the default namespace. Note that we do not see the resources for Falco, as this is installed in our host cluster and isn't visible from within the vcluster.
Next, let's switch contexts by disconnecting from vcluster. This will take us back to the context of the host cluster.
$ vcluster disconnect
info   Successfully disconnected from vcluster: ssh and switched back to the original context: minikube
Code language: Perl (perl)
We can now ask kubectl to show us all of the resources again, as we will see a very different picture.
$ kubectl get all --all-namespaces
NAMESPACE     NAME                                                READY   STATUS    RESTARTS   AGE
falco         pod/falco-zwfcj                                     1/1     Running   0          5m
kube-system   pod/coredns-d4b75cb6d-ttwdl                        1/1     Running   0          4m
kube-system   pod/etcd-minikube                                   1/1     Running   0          4m
kube-system   pod/kube-apiserver-minikube                         1/1     Running   0          4m
kube-system   pod/kube-controller-manager-minikube                1/1     Running   0          4m
kube-system   pod/kube-proxy-dhg9v                                1/1     Running   0          4m
kube-system   pod/kube-scheduler-minikube                         1/1     Running   0          4m
kube-system   pod/storage-provisioner                             1/1     Running   0          4m
vcluster      pod/coredns-6ffcc6b58-h7zwx-x-kube-system-x-ssh    1/1     Running   0          1m
vcluster      pod/my-dummy-ssh-f98c68f95-vwns-x-default-x-ssh   1/1     Running   0          5m
vcluster      pod/ssh-0                                           2/2     Running   0          1m
NAMESPACE     NAME                                   TYPE        CLUSTER-IP      EXTERNAL-IP   PORT(S)                  AGE
default       service/kubernetes                     ClusterIP   10.96.0.1               443/TCP                  4m
kube-system   service/kube-dns                       ClusterIP   10.96.0.10              53/UDP,53/TCP,9153/TCP   4m
vcluster      service/kube-dns-x-kube-system-x-ssh   ClusterIP   10.97.196.120           53/UDP,53/TCP,9153/TCP   1m
vcluster      service/my-dummy-ssh-x-default-x-ssh   ClusterIP   10.99.109.0             22/TCP                   5m
vcluster      service/ssh                            NodePort    10.96.112.178           443:31530/TCP            1m
vcluster      service/ssh-headless                   ClusterIP   None                    443/TCP                  1m
vcluster      service/ssh-node-minikube              ClusterIP   10.102.36.118           10250/TCP                1m
NAMESPACE     NAME                        DESIRED   CURRENT   READY   UP-TO-DATE   AVAILABLE   NODE SELECTOR            AGE
falco         daemonset.apps/falco        1         1         1       1            1                              5m
kube-system   daemonset.apps/kube-proxy   1         1         1       1            1           kubernetes.io/os=linux   4m
NAMESPACE     NAME                      READY   UP-TO-DATE   AVAILABLE   AGE
kube-system   deployment.apps/coredns   1/1     1            1           4m
NAMESPACE     NAME                                 DESIRED   CURRENT   READY   AGE
kube-system   replicaset.apps/coredns-d4b75cb6d   1         1         1       4m
NAMESPACE   NAME                   READY   AGE
vcluster    statefulset.apps/ssh   1/1     1m
Code language: Perl (perl)
Now, we can see the resources for Falco as well as the synced resources from our ssh install. This time, it is seen as running in the vcluster namespace we created on the host cluster.
Testing out our honeypot
Great, we have everything assembled now. Let's do something to trip a Falco rule in our honeypot target and see how everything works so far.
The most convenient way to simulate a real intrusion is to use three different terminal windows.
Terminal 1
In terminal 1, we'll set up a port forward in order to expose our ssh server to the local machine. This terminal needs to stay open while we test in order to expose the ssh service.
This command will expose the service on 127.0.0.1, port 5555. We need to make sure that we are running in the vcluster context for this window. If we are in the host cluster context, we can switch back by running the command vcluster connect ssh -n vcluster.
$ kubectl port-forward svc/my-dummy-ssh 5555:22
Forwarding from 127.0.0.1:5555 -> 22
Forwarding from [::1]:5555 -> 22Code language: Perl (perl)
Terminal 2
In this terminal, we will ssh into the service that we just exposed on port 5555. The credentials are root/THEPASSWORDYOUCREATED.
$ ssh -p 5555 root@127.0.0.1
The authenticity of host '[127.0.0.1]:5555 ([127.0.0.1]:5555)' can't be established.
ED25519 key fingerprint is SHA256:eLwgzyjvrpwDbDr+pDbIfUhlNANB4DPH9/0w1vGa87E.
This key is not known by any other names
Are you sure you want to continue connecting (yes/no/[fingerprint])? yes
Warning: Permanently added '[127.0.0.1]:5555' (ED25519) to the list of known hosts.
root@127.0.0.1's password:
Welcome to Ubuntu 16.04.6 LTS (GNU/Linux 5.10.57 x86_64)
 * Documentation:  https://help.ubuntu.com
 * Management:     https://landscape.canonical.com
 * Support:        https://ubuntu.com/advantage
The programs included with the Ubuntu system are free software;
the exact distribution terms for each program are described in the
individual files in /usr/share/doc/*/copyright.
Ubuntu comes with ABSOLUTELY NO WARRANTY, to the extent permitted by
applicable law.Code language: Perl (perl)
Once we have logged in with ssh, then we want to do something to trip a Falco rule. For example, viewing /etc/shadow should get us a hit.
Here, we will see many entries for the Notice Redirect stdout/stdin to network connection rule, as a result of our port forwarding. But we should also see the Warning Sensitive file opened for reading by non-trusted program rule fire, as a result of our taking a peek at /etc/shadow.
Voila! This is Falco catching us mucking about with things that we should not be, via an ssh connection to our target, inside of our vcluster cluster, and inside of the host cluster.
Burn it all down
If we want to clean up the mess we've made, or if things go sideways enough for us to want to start over, we can clean everything out with a few simple commands: uninstall Falco and our ssh server, clean out minikube, and tidy a few temp files we might trip over later.
$ helm delete falco --namespace falco; helm delete my-dummy-ssh --namespace default; minikube delete --all -purge; sudo rm /tmp/juju*
release "falco" uninstalled
release "my-dummy-ssh" uninstalled
🔥  Deleting "minikube" in virtualbox ...
💀  Removed all traces of the "minikube" cluster.
🔥  Successfully deleted all profiles
[sudo] password for user:
Code language: Perl (perl)
But wait, there's more!
Virtual clusters show a great deal of promise for use in honeypots and for security research in general. This is sure to be an exciting field to watch, both in terms of future developments and how the technology industry puts these tools to use.
What we built here is a good start, but there are quite a few more interesting things we can do to polish and enhance.