When running containers in a Kubernetes cluster, trusting the images you deploy is key to enforce security. The use of mutable images represents a risk to the secure Kubernetes deployment and highlights the importance of having a reliable mechanism to ensure you run what you expect.

In this blog, you will learn step-by-step how to implement a secure Kubernetes deployment. You will be able to set up a solution ensuring nothing runs in your cluster without a signature verification by a known authority and verified by an admission controller.
Why we need trust in our images we deploy
Let’s imagine the following scenario: we are working as security engineers in a large company and there is been a recent data leak. The forensic investigators have discovered that the leak was related to some malicious code that was deployed into our Kubernetes production cluster.
To validate our container images, we were using image scanning in our CI/CD pipelines but somehow the container was published into our internal OCI registry and deployed to the cluster. Our teams are using mutable tags on the deployments so the admission controller accepted the image, since our security tool seemed to have accepted the image too. However, only the image name was verified.
The implementation of our content trust policy will require signature and verification of images.
This will ensure that any future image deployed in the Kubernetes cluster will be the same one verified earlier in our pipeline, and therefore, authentified within our security process.
Step-by-step secure Kubernetes deployment
If we want to secure Kubernetes in the deployment step, we must sign all the containers we are going to use once we know that they are free of vulnerabilities.
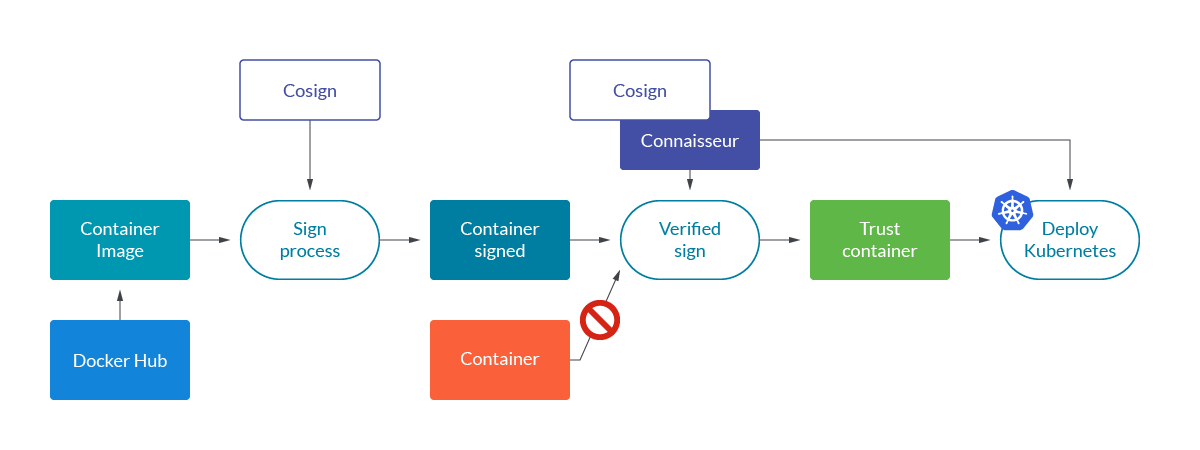
Once we sign the container, we share it with the official registry. As a result, only the containers signed by us or by the official registry will be the ones that can be deployed in our cluster.
Let’s go deeper into signature verification process.
Signing image process with Cosign
Cosign is part of the sigstore project developed by Google in collaboration with the Linux Foundation Project. We use Cosign to the signature process to solve the problem of trust in the images we deploy in our scenario.
It’s simple and secure, we show the steps to sign a container.
Clone the official repository:
$ git clone https://github.com/sigstore/cosign
$ cd cosign
$ go install ./cmd/cosign
$ $(go env GOPATH)/bin/cosign
Generating the key pair is simple, you run the command and the keys are encrypted under a password using scrypt as a KDF and nacl/secretbox for encryption.
cosign generate-key-pair

We generate a completely new key pair, cosign.key and cosign.pub.
Private keys should be safe and manage to decrypt/sign with a password stored in a secret manager as part of your CI system. You can use HashiCorp Vault or Amazon KMS for it. Just make sure that the access to the secrets is restricted to the pipeline scope and not globally accessible in the ci/cd tool you are using.
We have all the elements to the sign process and we use the private key to sign the container so that we can ensure we are the only ones who can sign it but this can be verified through the public.
Troubleshooting container signing
First of all, we need to publish an image into a registry where we have write permissions. It is impossible to sign images from a registry in which we have no write permission (UNAUTHORIZED: authentication required).
cosign sign --key cosign.key alpine:3.5

It is also impossible to sign images that have not been yet published into the registry. So trying to sign a local image will result in an error (accessing entity: entity not found in registry):
docker tag alpine:3.5 guillermopal/contenttrust:not_uploaded
cosign sign --key cosign.key guillermopal/contenttrust:not_uploaded

For our example, we will retag an alpine image and push it to our registry as a first step. We will use the tag “signed” to identify the image we are going to sign.
docker pull alpine:3.5
docker tag alpine:3.5 guillermopal/contenttrust:signed
docker push guillermopal/contenttrust:signed

Once this is done, we can proceed with image signing.
cosign sign --key cosign.key guillermopal/contenttrust:signed

This command creates a new tag SHAxxx.sig in our OCI registry. You can verify that the name of the tag contains the digest of the image uploaded with the tag “signed.”
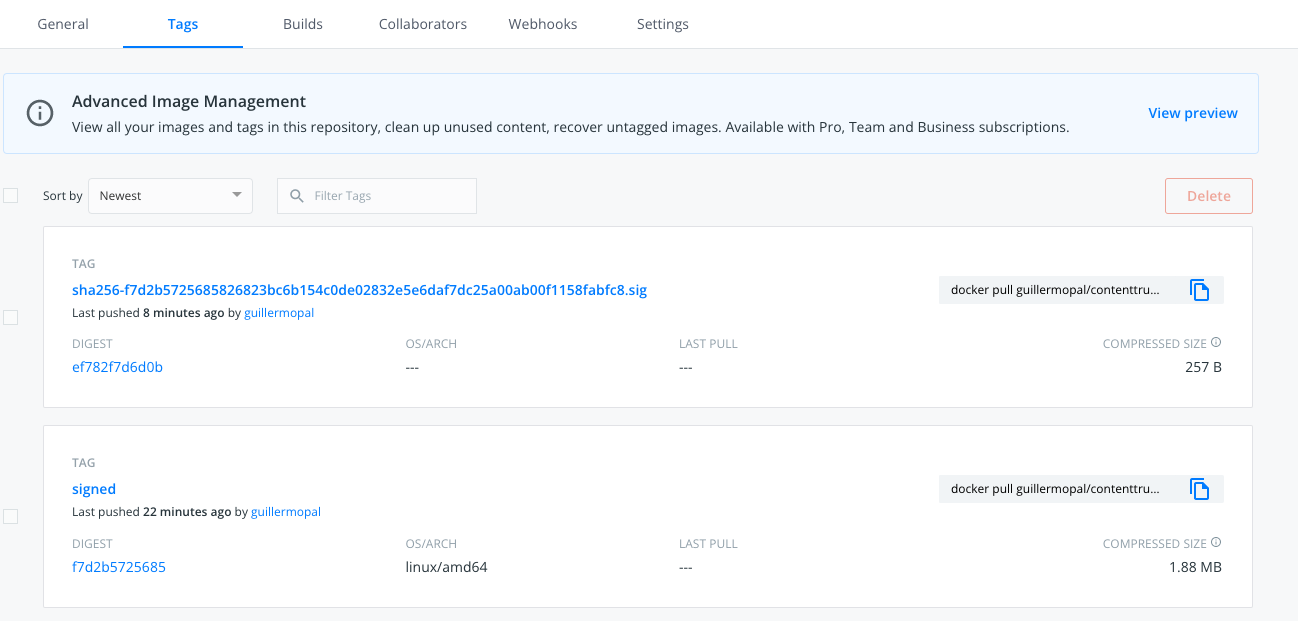
With these simple steps we have finished the process of signing an image, and the image sign is available in the same container registry as the image for verification.
Verify signature process
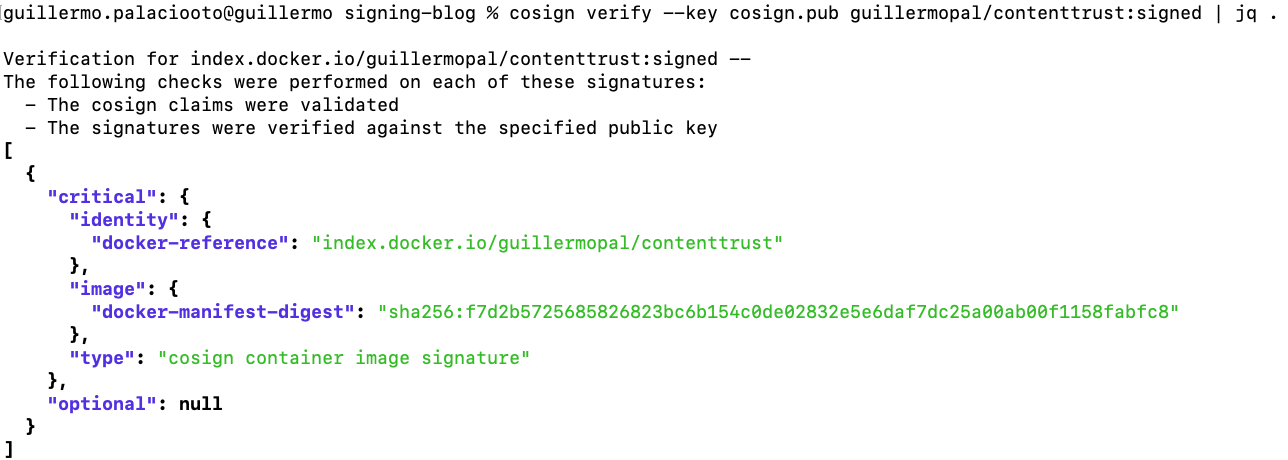
To run the verification of the signature against the signed image, we now use the public key cosign.pub. The output will look like this:
cosign verify --key cosign.pub guillermopal/contenttrust:signed | jq .
Troubleshooting container signing verification
If we try to verify a container without a signature, we expect an error (no_matching signatures), as the image has not been signed.
docker pull alpine:3.7
docker tag alpine guillermopal/contenttrust:unsigned
docker push guillermopal/contenttrust:unsigned
cosign verify --key cosign.pub guillermopal/contenttrust:unsigned

Additionally, if you try to verify an image that has been modified by uploading a different one, you will get an error as the sign is not dependent on the tag but on the image content.
docker tag alpine:3 guillermopal/contenttrust:signed
docker push guillermopal/contenttrust:signed
cosign verify --key cosign.pub guillermopal/contenttrust:signed

Nevertheless, it is important to use immutable tags so you can ensure you are always downloading the same image when using it. Mutating a tag might be useful for development purposes, but it can introduce risks when using it in production environments.
Signing the image will help us mitigate the problem, but using both strategies at the same time increases our security layers.
Signature verification statement
Signing an image is another security layer that can prevent supply chain attacks. Nevertheless, it’s not a magic wand that solves everything so we need to implement it properly.
A supply chain attack basically consists of an attacker getting access to the development pipelines where the final artifacts are built. Once they have access there, there’s nothing that prevents them from generating a malicious artifact and distributing it as a valid one. By including image signatures, we provided a way to verify the artifact to our clients.
It’s important that we keep this process out of the development pipeline to avoid it also being compromised. Development teams can generate artifacts that are later verified by security and then signed to warranty their quality.
Verify signatures in deployment with Cosign
After signing and uploading the image to the registry, the next step is deploying this signed image to Kubernetes. The idea of signed images is to verify, within the cluster, that only signed images can run into the cluster.
The first option to implement this is by using the Cosigned Admission Webhook.
To Install webhook, we first exported the key password into an environment variable to keep it secret. Then we can follow the instructions in the repository to install using the Helm package manager.
kubectl create namespace cosign-system
kubectl create secret generic mysecret -n cosign-system \
--from-file=cosign.pub=./cosign.pub \
--from-file=cosign.key=./cosign.key \
--from-literal=cosign.password=$COSIGN_PASSWORD
helm repo add sigstore https://sigstore.github.io/helm-charts
helm repo update

helm install cosigned -n cosign-system sigstore/cosigned --devel --set cosign.secretKeyRef.name=mysecret

After installing the webhook, we need to enable it in every namespace we want to be activated. To enable the feature, we just need to add the proper label to the target namespace.
kubectl label --overwrite namespace/testcontenttrust cosigned.sigstore.dev/include=true
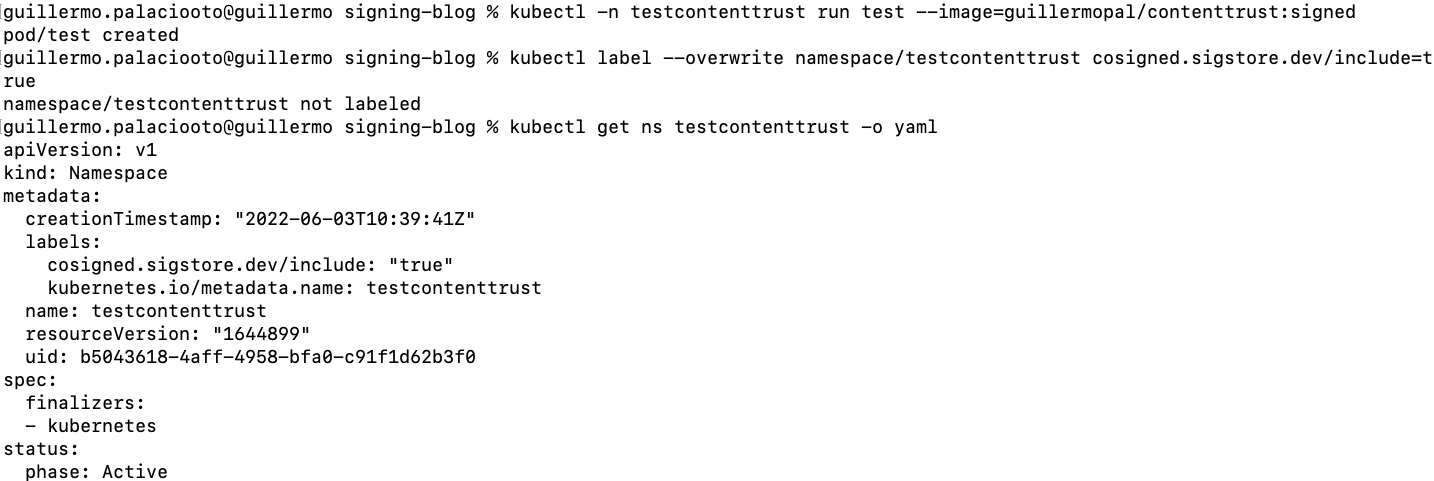
After doing so, the image is not able to run if it is not signed (validation failed: no matching signatures).
kubectl run test –-image=guillermopal/contenttrust:unsigned -n testcontenttrust

Let’s try to run the signed image now.
kubectl run test –-image=guillermopal/contenttrust:signed -n testcontenttrust

Nevertheless, this webhook does not provide the ability to block or notify and you need to provide key and password as parameters to it, which we would like to prevent and just provide the public key you want to verify against.
It is also remarkable that this webhook only allows you to verify one signature.
To solve this issue or if you need to extend this feature, we use Connaisseur.
Verify signatures in deployment with Connaisseur
As stated on their Github page, Connaisseur is an advanced admission controller we can use for advanced behaviors.
It’s a Kubernetes admission controller to integrate container image signature verification and trust pinning into a cluster.
With this admission controller, we can decide which namespaces are going to be analyzed and also change between Alerting Only or Blocking the deployments.
By default, Connaisseur is configured to verify the signature for the official docker hub images and the project ones. We will configure it to also verify the ones signed with our generated keys.
Installation process is similar to cosign:
git clone https://github.com/sse-secure-systems/connaisseur.git
cd connaisseur
helm install connaisseur helm --atomic --create-namespace --namespace connaisseur

As we can see, with the default configuration we are able to run official images from the docker hub but the ones signed by our internet authority are being rejected. In this case, the check is applied globally so there’s no need to annotate the namespace. We will run them on the default namespace to showcase (trust root “default” not configured for validator “default”).
kubectl run hello-world --image=docker.io/hello-world

kubectl run contenttrust --image=guillermopal/contenttrust:signed

If we want to run images signed with our previously generated cosign keys, we need to modify the connaisseur deployment.
Looking into the documentation, there’s a section where it is explained how to add your own public key. It’s as easy as going to the values.yaml file provided in the repo and modifying the default validator by adding our publicKey, changing the type to cosign and removing the host specification. The next picture shows an example of a modified file.
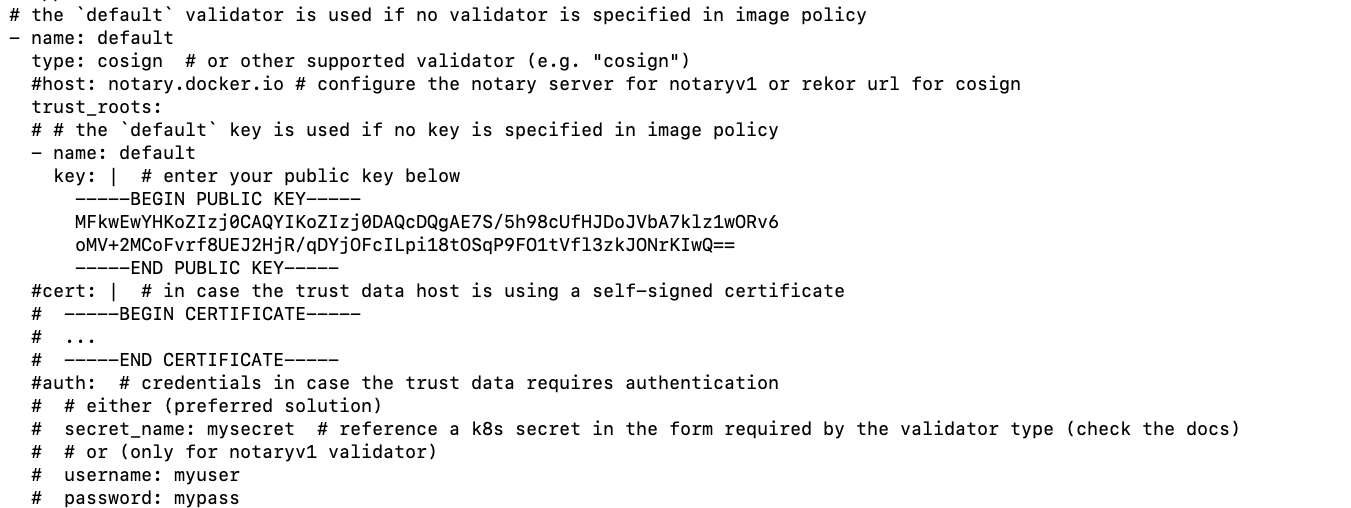
After that, deploy the chart with new values.
helm upgrade connaisseur helm --atomic --create-namespace --namespace connaisseur

And now you will be able to run your signed images:
kubectl run contenttrust --image=guillermopal/contenttrust:signed

In addition to this, we can even be more restrictive and deny the deployment of images signed in Docker Hub. To do so, we need to disable the preconfigured validators that came with connaisseur default values. Just go to the helm/values.yaml file and comment with the dockerhub-basics validator.
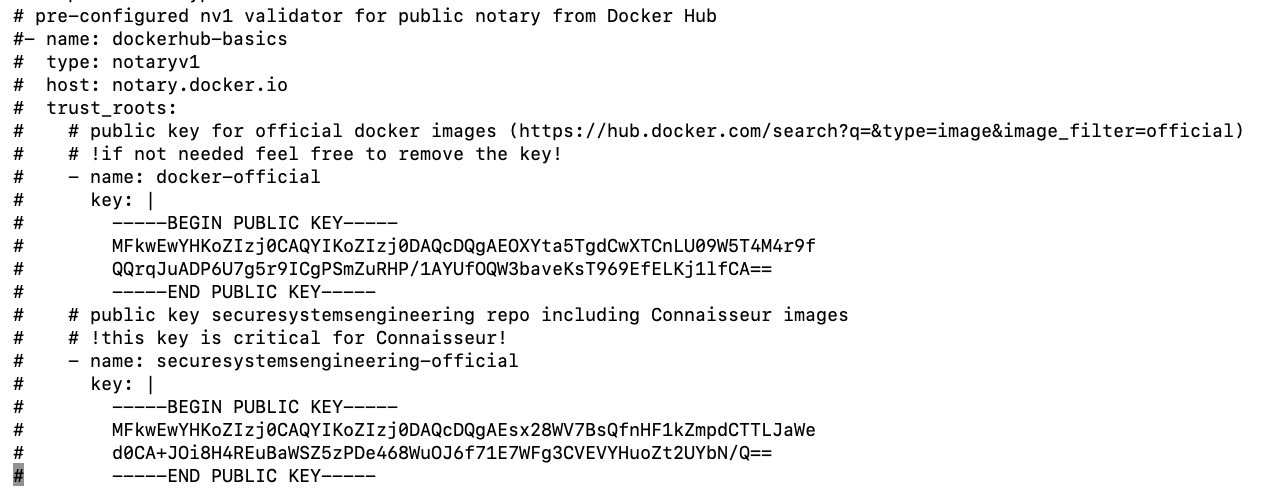
After deploying this modified version, you will no longer be able to deploy Docker Hub signed images (Unable to find validator configuration dockerhub-basics).

kubectl run hello-world --image=docker.io/hello-world

As we can see in the example above, it’s easy to incorporate image signing to our software lifecycle so we can ensure trust in our whole pipeline.
Conclusion
Using Cosign allows us to easily deploy a system where no external services are needed and we can set our first level of trust. Cosign, along with Connaisseur, ensures that images running in our Kubernetes clusters have been verified.
Moving to a production environment, we would probably start with just the detection policy and alerting by using the alert feature so we do not block deployments. Once the company is ready for blocking we can easily change and enforce the policy.
We hope that you now know how to implement a secure Kubernetes deployment step-by-step, and all the applications involved in signature verification.
Manage the alerts and incidents with Sysdig
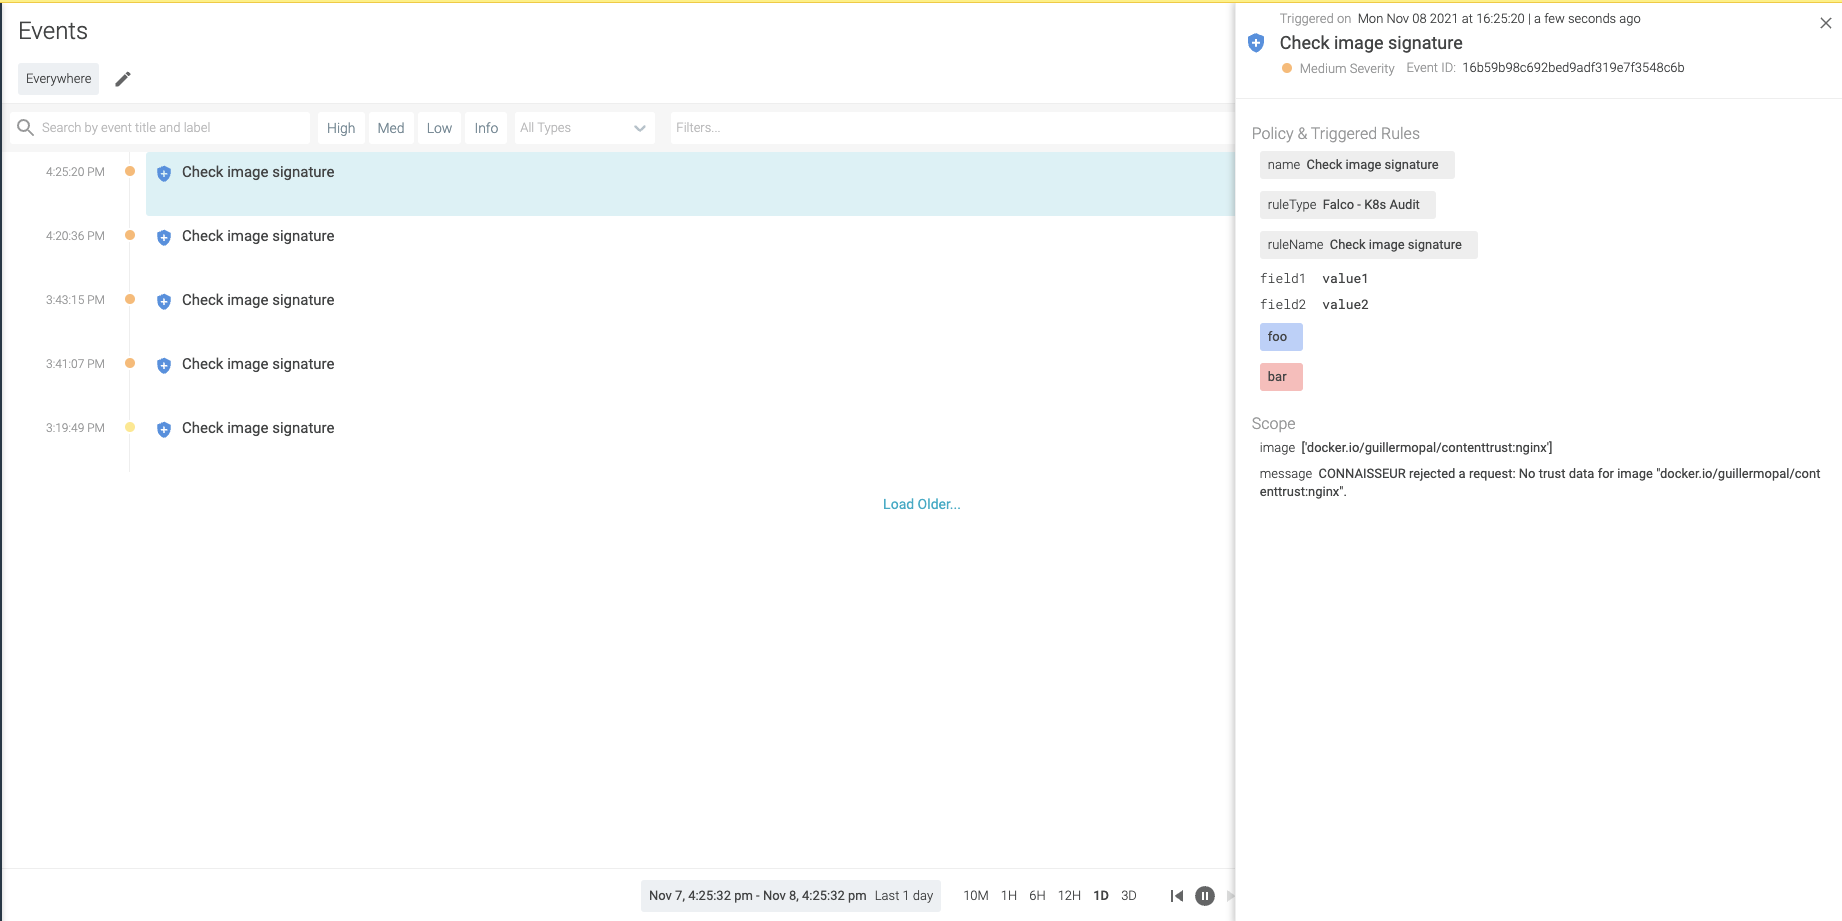
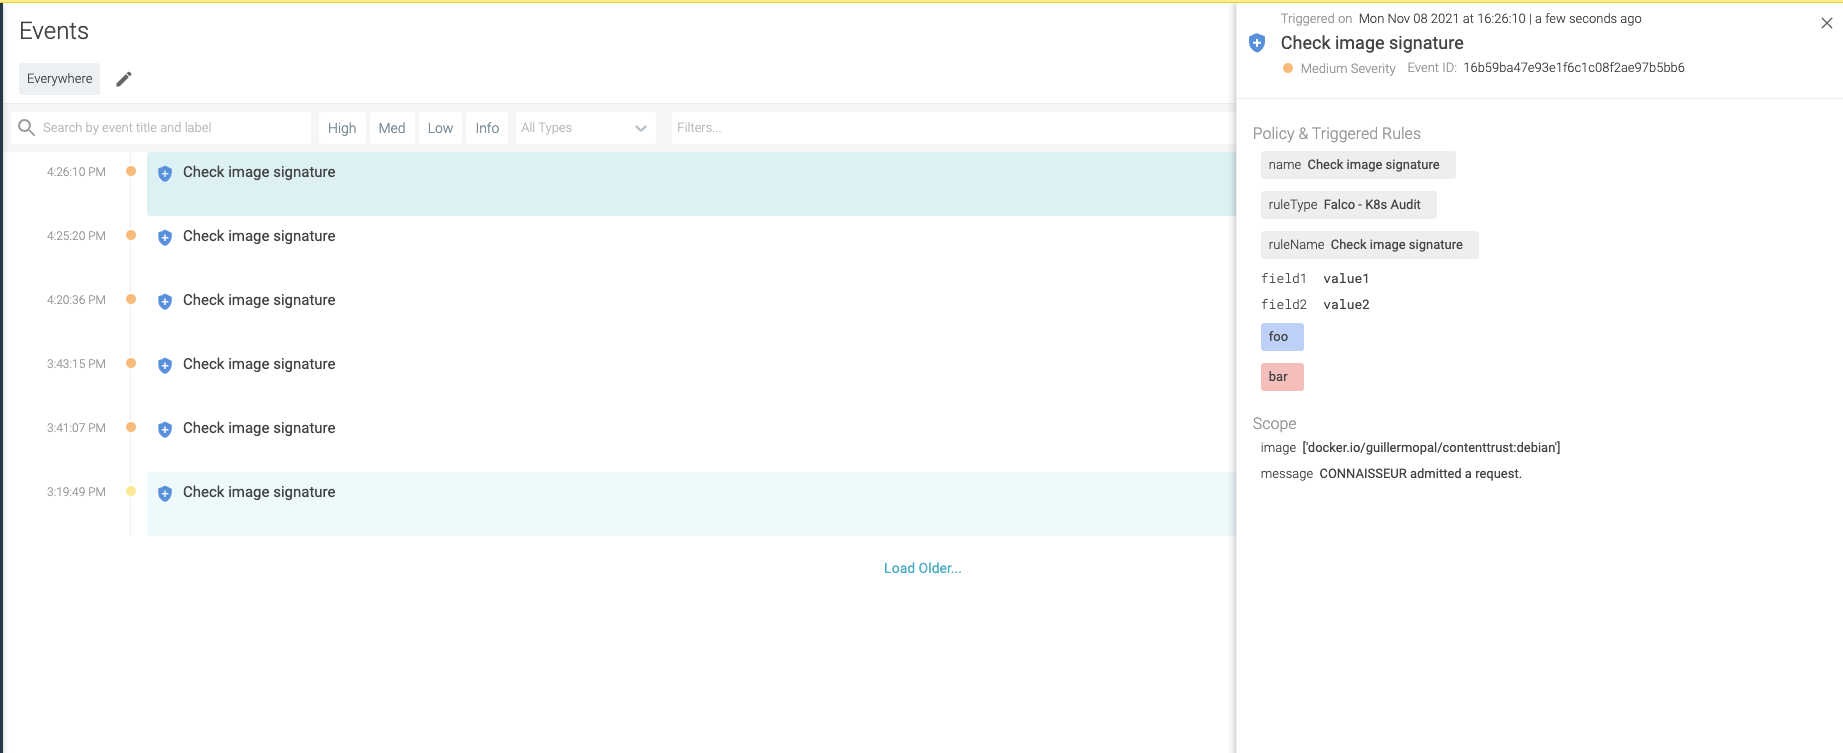
For alerting to third-party applications, we just need to modify helm values as defined in the documentation. Eventually, if you would like to know how to easily implement the alerts from your Kubernetes cluster with Sysdig, follow the next steps:
Create a sysdig.json file template on $connaisseur_home/helm/alert_payload_templates:
{
    "events": [
        {
            "timestamp": " {{ timestamp }}",
            "rule": "Check image signature",
            "priority": " {{priority}}",
            "output": "{{ alert_message }} for Image {{ images }}",
            "source": "Connaisseur AC",
            "tags": [
                "foo",
                "bar"
            ],
            "output_fields": {
                "field1": "value1",
                "field2": "value2"
            }
        }
    ],
    "labels": {
        "image": "{{ images }}",
        "message": "{{ alert_message }}"
    }
}
Modify values.yaml to look similar to:
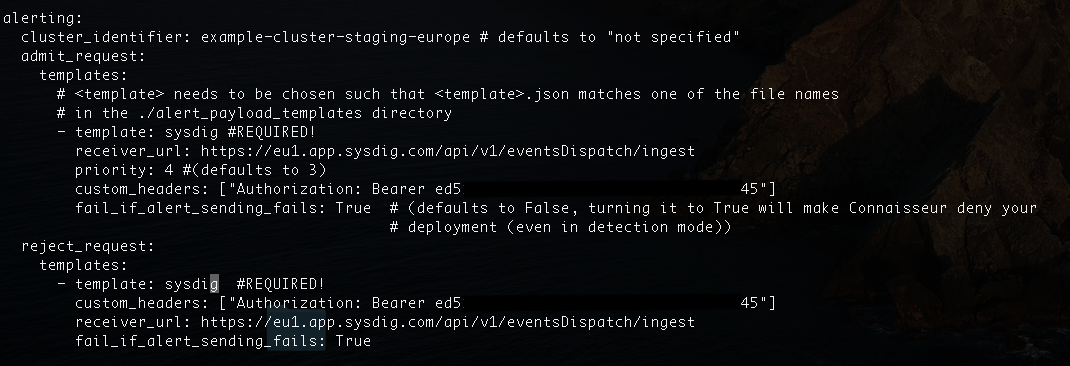
Authorization token can be retrieved from the profile setting in Sysdig Secure. In every request, there will be an automatically generated event.
Admit Request
Reject request
