


Falco Feeds extends the power of Falco by giving open source-focused companies access to expert-written rules that are continuously updated as new threats are discovered.

A Denial-of-Service (DoS) is an attack meant to shut down a machine or network, making it inaccessible to its intended users, so dos Kubernetes is a potential target.
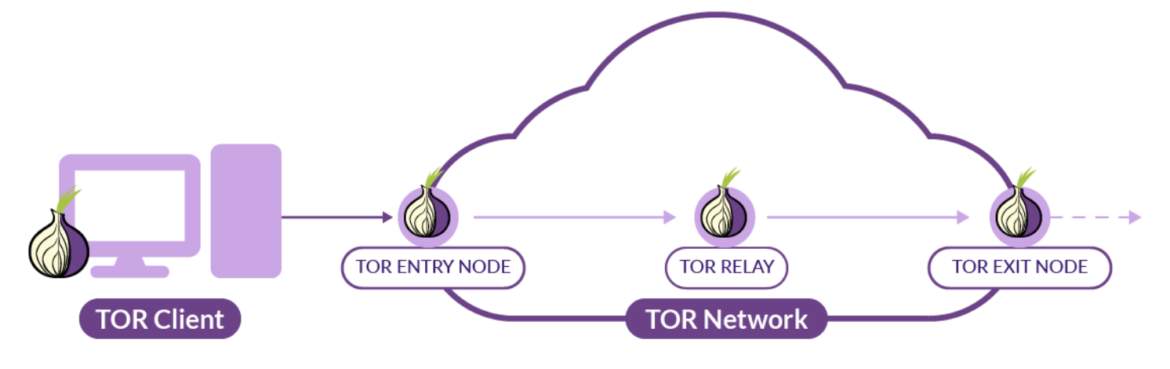
In the case of Distributed Denial-of-Service (DDoS), the attacker will look to maintain some form of anonymity so their activities cannot be traced. They can route traffic through Tor and VPN infrastructure to scan, attack, or compromise the target, while maintaining anonymous communications.
Keep reading for everything you need to know about preventing DoS Kubernetes, and how to use cloud-native tools such as Calico to prevent it or Falco to detect it.
First steps in DoS attacks in Kubernetes
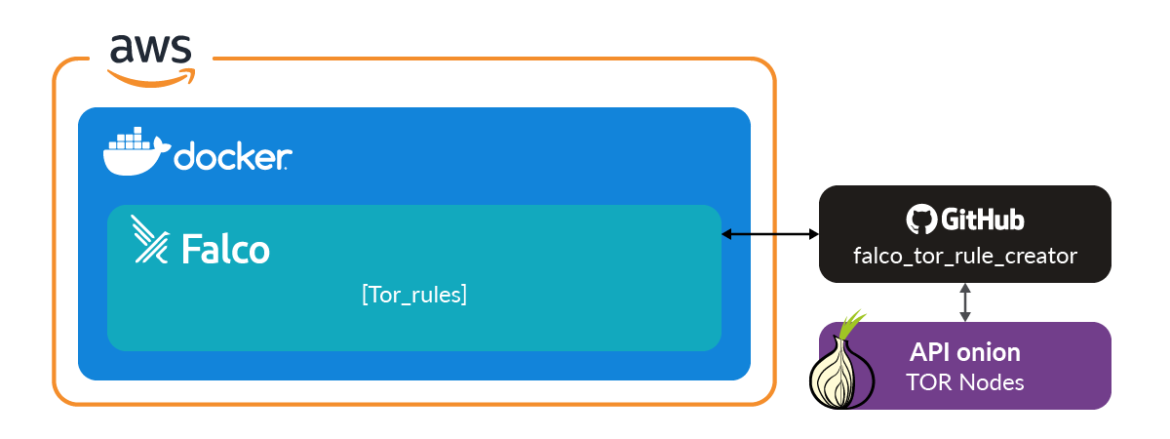
The first idea could be to alert us when requests to our Kubernetes cluster come from an untrusted network. Open source Falco can detect connections made to these relay nodes. Intrusion Detection System (IDS) is a great start, as administrators are notified of the patterns and behaviors associated with a potential DoS Kubernetes incident. We can make use of TorProxy as a simple container to relay traffic through the Tor network for detection purposes. When a container is run, it initiates a connection to the TOR network.
This means we will not need to configure a system to use the proxy to test our Falco rule. It should alert as soon as the container starts.
Run torproxy:
Check the output of Falco:
The output should look something like this:
Warning Detected connection to known Tor Node from pod or host. tor res=-115(EINPROGRESS)
This is a good starting point. It proves that Falco will detect the inbound connection from the Tor network, however, it will NOT block those connections that produce a DoS Kubernetes attack.
That's why it's worth considering a different approach from ingress threats to your cluster environment, while ensuring unwanted lateral movement is prevented within your Kubernetes environment. We will explore how Kubernetes NetworkPolicies work as a kind of virtual firewall with Intrusion Prevention System (IPS) capabilities, which could prevent a DoS in Kubernetes.
Container Network Interface plugins
We can mitigate the risk of DoS attempts in Kubernetes by use of the Container Network Interface (CNI) plugin.
CNI is a Cloud Native Computing Foundation project, and it consists of a specification and libraries for writing plugins to configure network interfaces in Linux containers, along with a number of plugins. CNI concerns itself only with network connectivity of containers and removing allocated resources when the container is deleted. However, the rules that eventually decide which packets to 'DROP' or 'ACCEPT' are defined in the NetworkPolicy plugin.
Kubernetes allows for a variety of open source networking plugins, not limited to the following examples. Depending on your environment, some plugins may or may not be supported:
- Cilium
- Flannel
- Weavenet
- Calico
In this blog post, we will utilize Project Calico as our CNI of choice with Calico also running for policy enforcement.
By default, Kubernetes provides a basic networking plugin – kubenet, and a limited-scope network policy plugin. While these two plugins allow us to secure our cluster connections, they are not intended for protection against DoS attacks.
Unlike the default NetworkPolicy offered in Kubernetes, Calico users can create a single GlobalNetworkPolicy that extends to workloads running in multiple namespaces (whether they are present or not). This is ideal when preventing a DoS attack on potentially multiple network namespaces. As a result, we are using Calico CNI and its NetworkPolicy implementation to provide explicit 'Accept' and 'Drop' Actions across our clusters and hosts.
When you define DoS mitigation rules in Calico network policy, Calico enforces them as efficiently as possible to minimize the impact. We will guide you through installing Calico in a test lab environment, and provide sample policies to prevent a DoS Kubernetes attack via lateral movement.
Building a Cloud-Native Lab
It wouldn't make sense to casually change your CNI plugins within a Staged or Production environment. We're creating a Linux container threat detection lab to limit the blast radius.
If you would like to test Calico in a sandboxed environment, you can run either MiniKube or MicroK8s on your local machine. In our case, we used KinD to create the Kubernetes lab.
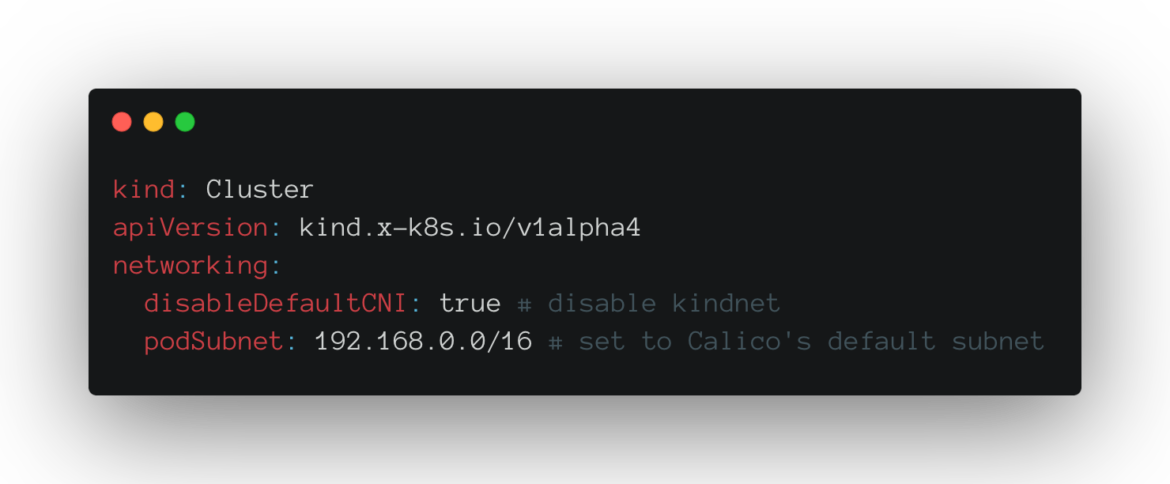
KinD offers a lot of customization, so we could freely install alternative networking components like Calico for CNI and network policies instead of relying on the built-in one:
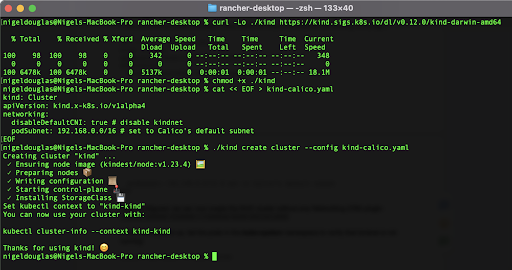
We then proceed to create a simple YAML file which explicitly disables the existing CNI plugin:
Once configured, we can now create the KinD cluster without any Networking (CNI) plugin:
Once the cluster is up, check pods in kube-system namespace to verify kindnet was removed:
kindnet should be missing from the list of pods.
Note: The coredns pods are in the pending state. This is expected! Without a CNI plugin, CoreDNS should not be functioning.
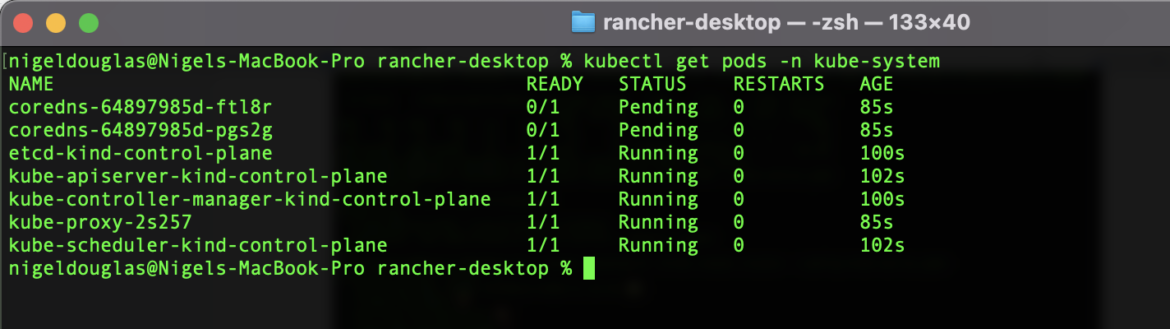
Those pods will remain in the pending state until a CNI plugin is installed.
Install Calico
- Install the Calico Operator. This creates the Custom Resource Definitions (CRDs) for Calico:
kubectl create -f https://raw.githubusercontent.com/projectcalico/calico/v3.24.0/manifests/tigera-operator.yaml - Install the remaining custom resources required for Calico to work in your cluster:
kubectl create -f https://raw.githubusercontent.com/projectcalico/calico/v3.24.0/manifests/custom-resources.yaml
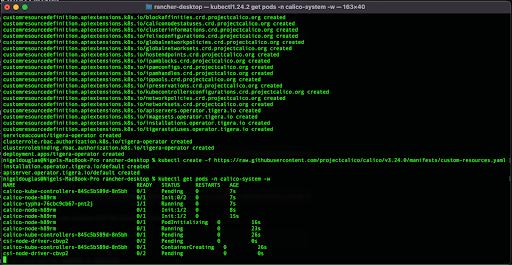
Confirm that all of the pods are running in the 'calico-system' namespace.

Wait until each pod has the STATUS of Running.
As expected, those coredns pods are now in a Running state after the CNI install.
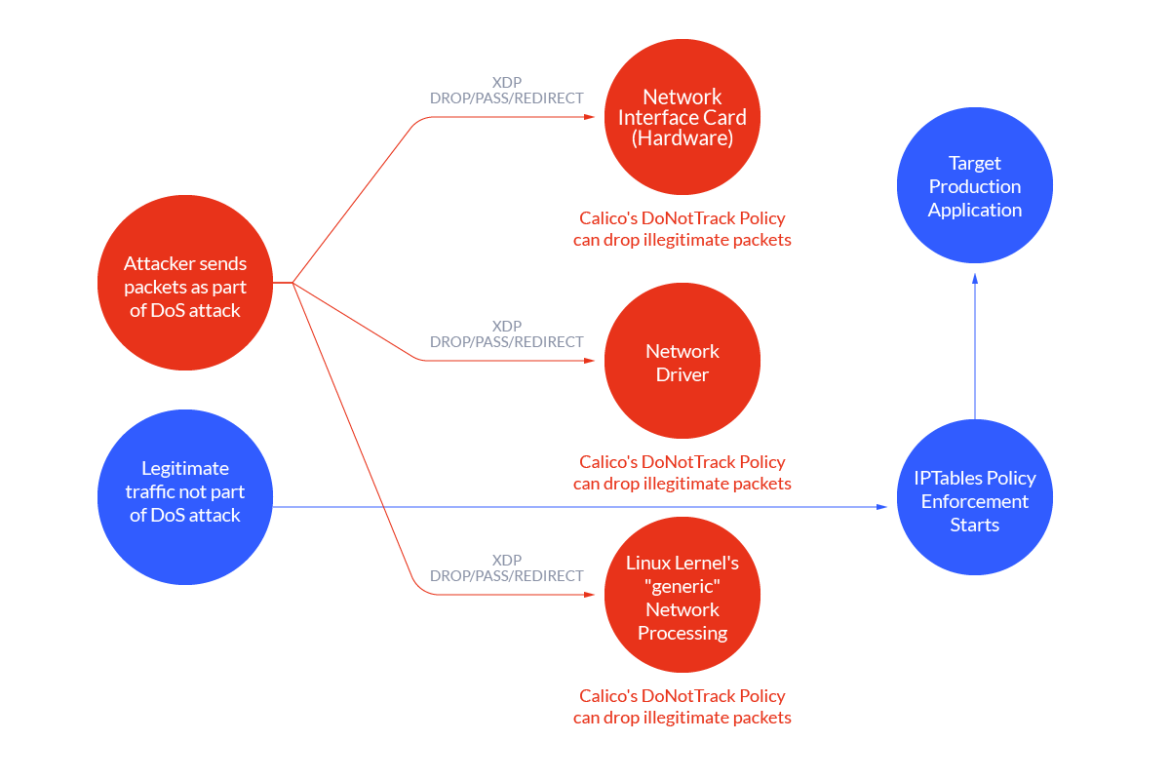
Using Calico for XDP
That said, the earliest point in the packet processing pipeline that packets can be dropped depends on the Linux kernel version and the capabilities of the NIC driver and NIC hardware. Thankfully, Calico automatically uses the fastest available option.
In this blog post, we will define DoS mitigation rules within our Calico policies to quickly drop connections when under attack. Calico allows us to utilize extended Berkeley Packet Filter (eBPF) and eXpress Data Path (XDP), including hardware offload when available.
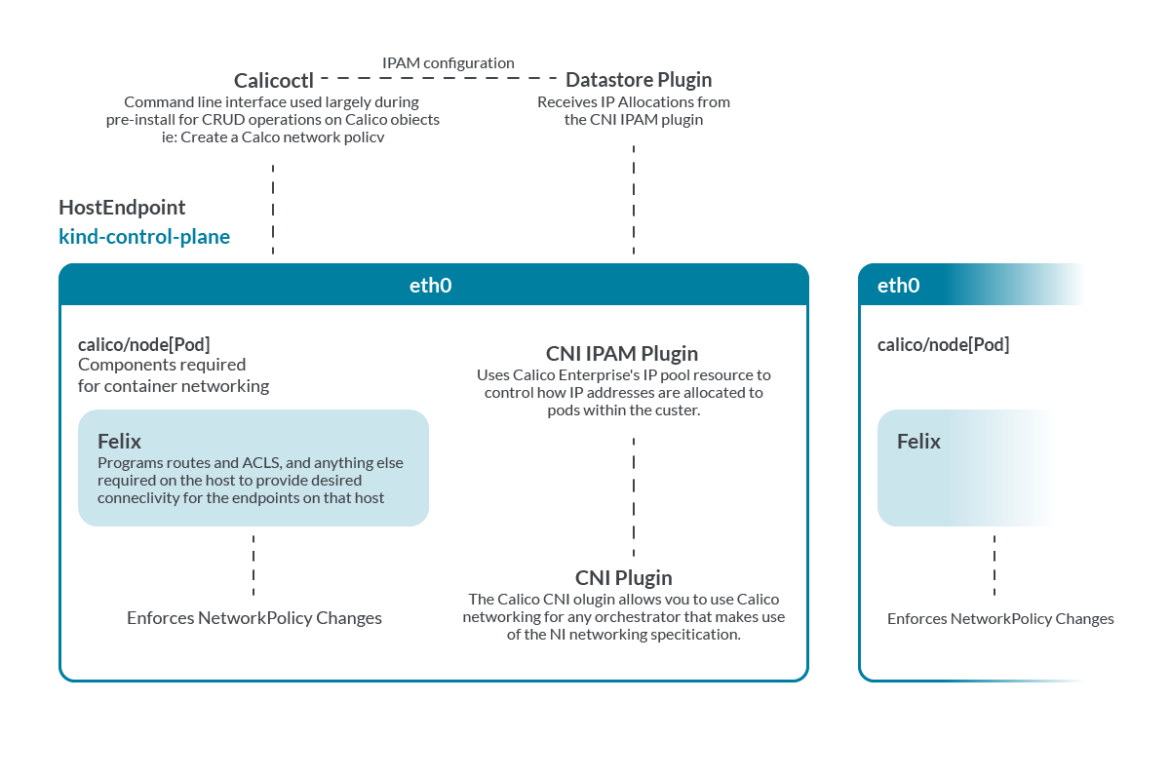
Since no prior configuration is in place, a best practice here is to proactively build a HostEndpoint resource for identifying traffic that enters or leaves the cluster, a GlobalNetworkPolicy to enforce rules on what traffic can enter/leave the host endpoint, and a GlobalNetworkSet to define unwanted external networks that could be communicating with our Kubernetes cluster.
Before we do any of this, it's good to describe the below custom resources:
- HostEndpoints: A host endpoint resource represents one or more real or virtual interfaces attached to a host that is running Calico. It enforces Calico policy on the traffic that is entering or leaving the host's default network namespace through those interfaces. This allows us to provide declarative, cloud native detection and response at the host-level.
- GlobalNetworkPolicy: A global network policy resource represents an ordered set of rules which are applied to a collection of endpoints that match a label selector. Unlike Kubernetes Network Policies, which are only scoped per network namespace, GlobalNetworkPolicy applies to workload endpoint resources in all namespaces, and to host endpoint resources.
Note: GlobalNetworkPolicy is not limited to Linux container threat detection.
In our case, we can use it to secure the Linux host communications, so as to offer extended Kubernetes threat detection.
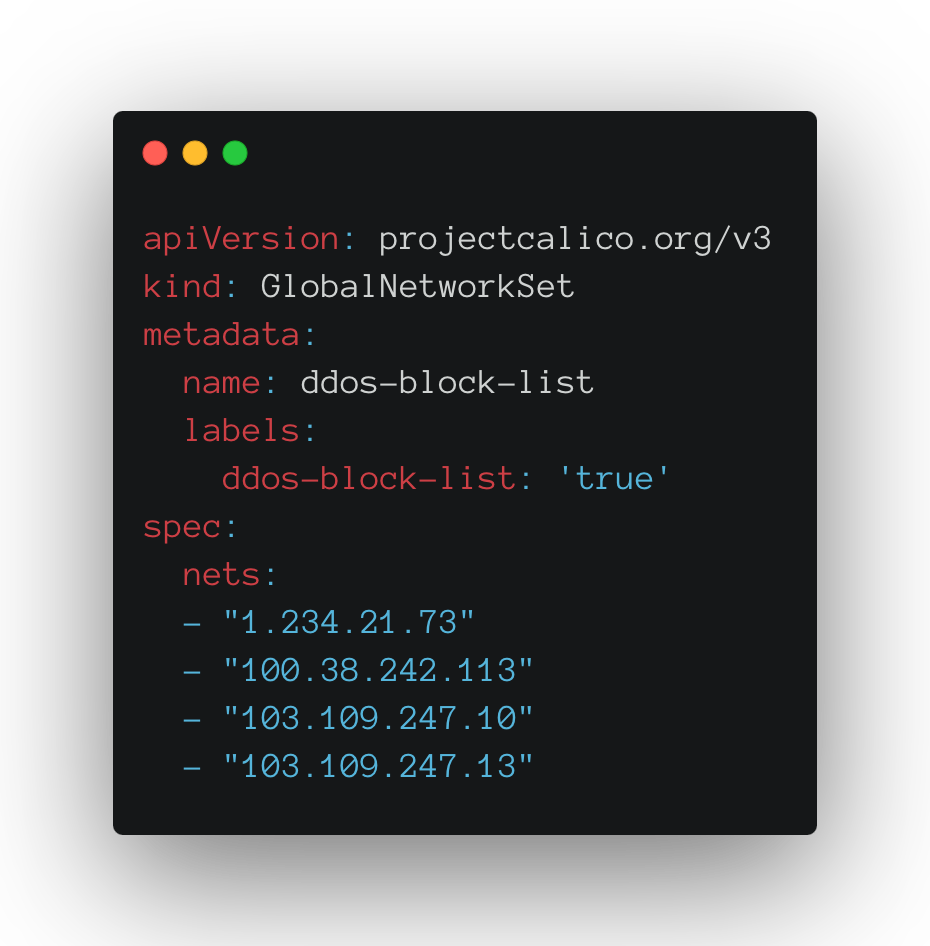
- GlobalNetworkSet: A global network set resource represents an arbitrary set of IP subnetworks/CIDRs, allowing it to be matched by Calico policy. Network sets are useful for applying policy to traffic coming from (or going to) external, non-Calico, networks. In the event of a DoS attack, you can quickly respond by just adding the CIDRs that you want to deny-list to the global network set. We will use GlobalNetworkSets to subscribe to C2 botnet blocklists and Tor Infrastructure in order to limit the blast radius associated with anonymization attacks.
1. HostEndpoint resource
First, you create the HostEndpoint resource corresponding to the network interfaces where you want to enforce DoS mitigation rules. In the following example, the HostEndpoint secures the network interface named 'eth0' with IP '172.18.0.2' on node 'kind-control-plane':
HostEndpoint is labeled as apply-dos-mitigation: "true"
Recap: spec for HostEndpoints:
- interfaceName: Either * or the name of the specific interface on which to apply policy.
A host endpoint with interfaceName: * represents all of a host's real or virtual interfaces.
Or, leave the interfaceName empty and include one of the interface's IPs in expectedIPs. - node: Name of the node where the HostEndpoint resides (as seen in the below image).
- expectedIPs: The expected IP addresses associated with the interface of the host/node.
2. GlobalNetworkSet resource
Create a Calico GlobalNetworkSet, listing the IP CIDR ranges to deny. We can reference known bad IPs associated with Command & Control (C2) servers, and then block via NetworkPolicy.
An example of a free, threat intelligence feed in FeodoTracker by Abuse.ch.
This feed is updated daily.
From a DDoS perspective, we can block Tor communications, as this is a popular anonymization network on the internet. Add IPs from the list to a NetworkSet for policy to block.
However, it's impossible to completely de-anonymize the attacker. Thus, Tor bulk exit feed came into existence to track all the Tor exit IPs over the internet to identify attackers using the Tor infrastructure.
Using Falco to detect anomalous behavior
Tor Bulk Exit feed lists available Tor exit nodes on the internet that are used by the Tor network. The feed is updated bi-monthly, which means network security teams only need to make changes to the NetworkSet a few times per year to detect them early in the enumeration phase.
Alerting on unwanted DNS traffic
It's also worth mentioning that we are monitoring and planning to prevent connections from being established to a TOR network IP address. However, Falco can also notify admins when a connection is attempted to an unexpected Fully Qualified Domain Name (FQDN).
In the example below, we have defined a list of trusted domain names (sysdig.com, github.com, and google.com). A network connection to an IP address that isn't resolved by any of these domain names will trigger the policy.
These new filterchecks allow specifying a domain name and Sysdig will resolve the IP address, intelligently maintaining the IP addresses it resolves to.
This means we can now easily pass Falco domain names and alert on unwarranted connections to external services without solely relying on the management of unreliably resolving the IP addresses of networks (like the above NetworkSets) and keeping them up to date. In the case of Tor, this is okay, as we only have to update the feed every other month. But in the case of regularly updated IP feeds for Malware C2 servers, NetworkSets can become hard to manage.
An alternative free to access feed is URLHaus by Abuse.ch. We can explicitly list these URLs as bad domain in our Falco rules, similar to the above allow list for FQDN.
3. GlobalNetworkPolicy resource
Finally, create a Calico GlobalNetworkPolicy, adding the GlobalNetworkSet label (dos-deny-list in the previous step) as a selector to deny ingress traffic. To more quickly enforce the denial of forward traffic to the host at the packet level, use the doNotTrack and applyOnForward options.
The Calico global network policy option, doNotTrack: true, indicates to apply rules in the policy before connection tracking, and that packets allowed by these rules should not be tracked.
Finally, add an applyOnForward: true expression for a doNotTrack policy to work. When set to false on policies that select HEPs, the policies are applied only to traffic that originates or terminates on the host:
The GlobalNetworkPolicy is denying traffic from source using the label dos-deny-list: "true". This allows the policy to be applied early in the Linux packet processing pipeline, before any regular network policy rules, and independent of the policy order field. To recap on the doNotTrack policy, the Ingress rules will apply to all incoming traffic through our host endpoint, regardless of where the traffic is going.
It's worth noting that Egress rules apply only to traffic that is sent from the host endpoint, so this will not apply to local workloads such as pods.
Utilizing eBPF in Falco and Calico
Falco has also adapted the agent to take advantage of eBPF, a core part of the Linux kernel.
That means Falco should also be able to monitor kernel-space events, not just the activity in userland. If Calico drops packets via XDP, we should be able to observe low volume data, such as the number of system calls handled via these eBPF programs.
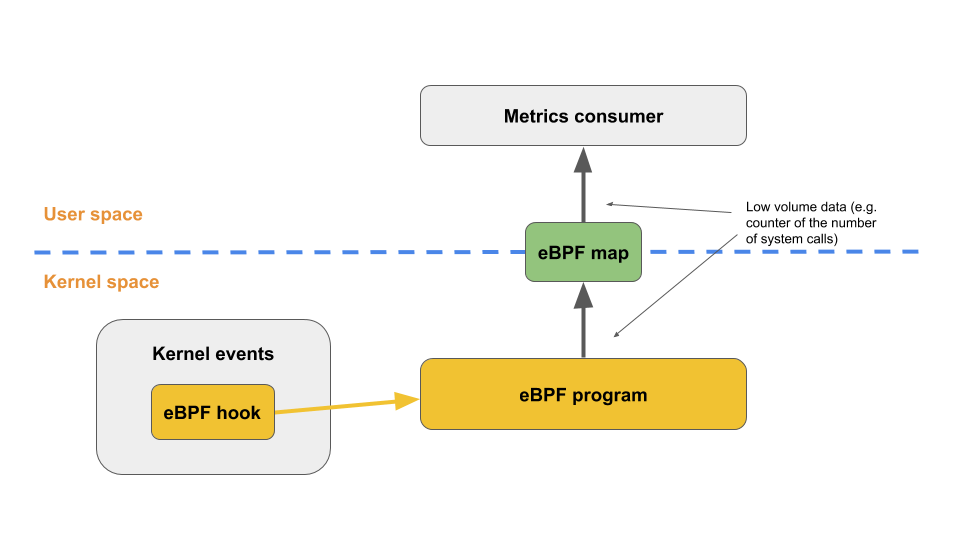
The eBPF programs can be run at various points of execution in the kernel by attaching them to static tracepoints, dynamic Kernel and User probes, and many other hooking points, which is ideal for observability and tracing.
In case of XDP in Calico networking, BPF programs can be updated atomically without having to restart the kernel, system services, or containers, and without traffic interruptions. Furthermore, any program state can also be maintained throughout updates via BPF maps, which ensures stability and less system downtime for updates/restarts.
Conclusion DoS Kubernetes
eXpress Data Path (XDP) makes it possible to perform high-speed packet processing within BPF applications. By enabling faster responses to network operations, XDP runs a BPF program as soon as possible, usually as soon as a packet is received by the network interface. This way, an XDP program can perform XDP_DROP with the packets it receives once it is connected to a network interface. If you are unfamiliar with XDP_DROP, this operation drops and does not process the packet, preventing the Linux kernel from being flooded.
eBPF programs can analyze traffic patterns and use filters to update the XDP application in real time to drop specific types of packets (for example, malicious ddos traffic).
Therefore, we still want to keep track of networking connections originated from Pods. Unfortunately, with Calico's Network Policies, it's hard to easily confirm which Pod tried to open a connection to the internal or external resource.
Because Falco is behavioral monitoring with a syntax that leverages system calls, you can write a rule for just about anything: opening a file, becoming root, or making a network connection. If we know what ports and protocols are Kubernetes workloads are supposed to be communicating over (ie Elasticsearch outbound TCP traffic over port ..), we can therefore create Falco rules to alert on any unexpected lateral movement via port numbers that deviate from the expected ports/protocols of an application, here an example taken from the Falco docs page:
Projects such as Falco and Calico are individually good in building a strong security posture.
Falco detects the signs of compromise in a cloud-native environment, but cannot prevent the DoS attack at the network layer. Similarly, Project Calico can drop the malicious packets at the earliest point in the packet processing pipeline via NetworkPolicies for host interfaces, but cannot provide the forensics required for an active incident response approach.
For a complete security solution to dos Kubernetes, we will have to use both open source tools.
Sysdig believes that an open source foundation is critical to a solid Cloud Detection & Response (CDR) foundation.
For a true CDR solution that scans and blocks malicious images in your CI/CD pipeline, can provide the forensic logs required for regulatory compliance reporting, and has the network visibility to prevent potential DoS incidents in the future, try a Sysdig Secure free trial today.