


Falco Feeds extends the power of Falco by giving open source-focused companies access to expert-written rules that are continuously updated as new threats are discovered.

The privilege escalation category inside MITRE ATT&CK covers quite a few techniques an adversary can use to escalate privileges inside a system. Familiarizing yourself with these techniques will help secure your infrastructure.
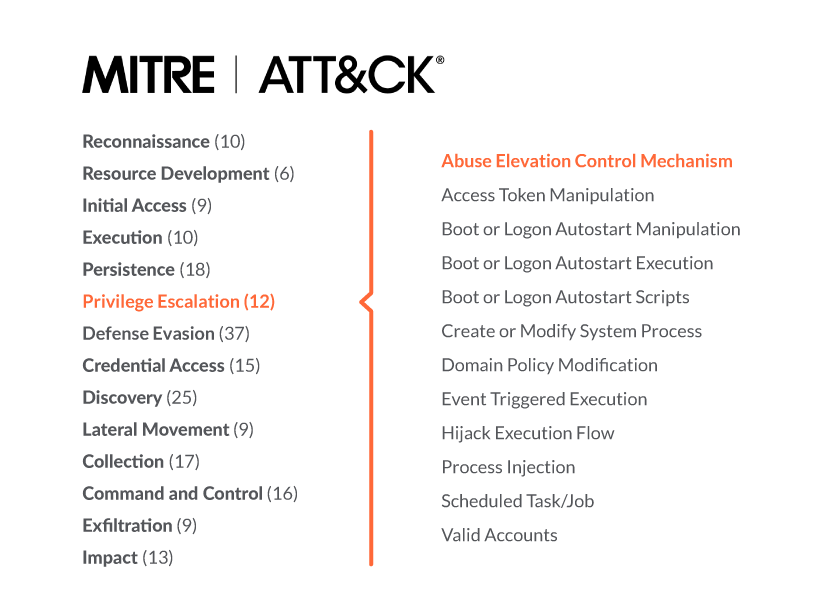
MITRE ATT&CK is a comprehensive knowledge base that analyzes all of the tactics, techniques, and procedures (TTPs) that advanced threat actors could possibly use in their attacks. Rather than a compliance standard, it is a framework that serves as a foundation for threat models and methodologies. These techniques are grouped into 14 categories.
In this article, we will walk through a few techniques that can be classified as MITRE privilege escalation. We'll also provide examples of how an open-source tool like Falco can help you detect these container security attacks.
Looking for a commercial offering? If so, check out Sysdig Secure, which provides image scanning, compliance runtime security, and incident response for containers and Kubernetes. Start a free 30-day trial here!
Why privilege escalation is important
Privilege escalation attacks leverage security issues to allow users to gain more permissions and a higher level of access to systems.
These types of flaws are valuable for attackers because they are needed for full exploit chains, but can be overlooked by defenders or developers because of their lower severity scores.
It is common to think that security flaws are present where there aren't enough security technology and mechanisms in place. However, one of the main vectors to reach the privilege escalation is via misconfigurations applied within the hosts.
It's very common that while a host is being set up, or while a new software is installed, operators leave open permissions. So, it's easy to forget to turn them back once the installation is done.
Another example would be during an incident. In order to fix the situation as soon as possible, high privileges might be granted but not reset once finished.
The conclusion is that your security tool shouldn't limit itself to detect abnormal behavior. You can prevent attacks from happening in the first place by checking for those misconfigurations. For example, using versatile security tools that can detect a wide range of situations, like Falco, or following image scanning best practices.
MITRE category: Privilege escalation
The privilege escalation category contains 12 techniques an attacker may use to gain more permissions, as part of a full chain exploit.
For example, abuse elevation control mechanism, boot or logon autostart execution, create or modify system process, or hijack execution flow.
In this post, we are going to cover some of the most famous techniques under the abuse elevation control mechanism.
This is how attackers escalate their permissions to further hurt your infrastructure.Learn about privilege escalation in MITRE ATT&CK, and how to protect yourself with Falco. Click to tweet
Abuse elevation control mechanism
Adversaries may circumvent mechanisms that control elevated privileges to gain higher-level permissions.
In this section, we are going to see three of these techniques:
- SUID and SGID
- Sudo and sudo catching
- World-writable file permissions
Most modern systems contain native elevation control mechanisms that are intended to limit the privileges that a user can perform on a machine. However, users' actions and configuration of the system may alter the system state, introducing weak points. We'll see how weak points can benefit an attacker, and we'll identify the insights that will help us detect them.
SUID and SGID
We recently covered SUID and the GUID in our "Detecting MITRE ATT&CK: Defense evasion" article.
In Linux, some of the existing binaries and commands can be used by non-root users to escalate root access privileges if the SUID and SGID bit is enabled. There are some famous Linux / Unix executable commands that can allow privilege escalation: bash, cat, cp, echo, find, less, more, nano, and vim, among others.
Same behavior is present in files or directories. By changing the SUID and SGID bit in a file or directory, other users can run them using the same access permissions of the owner of the file (i.e., root), enabling a regular user to edit the password file which is owned by the system admin.
Once attackers get local access to a host, they will most likely start by checking for privileges misconfiguration in files, using them to modify files and escalate their privileges. For an adversary, it is possible to find all files and binaries with the SUID bit set by using the following command:
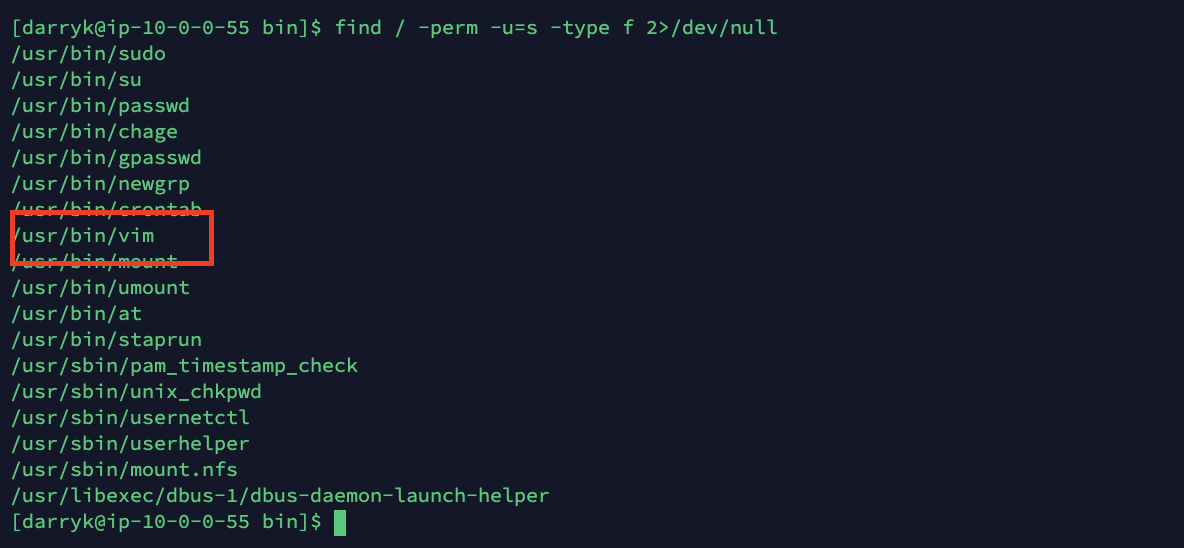
In this case, the binary /usr/bin/vim has the SUID set.
Since vim is an editor, the user can use the editor as root which makes it possible for an attacker to edit files and add a new user, root2.
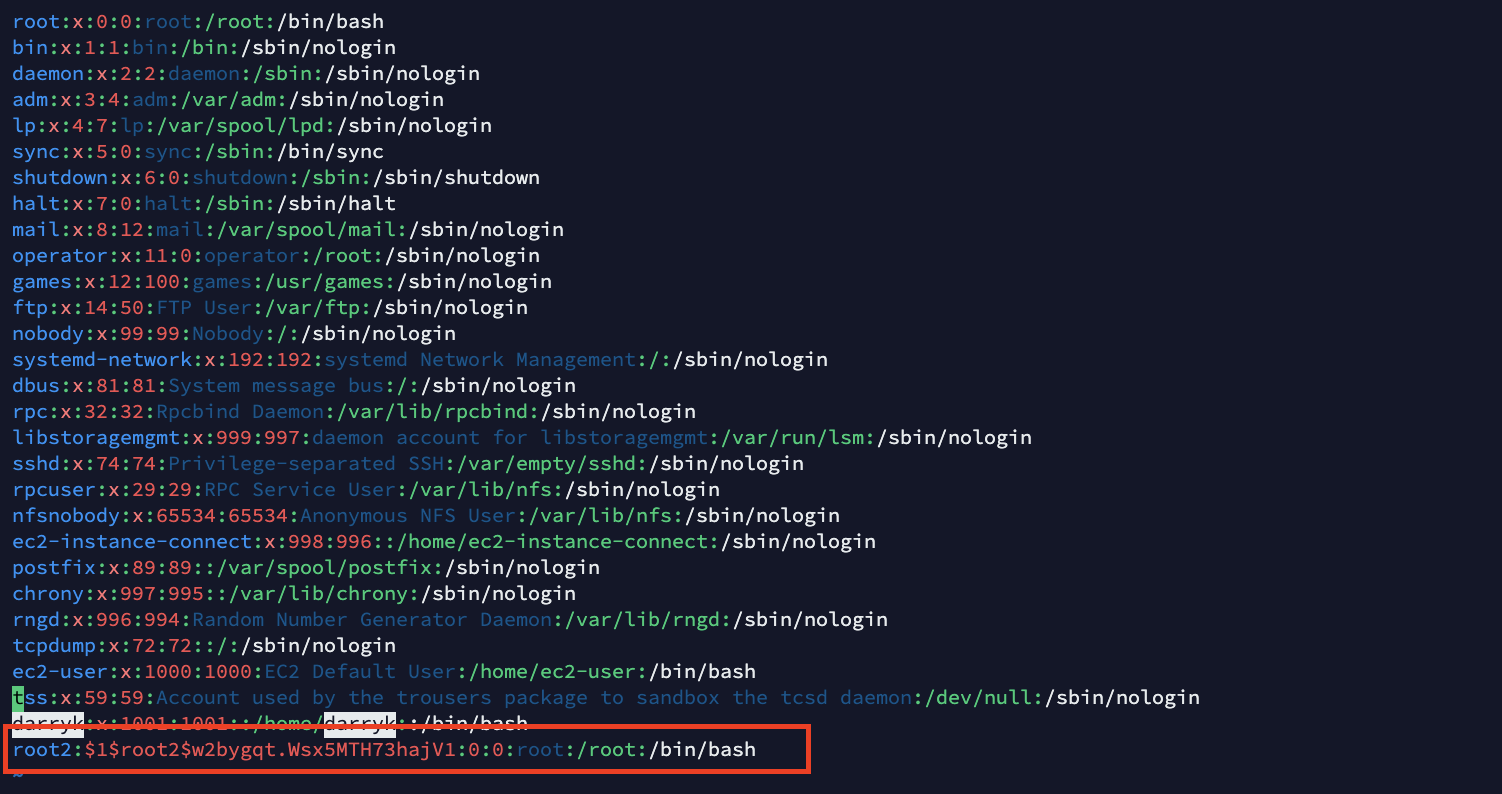
Once the file is saved, the attacker can login with the new user and get root access in the machine.

Sudo and sudo caching – Creating a local user with a duplicated user ID
In Linux, it is possible to create multiple users with the same userID since Unix systems and Linux generally do nothing to prohibit duplicates in the /etc/passwd. The intent of this file is to map symbolic usernames to the real userID and specify what shell a user will get when they login.
Users with permissions to create new users on the system have permissions to create a duplicate root user by re-using the root userID. If they login as this clone user, they would be effectively acting as root.
In case such a user is hacked, an attacker would be able to use this route to escalate the privileges on the system.
To start evaluating what the unprivileged user can do in the system, the attacker starts checking for special privileges with sudo -l. As shown in the screen below, the user has special privileges on the binary adduser.

In this case, the user is able to execute adduser as root, by using sudo, and add a new local user. Using specific flags, though, it is possible to create a user with the same root user ID and escalate the privileges:

The flag -u 0 sets the userID to 0, which is the default root userID.
With -o we allow to create a new user with a duplicated userID.
Once logged in with the password set for the bob user, we obtain root privileges access in the machine right away. We can check this with whoami.
World-writable file permissions
In Linux, a file "world-writable" is a file which everyone can write.
This configuration might be used when there is the need to give special permissions to files or folders to an unprivileged user who might need to make some changes within the system.
In being writable by anyone, giving this permission away might be really dangerous, especially for files that are owned by root. And world-writable files are even more dangerous when they are scripts that might be executed by root manually, or automatically via crontab jobs.
Once attackers get local access to the host, they can check privilege misconfigurations in files in hopes of using them to modify files and escalate their privileges.
For an adversary, it is possible to find all writable files and folders in the system with find:

Looking at the result, the local user has writable access to the automatedCleaner.py file owned by root. From the name, it's possible to understand that it is a scheduled script to keep the /tmp/ folder clean.

Since the user has writable access to the file, it's possible for an attacker to edit it.
One way to exploit this script would be by adding the compromised user to the sudoers users, allowing it to use the sudo tool to run code as root. This would be as simple as adding a line to the /etc/sudoers file:
When the script is executed as root from the crontab scheduler, the new line will be added to the sudoers file.
By using sudo -l we can see when this happens. Once the user is in sudoers, they'll be allowed to execute the sudo command and check its privileges.
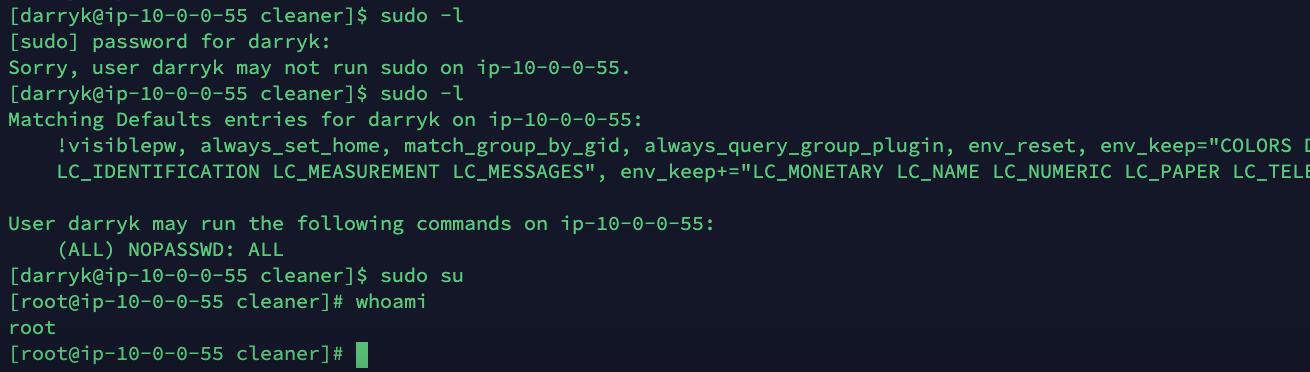
Now, the attacker is able to escalate privileges on the machine using sudo su.
Detecting MITRE privilege escalations techniques with Falco
Now that we know what threats we are facing, we can start defending against them.
Falco is the CNCF open-source project for runtime threat detection for containers and Kubernetes. It is a container security tool designed to detect anomalous activity in your containers. Falco taps into system calls to generate an event stream of all system activity. Falco's rules engine then allows you to create rules based on this event stream, allowing you to alert on system events that seem abnormal. Falco's rich language lets you write rules at the host level and identify suspicious activity.
Let's follow up on our previous examples and see how you can detect defense evasion with Falco.
Detecting SUID and SGID
The following Falco rule would detect changes on the SUID and GUID bits. We covered this recently in our defense evasion article, so we invite you to check the detailed explanation there.
Detecting sudo and sudo caching – Creating a local user with a duplicated user ID
When we introduced this attack, we saw how the attacker can exploit adduser to create a new user with the same userID as root.
The following Falco rule can detect the execution of adduser or useradd with particular flags, like -o or -u 0:
Detecting world-writable file permissions
As we saw before, world-writable files can be used to escalate the privileges inside the host.
The following Falco rule will detect a privileged user changing the permissions on files or folders in a way that would give writable access to anyone:
Conclusion
In this article, we presented ways to escalate privileges inside a linux machine, and how Falco can detect those malicious behaviours.
Additional, well-known techniques are available in the wild, and more will come in the future.
Relying on syscalls and low level events to detect intrusions and malicious activity, Falco permits us to create powerful detection rules to help security teams be fully aware of what is going on in their hosts.
Falco has become the defacto standard for runtime container security. It relies on syscalls and K8s audit logs to detect intrusions and malicious activity. By mapping Falco rules to the MITRE ATT&CK Defense Evasion category, security teams can streamline their threat detection and response workflows.
If you would like to find out more about Falco:
- Get started in Falco.org.
- Check out the Falco project in GitHub.
- Get involved with the Falco community.
- Meet the maintainers on the Falco Slack.
- Follow @falco_org on Twitter.
Looking for a commercial offering? If so, check out Sysdig Secure, which provides image scanning, compliance runtime security, and incident response for containers and Kubernetes. Start a free 30-day trial here!