12 container image scanning best practices
One of the main challenges your teams face is how to manage container security risk without slowing down application delivery. A way to address this early is by adopting a Secure DevOps workflow.
Secure DevOps, also known as DevSecOps, brings security and monitoring throughout the application lifecycle from development through production. This sets you up to deliver applications that are secure, stable, and high performance. This workflow plugs into your existing tool chain and provides a single source of truth across DevOps, developer, and security teams to maximize efficiency.
Image scanning is a key function to embed into your Secure DevOps workflow. As one of your first lines of defense, it can also help you detect and block vulnerabilities before they are exploited.
Fortunately, image scanning is easy to implement and automate. In this article, we will cover many image scanning best practices and tips that will help you adopt an effective container image scanning strategy.


What you'll learn
- What is container image scanning?
- 1: Bake image scanning into your CI/CD pipelines
- 2: Adopt inline scanning to keep control of your privacy
- 3: Perform image scanning at registries
- 4: Leverage Kubernetes admission controllers
- 5: Pin your image versions
- 6: Scan for OS vulnerabilities
- 7: Make use of distroless images
- 8: Scan for vulnerabilities in third-party libraries
- 9: Optimize layer ordering
- 10: Scan for misconfigurations in your Dockerfile
- 11: Flag vulnerabilities quickly across Kubernetes deployments
- 12: Choose a SaaS-based scanning solution
- Conclusion

What is container image scanning?
Image scanning refers to the process of analyzing the contents and the build process of a container image in order to detect security issues, vulnerabilities or bad practices.
Tools typically gather Common Vulnerabilities and Exposures (CVEs) information from multiple feeds (NVD, Alpine, Canonical, etc.) to check if images are vulnerable. Some also provide out-of-the-box scanning rules to look for the most common security issues and bad practices.
Image scanning can be easily integrated into several steps of your secure DevOps workflow. For example, you could integrate it in a CI/CD pipeline to block vulnerabilities from ever reaching a registry, in a registry to protect from vulnerabilities in third-party images, or at runtime to protect from newly discovered CVEs.
When automated and following the best practices, image scanning ensures your teams are not slowed down from deploying applications.
Let's deep dive into the 12 image scanning best practices you can implement today.
1: Bake image scanning into your CI/CD pipelines
When building container images, you should be extra careful and scan them before publishing.
You can leverage the CI/CD pipelines you are already building for your DevOps workflow and add one extra step to perform image scanning.
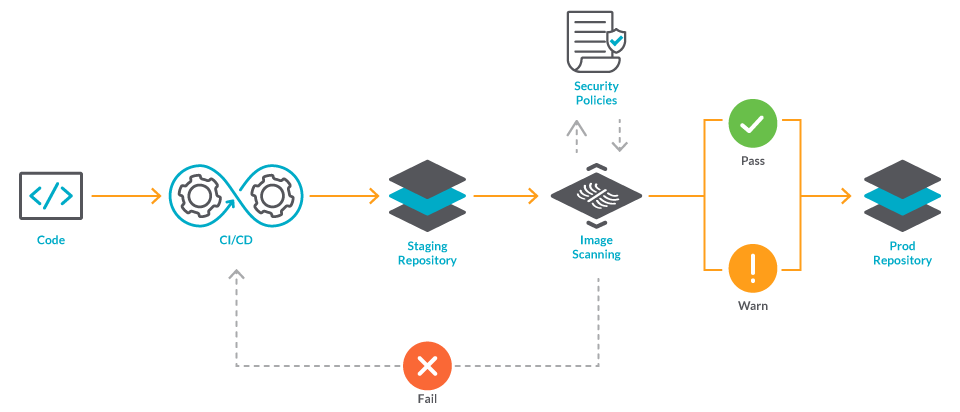
Once your code is tested and built, instead of pushing the images to the production repository, you can push images to a staging repository. Then, you can run your image scanning tool. These tools usually return a report listing the different issues found, assigning different severities to each one. In your CI/CD pipeline you can check these image scanning results and fail the build if there is any critical issue.
Keep in mind, automation is key. This is a core concept for DevOps, right? The same applies to securing DevOps.
By automating security into your CI/CD pipelines, you can catch vulnerabilities before they enter your registry without giving people the chance to be affected by these issues, or the issues to reach production.
2: Adopt inline scanning to keep control of your privacy
In the previous step we saw how image scanning in a CI/CD pipeline traditionally involves a staging registry. But what if your image contains some credentials by mistake? They could reach the wrong hands and end up being leaked.
Going a step further, you can implement inline image scanning, scanning your images directly from your CI/CD pipeline without needing that staging repository.
With inline image scanning, only the scan metadata is sent to your scanning tool, helping you keep control of your privacy.

We've prepared some guides on how to implement inline image scanning with the most common CI/CD tools, like Gitlab, Github Actions, AWS Codepipeline, Azure Pipelines, CircleCI, Jenkins, Atlassian Bamboo, and Tekton.
3: Perform image scanning at registries
When you start implementing image scanning, you should include it with your registry as one of the first steps.

All of the images you deploy will be pulled from a registry. By scanning images there, you at least know that they have been scanned before running.
4: Leverage Kubernetes admission controllers
Even if you block your vulnerable images in your CI/CD pipelines, nothing is stopping them from being deployed in production. And also, even if they are scanned at a registry, who blocks the images from external developers?
Ideally, you would like Kubernetes to check the images before scheduling them, blocking unscanned or vulnerable images from being deployed onto the cluster.
You can leverage admission controllers to implement this policy.
Kubernetes admission controllers are a powerful Kubernetes-native feature that helps you define and customize what is allowed to run on your cluster. An admission controller intercepts and processes requests to the Kubernetes API after the request is authenticated and authorized, but prior to the persistence of the object.
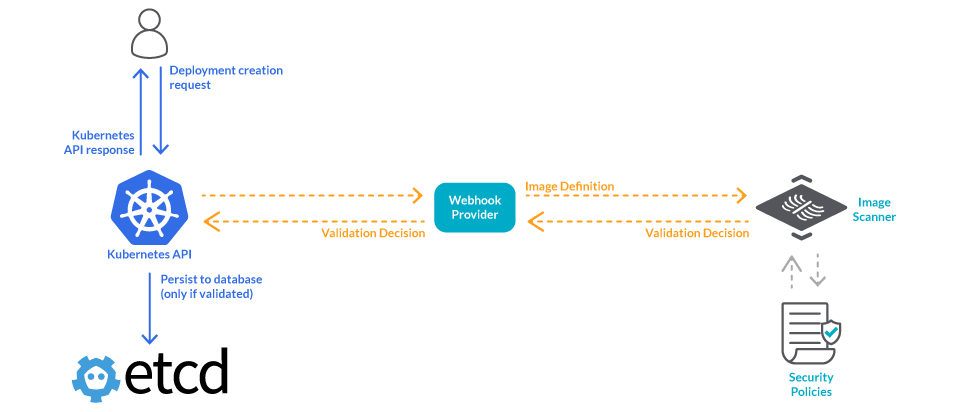
Scanning tools usually offer a validating webhook that can trigger an image scanning on demand and then return a validation decision.
An admission controller can call this webhook before scheduling an image. The security validation decision returned by the webhook will be propagated back to the API server, which will reply to the original requester and only persist the object in the etcd database if the image passed the checks.
However, the decision is made by the image scanner without any context on what is happening in the cluster. You could improve this solution by using OPA.
Open Policy Agent (OPA) is an Open-Source and general purpose policy engine that uses a high level declarative language called rego. One of the key ideas behind OPA is decoupling decision-making from policy enforcement.
With OPA, you can make the admission decision in the Kubernetes cluster instead of the image scanner. This way, you can use cluster information in the decision making, like namespaces, pod metadata, etc. An example would be having one policy for the "dev" namespace with more permissive rules, and then another very restrictive policy for "production".
5: Pin your image versions
Sometimes, the image you scan is not the same one you deploy in your Kubernetes cluster. This can happen when you use mutable tags, like "latest" or "staging". Such tags are constantly updated with newer versions, making it hard to know if the latest scan results are still valid.

Using mutable tags can cause containers with different versions to be deployed from the same image. Beyond the security concerns from the scan results, this can cause problems that are difficult to debug.
For example, instead of using ubuntu:focal, you should enforce the use of immutable tags like ubuntu:focal-20200423when possible.
Keep in mind that version tags (for some images) tend to be updated with minor, non-breaking changes. So, although it looks a bit verbose, the only option to ensure repeatability is using the actual image id:
ubuntu:@sha256:d5a6519d9f048100123c568eb83f7ef5bfcad69b01424f420f17c932b00dea76
You might be starting to think that this is an issue that goes beyond image scanning best practices. And you would be right — you need a set of Dockerfile best practices. This not only affects the FROM command in Dockerfiles, but also Kubernetes deployment files and pretty much everywhere you put image names.
What can you do from an image scanning perspective?
You can enforce this policy via the combination of a Kubernetes admission controller, your image scanner, and the OPA Engine, the system described in the previous point.
6: Scan for OS vulnerabilities
As a general image scanning best practice, keep this thought in mind: "The lighter the image, the better". A lighter image means faster builds, faster scans, and fewer dependencies with potential vulnerabilities.
New Docker images are usually built off of, or adding a layer over, an existing base image. This base image is defined by the FROM statement in the image Dockerfile. The result is a layered architecture design that saves a lot of time in the most common tasks. For example, when it comes to image scanning, you only need to scan a base image once. If a parent image is vulnerable, any other images built on top of that one will be vulnerable too.
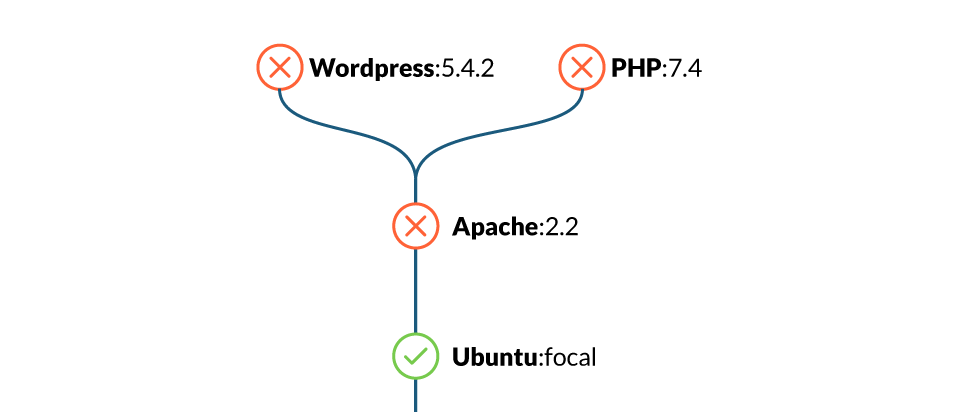
Even if you didn't introduce a new vulnerability in your image, it will be susceptible to those in the base image.
That's why your scanning tool should actively track vulnerability feeds for known vulnerable images and notify you if you're using one of those.
7: Make use of distroless images
Introducing distroless images, base images that don't contain package managers, shells, or any other programs you would expect to find in a standard Linux distribution. Distroless images allow you to package only your application and its dependencies in a lightweight container image.
Restricting what's in your runtime container to precisely what's necessary minimizes the attack surface. It also improves the signal to noise of scanners (e.g., CVE) and reduces the burden of establishing provenance to just what you need.
Belows example shows the Dockerfile for a go "Hello world" app, running on Ubuntu vs. distroless.
FROM ubuntu:focal
COPY main /
ENTRYPOINT ["/main"]
After scanning it, we found 24 OS vulnerabilities, in which two of them are of Medium severity. Also, image size is rather big for such a simple app, 77.98MB.
Now, the same app based on a distroless image:
FROM gcr.io/distroless/static-debian10
COPY main /
ENTRYPOINT ["/main"]

Now, we only found two negligible severity OS vulnerabilities. Also, the image size was reduced to only 6.93MB, which is more appropriate for this app.
This shows that the distroless container didn't have any unnecessary packages that could lead to more vulnerabilities, and thus exploits, being identified.
8: Scan for vulnerabilities in third-party libraries
Applications use a lot of libraries, so much that those end up providing more lines of code than the actual code your team writes. This means you need to be aware not only of the vulnerabilities in your code, but also the ones in all of its dependencies.
Luckily, those vulnerabilities are well tracked in the same vulnerability feeds that your scanner uses to warn you about OS vulnerabilities. Not all tools go as deep as to scan the libraries in your images, so make sure your image scanner digs deep enough and warns you about those vulnerabilities.
9: Optimize layer ordering
You can further optimize your images if you're careful with the RUN commands in the Dockerfile. The order of RUN commands can have a big impact on the final image, as it dictates the order of the layers that conform the image.
You can optimize the Docker cache usage by placing bigger layers (usually invariant) first, and the most variable files (i.e., your compiled application) at the end. This will favor reusing existing layers, accelerating building the image, and indirectly speeding up the image scanning as well.
10: Scan for misconfigurations in your Dockerfile
As we've just seen, the Docker image building process follows instructions from a manifest, the Dockerfile.
There are several Dockerfile best practices you can follow to detect common security misconfigurations:
- Running as a privileged (root) user, with access to more resources than needed.
- Exposing insecure ports, like the ssh port 22 that shouldn't be open on containers.
- Including private files accidentally via a bad "COPY" or "ADD" command.
- Including (leaking) secrets or credentials instead of injecting them via environment variables or mounts. It's also a good practice to allow users to pass options to the Entrypoint and CMD, like in this java example.
- Many other things defined by your specific policies, such as blocked software packages, allowed base images, whether a SUID file has been added, etc.
In a Dockerfile like this one:
FROM ubuntu:focal-20200423
USER root
RUN curl http://my.service/?auth=ABD54F0356FA0054
EXPOSE 80/tcp
EXPOSE 22/tcp
ENTRYPOINT ["/main"]
Our image scanning could automatically detect several issues:
USER root
We are running as root.
EXPOSE 22/tcp
Here, we are exposing the port 22, which is commonly used for ssh, a tool no container should include. We are also exposing the port 80, but that should be fine, as is the common port for HTTP servers.
RUN curl http://my.service/?auth=ABD54F0356FA005432D45D0056AF5400
This command uses an auth key that anyone could use to cause us some harm. We should be using some kind of variable instead. Keys like this could be detected using regular expressions, not only on the Dockerfile, but also in any file present in the image. As an extra measure, you could also check for file names that are known to store credentials.
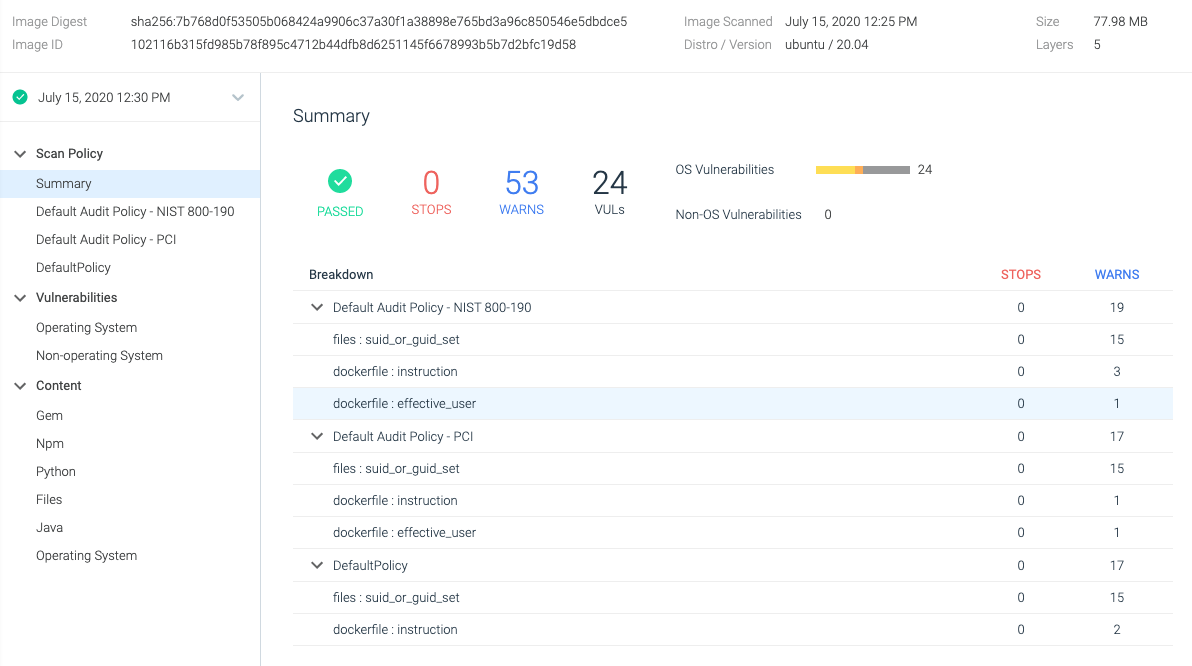
These are a lot of things to keep in mind, and that can be overwhelming. Fortunately, most of these best practices are covered by security standards like NIST or PCI, and many image scanning tools provide out-of-the-box policies that have been mapped to specific compliance controls.
11: Flag vulnerabilities quickly across Kubernetes deployments
An image that passed a scan is not completely secure. Imagine that you scan and deploy an image, and right after doing so a new vulnerability is found in it. Or suppose that you strengthen your security policies at a given moment, but what happens with those images that are already running?

It's an image scanning best practice to continuously scan your images to:
- Detect new vulnerabilities and adapt to your policy changes.
- Report those findings to the appropriate teams so they can fix the images as soon as possible.
Of course, implementing runtime scanning can help you mitigate the effect of those vulnerabilities. Let's take CVE-2019-14287 as an example; you could easily write some Falco rules to detect if that vulnerability is being exploited. However, having to write specific rules for each vulnerability is a time consuming effort and should be used as a last line of defense.
So, about continuously scanning the images that are running in your cluster.
Security tools use different strategies to archive this, the simplest one being to rescan all images every few hours. Ideally, you want to rescan affected images as soon as the vulnerability feeds are updated. Also, some tools are able to store the image metadata, and can detect new vulnerabilities without the need of a full rescan.
Then, once a vulnerability is found in a running container, you should fix it as soon as possible. The key here is having an effective reporting of vulnerabilities, so each person can focus on the relevant information for them.
One way to achieve this is with a queryable vulnerability database that allows DevOps and security teams to put some order in their vast catalog of images, packages, and CVEs. They will want to search for parameters like the CVE age, whether there is a fix available, software version, etc. Finally, it's useful if these reports can be downloaded and shared (PDF/CSV) with vulnerability management teams, CISO's, etc.
Let's illustrate this with an example. Imagine a query like the following: Show me all the vulnerabilities in prod namespace where the severity is greater than high, the CVE > 30 days old, and a fix is available.

With such vulnerability reporting capabilities, teams can easily identify the vulnerable images they can actually fix and start working on solutions before vulnerabilities can be exploited.
12: Choose a SaaS-based scanning solution
Choosing a SaaS-based scanning service over an on-prem solution has many benefits:
On-demand and scalable resources: You can start with scanning a few images at first and grow as your container applications scale; without worrying about backend data management.
Fast implementation: You can embed scanning into your CI/CD pipelines and get up and running in minutes, unlike on-premises applications that require more time to install and setup.
Easy upgrades and maintenance: The SaaS provider handles patches and rolls out new feature updates that don't require you to manually upgrade.
No infrastructure or staff costs: You avoid paying for in-house hardware and software licenses with perpetual ownership. You also don't need on-site to maintain and support the application.
Conclusion
Image scanning is the first line of defense in your Secure DevOps workflow. By automating it, you can maximize its potential and detect issues before they have the chance to become a problem. Following image scanning best practices will help you embed security without slowing you down.
Also, image scanning is not something you apply once, but rather a continuous checkpoint in several moments of your workflow, including when building, on registries, before deploying, and once your containers are already running.