


Falco Feeds extends the power of Falco by giving open source-focused companies access to expert-written rules that are continuously updated as new threats are discovered.

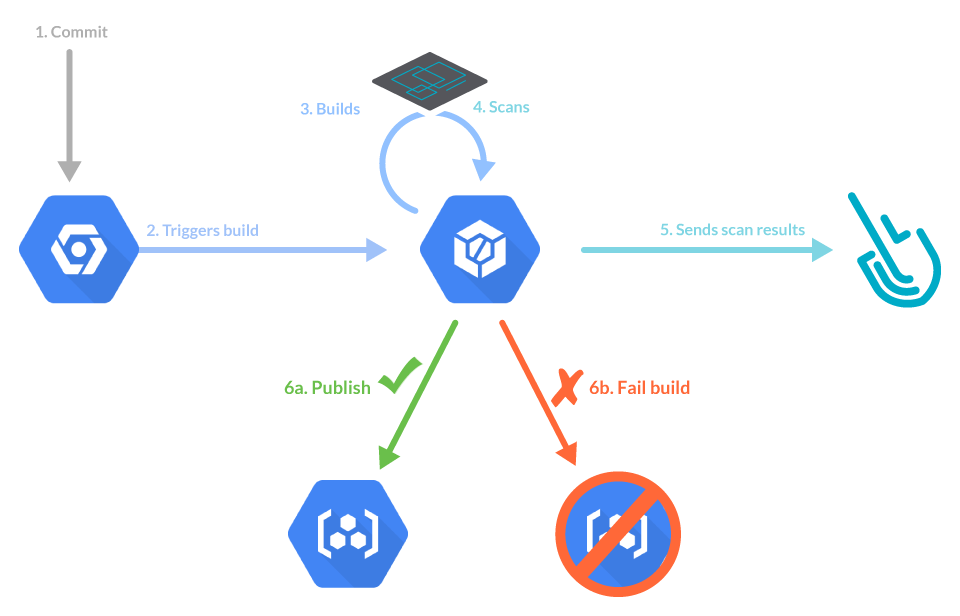
In this article, you will learn how to add inline image scanning to a Google Cloud Build pipeline using the Sysdig Secure DevOps platform. We will show you how to create a basic workflow to build your container image, scan the image, and push it to a registry. We will also customize scanning policies to stop the build if a high-risk vulnerability is detected.
Using Google Cloud Build for your CI/CD pipeline? Prevent vulnerabilities, misconfigurations, and harden your development workflow with Sysdig Secure image scanning. #GCP Click to tweet
What is Google Cloud Build?
Cloud Build is a CI/CD service that executes your builds on Google Cloud Platform’s infrastructure. CI/CD with Google Cloud Build uses workflows for the build and the steps are defined as code using a YAML specification, executed from container images.
In this sense, it is similar to GitHub actions, Tekton pipelines, or Azure Devops pipelines.
Creating a Cloud Build workflow for image scanning
We’ll follow a basic “image scanning for Google Cloud Build” example project with four steps:
- Build the container image.
- Get the secret token required to communicate with Sysdig Secure Platform.
- Scan the container image with Sysdig Secure.
- Push the container image to a registry.
Each step only executes if the previous one is successful.
That means that if you set your image scanning policy on Sysdig with a “stop” action and the scan fails, the image won’t be pushed to the registry.
Prerequisites for the Cloud Build workflow for image scanning
We’ll need to configure some prerequisites to use image scanning with Google Cloud Build. This is a minimal example, so you may need to adapt it to your specific tools and needs.
We will use:
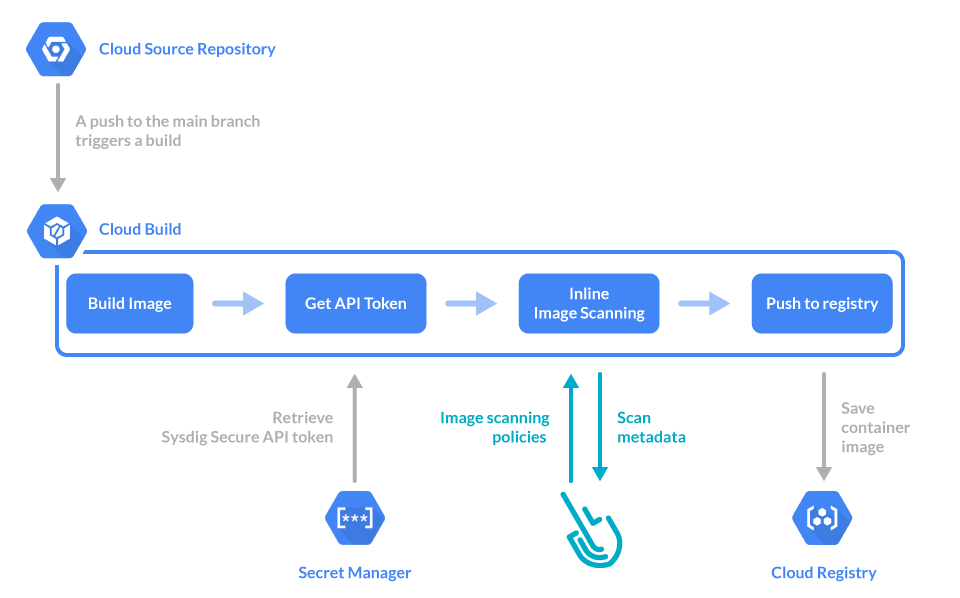
- Google Cloud Source Repository: A git repository to store our code, a containerized “hello word” written in Node.js.
- Google Container Registry: The registry in which we’ll push the images we’ll build.
- Google Secret Manager: To store the Sysdig Secure API token. You will have to grant permissions to the Cloud Build agents so they can access secrets.
Now, let’s see how to enable and set up each of these Google Cloud resources.
Setting up Google Cloud Source Repository
Start by visiting the Google Cloud Source Repository page and creating a new repository.
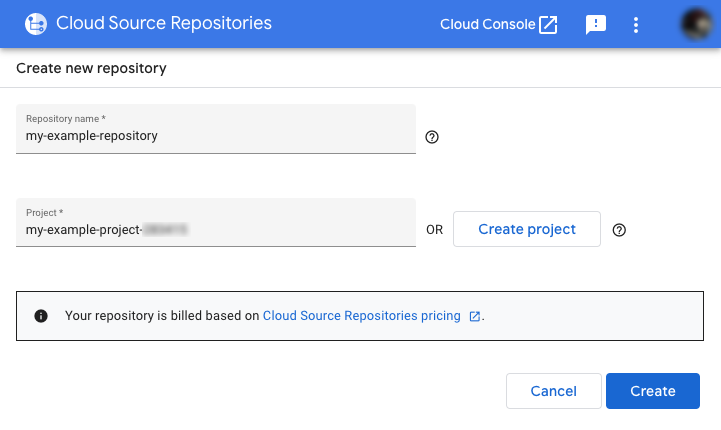
Create a new project or choose an existing project if you have one you want to use.
Press the Create button.
Once the repository is created, you will be presented with instructions on how to clone the repository on your computer.
We will use the sample Node.js hello world containerized example from the official Node.js website as a starting point.
Copy the source for the files Dockerfile, package.json, and server.js from their website, or download them as a zip from this GitHub repository.
Add them to your cloned git repository, and commit them.
Setting up Google Container Registry
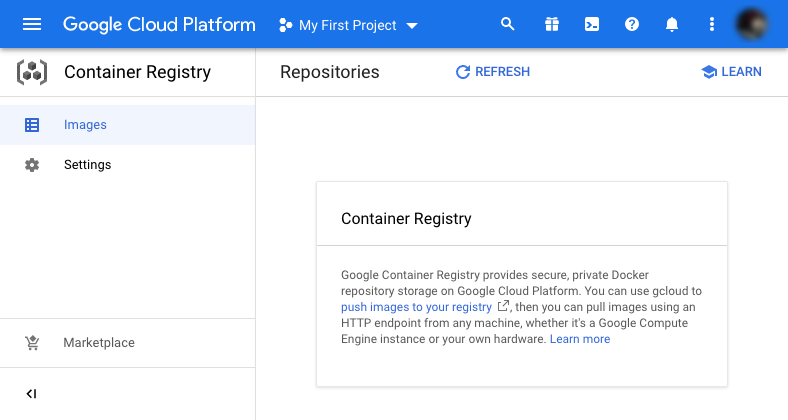
Now, visit the Google Container Registry dashboard.
If asked to choose a specific project, select the one you want to use.
You may also be asked to enable the Container Registry API if you haven’t used it before.
Once everything is set and enabled, it will show you an empty list of images:
Note this for later. To use this image registry, you have to tag images as:
gcr.io/<your_project_id>/<image_name>:<tag>Setting up Google Cloud Build
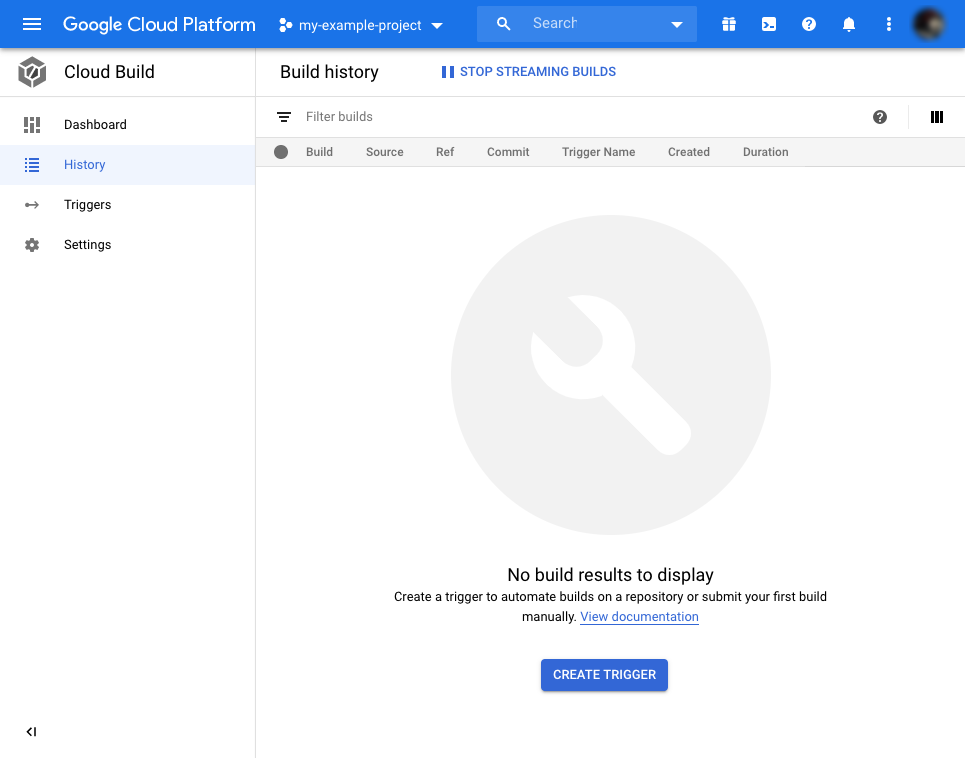
Visit the Google Cloud Build dashboard, and click the “Enable” button if you haven’t used it before. You will see the empty list of “builds” or workflows executions:
Google Secret Manager
You’re almost done! Now you need to go to Google Secret Manager dashboard, and again click on “Enable” its API if you are asked to.
Next, click on “Create credentials” in the upper right corner.
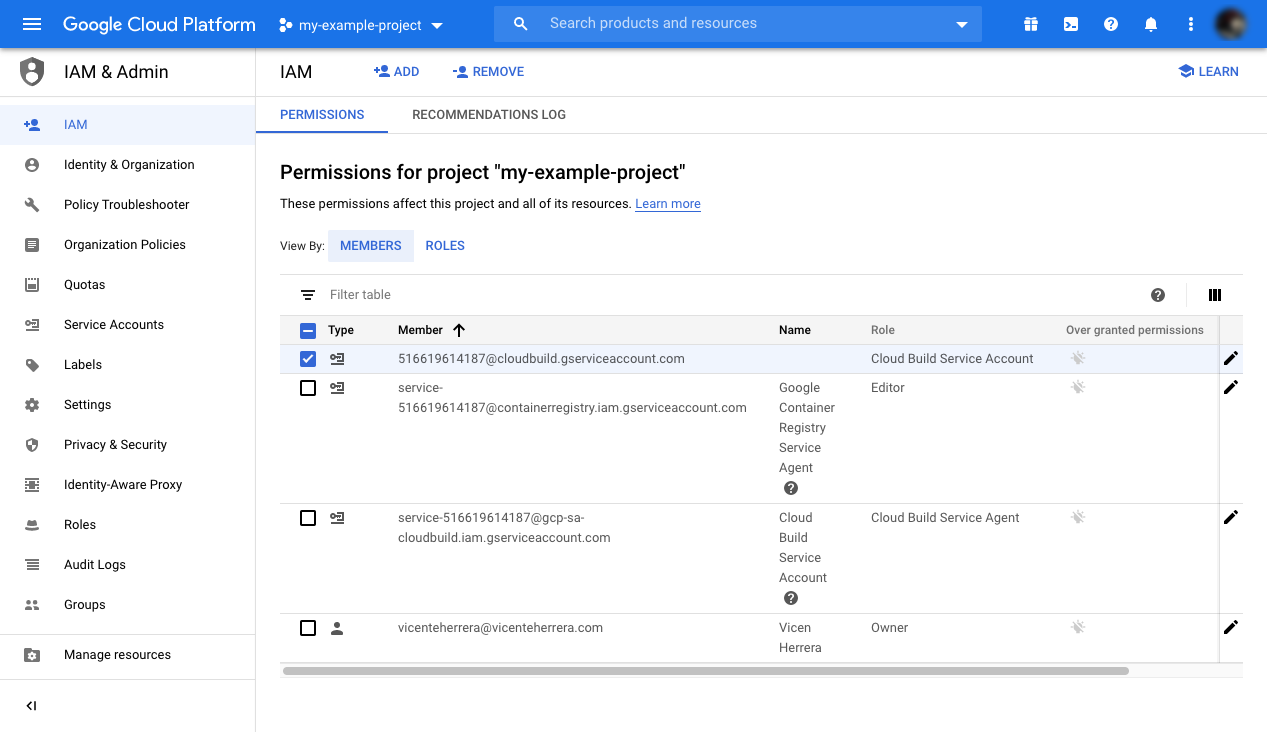
Finally, open the Cloud IAM page dashboard.
Open your project if it isn’t already selected.
In the permissions table, locate the one containing “@cloudbuild.gserviceaccount.com,” and click the pencil icon to the right.
Click Add role.
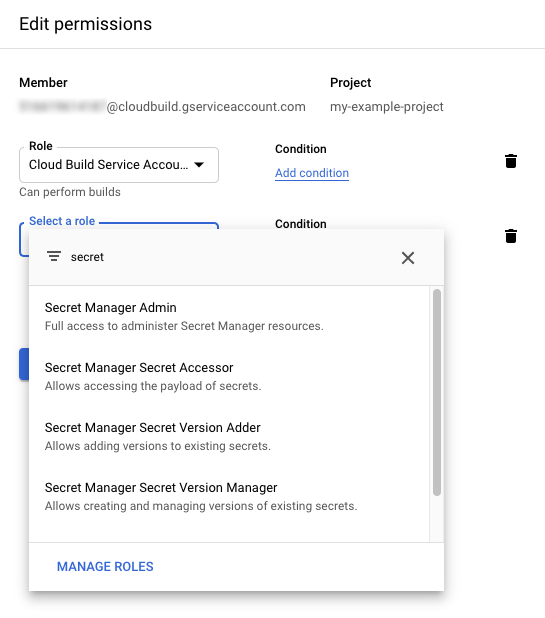
Select “Secret Manager Accessor role.”
And click “Save.”
Setting up the base Cloud Build workflow
Great! Everything is in place to create our image scanning Cloud Build workflow. Our first iteration will just build and push the image. For that, create a cloudbuild.yaml file at the root directory of your project, and paste the following code:
steps:
- name: 'gcr.io/cloud-builders/docker'
  args: ['build', '-t', '${_IMAGE_URL}:${_IMAGE_TAG}', '.']
- name: 'gcr.io/cloud-builders/docker'
  args: ['push', 'gcr.io/${_IMAGE_URL}:${_IMAGE_TAG}']
substitutions:
  _IMAGE_URL: 'gcr.io/<your_project_id>/<image_name>'
  _IMAGE_TAG: 'latest'
timeout: 900s
Each step in a Cloud Build workflow uses a container image to execute some action that you usually customize via arguments (args:).
In this case, we use an image with the Docker command-line tool to first build and then push the container image of our project. We could use a single step to do both actions, but we’ll want to insert a step in between later.
We are also using variable substitution for the image’s tag and name (_IMAGE_URL, _IMAGE_TAG). This will make it easier to reuse our workflow in other projects, or to use a different kind of registry.
Remember to change <your_project_id> and <image_name> for your own values.
Lastly, we’ve set an increased timeout of 900 seconds to give the pipeline enough time to complete all the steps.
Commit and push the changes to the repository.
Triggering the Cloud Build workflow
The workflow is defined. Now we will set up a trigger so it executes for each push to the master branch. For this:
Visit the Cloud Build console and click on “Triggers.”
Under “Repositories,” locate the one you are using in this example.
Press to display the “three dots” menu at the right of its name.
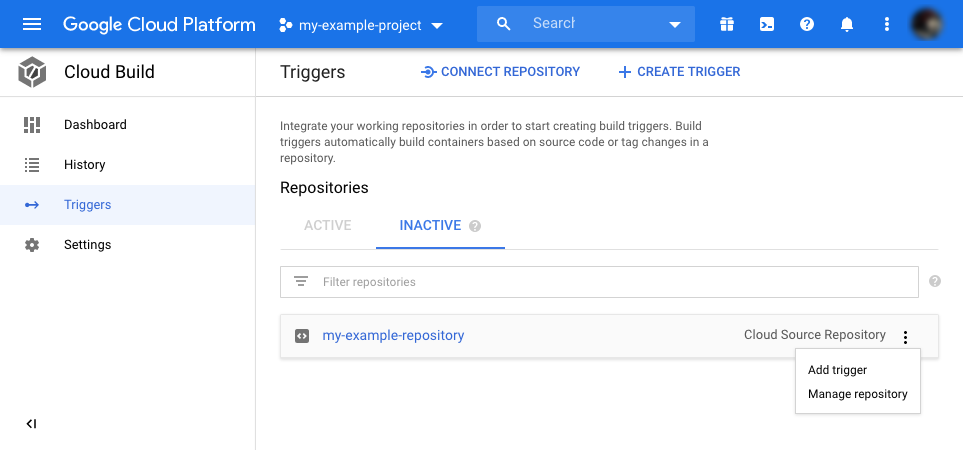
And select “Add trigger.”
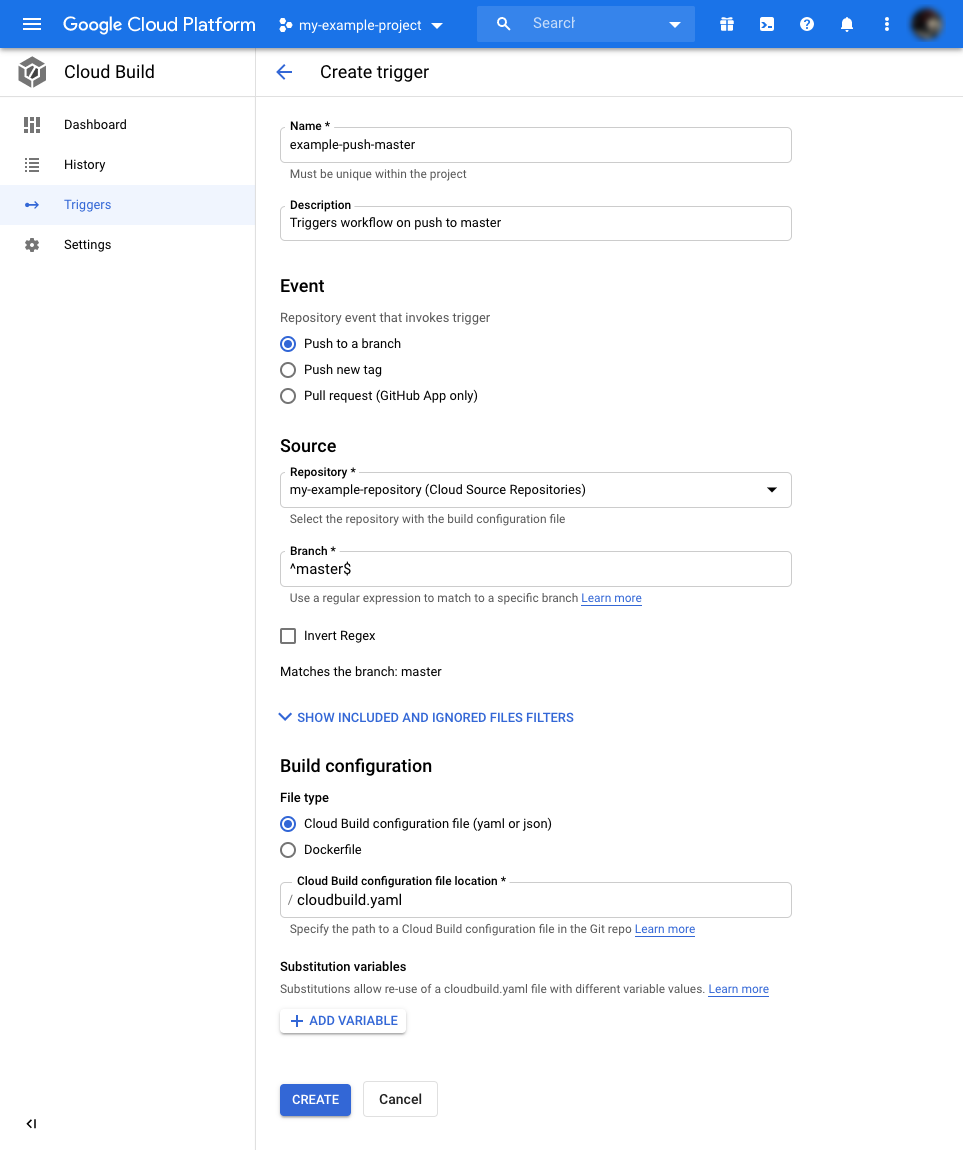
The trigger settings default values will work for this example. They will execute the workflow when we push to the master branch.
Just specify a name and description for the trigger and press “Create.”
Let’s test the workflow by triggering a manual run for the build.
Locate the “Run trigger” button next to trigger you just created. Press it.
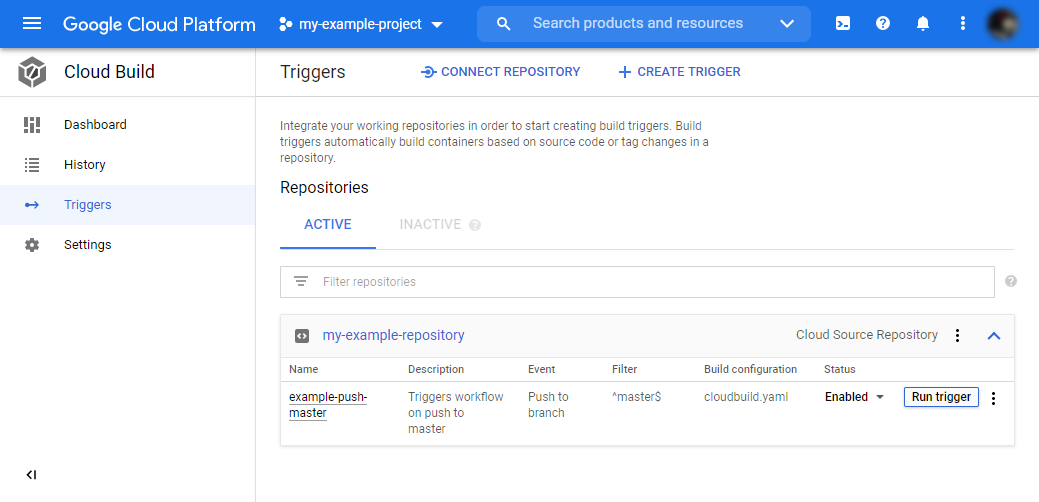
Your workflow should now execute. Click on the left menu on “History” to see the workflow execution log. After minutes it should successfully finish, and a new image should be available in your registry. If not, go through the logs and troubleshoot any error message.
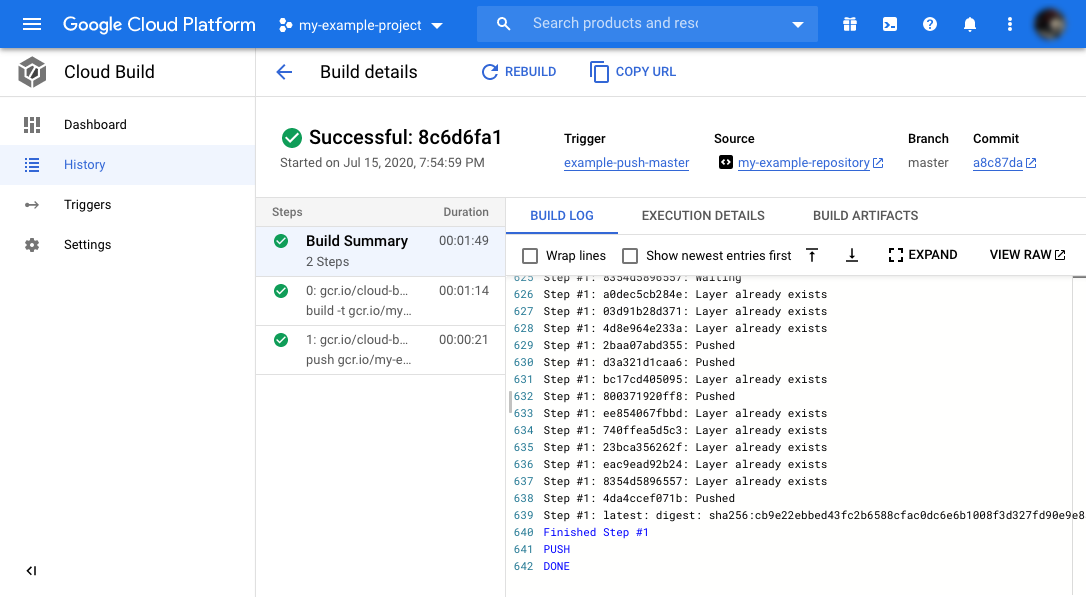
Now we know that everything is set up correctly, but remember, this image hasn’t been scanned and could be insecure. Let’s fix this!
Obtaining and storing the Sysdig API token
Before we add the image scanning step to the build, we’ll need to link the image scanning runtime with your Sysdig account. You will need your Sysdig API token.
To find it:
- Go to the Sysdig Secure dashboard.
- Click on your profile.
- Select “Settings.”
- It will be available on the first settings page.
Let’s create a secret to store your Sysdig API token instead of writing it directly on the workflow. If it’s written in the code, there’s a chance it leaks. To create it:
Go to Google’s Secret Manager page’s dashboard.
Press “Create secret.”
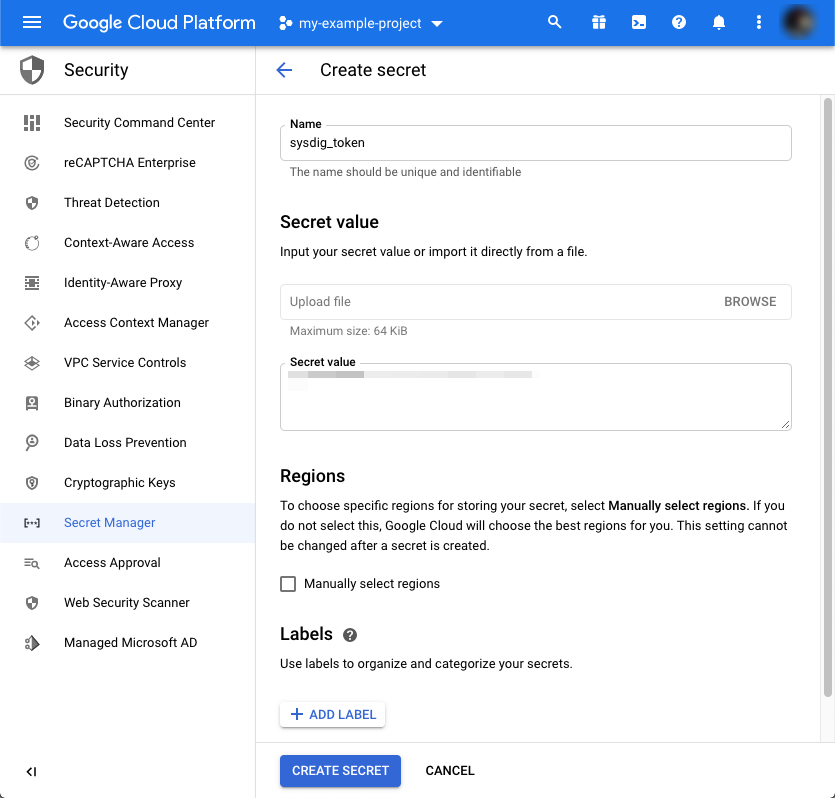
Add a name for it. We’ll use sysdig_token in our example.
Paste the value you copied from the settings page.
Finish by pressing “Create secret.”
Add image scanning step
Now, let’s add the image scanning steps to the cloudbuild.yaml file.
steps:
- name: 'gcr.io/cloud-builders/docker'
  args: ['build', '-t', '${_IMAGE_URL}:${_IMAGE_TAG}', '.']
- name: gcr.io/cloud-builders/gcloud
  entrypoint: 'bash'
  args: [ '-c', "gcloud secrets versions access latest --secret=sysdig_token --format='get(payload.data)' | tr '_-' '/+' | base64 -d > decrypted-data.txt" ]
- name: 'sysdiglabs/secure-inline-scan'
  entrypoint: 'bash'
  args: [ '-c', '/bin/inline_scan.sh analyze -k $(cat decrypted-data.txt) ${_IMAGE_URL}:${_IMAGE_TAG}' ]
- name: 'gcr.io/cloud-builders/docker'
  args: ['push', 'gcr.io/${_IMAGE_URL}:${_IMAGE_TAG}']
substitutions:
  _IMAGE_URL: 'gcr.io/<your_project_id>/<image_name>'
  _IMAGE_TAG: 'latest'
timeout: 900s
The cloud-builders/gcloud step will read and store our sysdig_token secret in the decrypted-data.txt file.
The sysdiglabs/secure-inline-scan step will perform the image scanning using Sysdig Secure. It will read the secret from the decrypted-data.txt file. Note that this step executes before pushing the image to the image repository.
Commit the changes and push them to the master branch of the git repository.
Image scanning for Google Cloud Build in action
After pushing the changes to master, you will see a new entry in the “History” section of the Cloud Build dashboard. It automatically triggered a new pipeline run that includes the four steps from our workflow.
Give it a few minutes to finish. If all goes according to plan, all steps should be green.
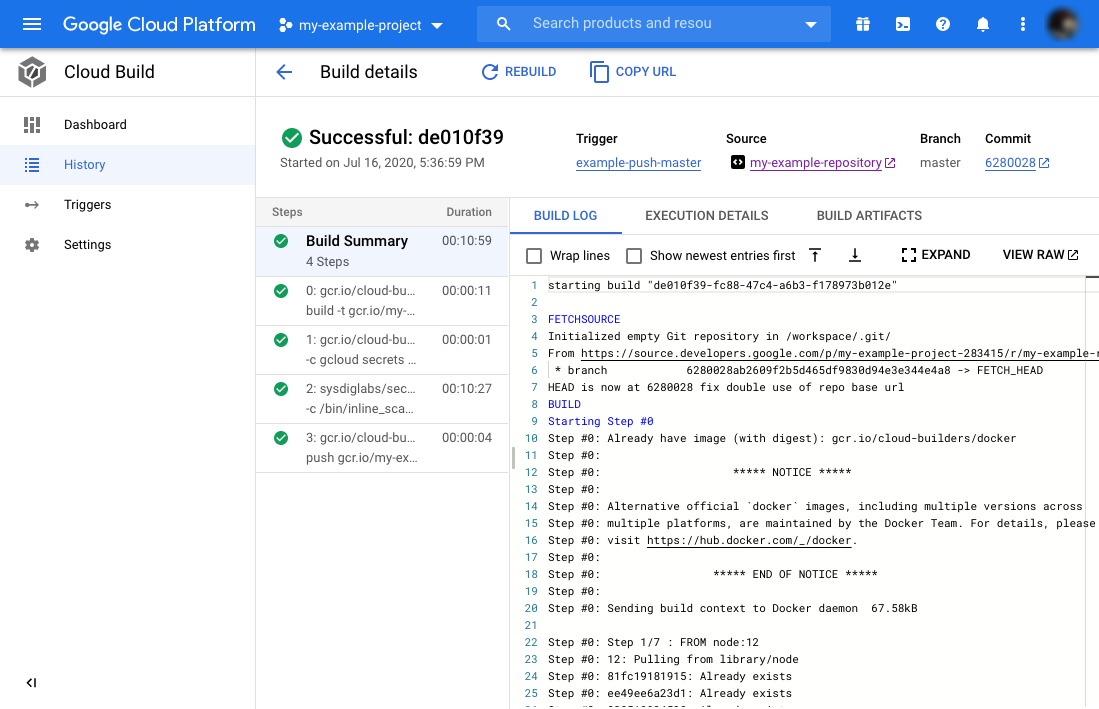
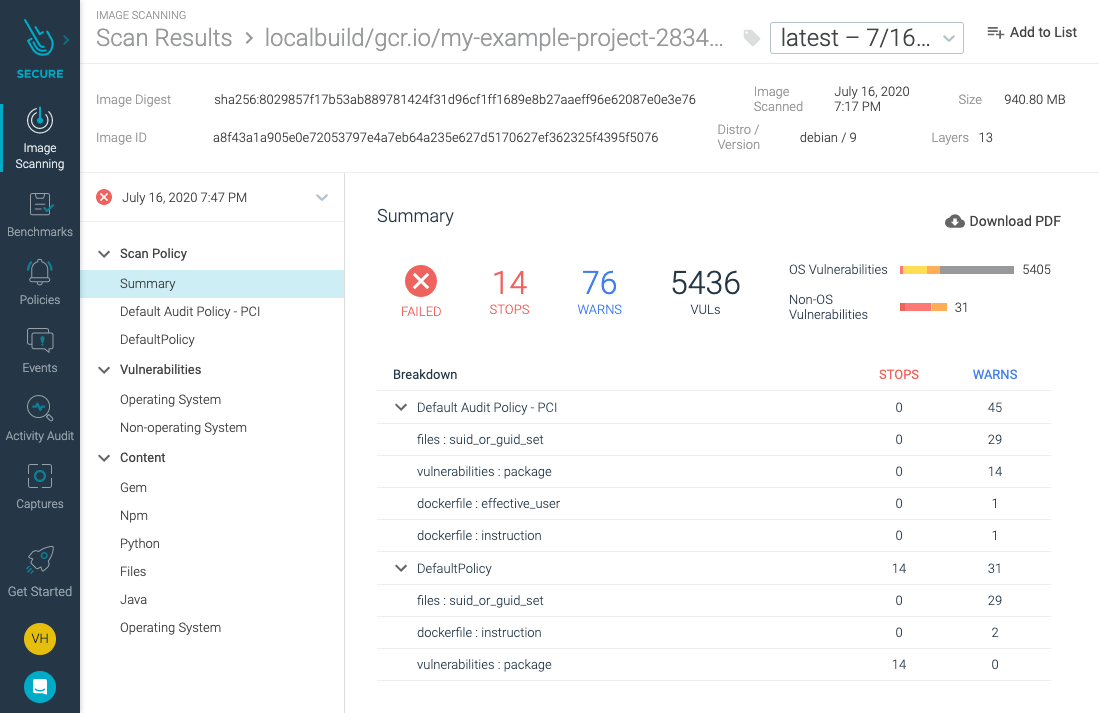
On the same build, click on the third step and scroll to the end of the log.
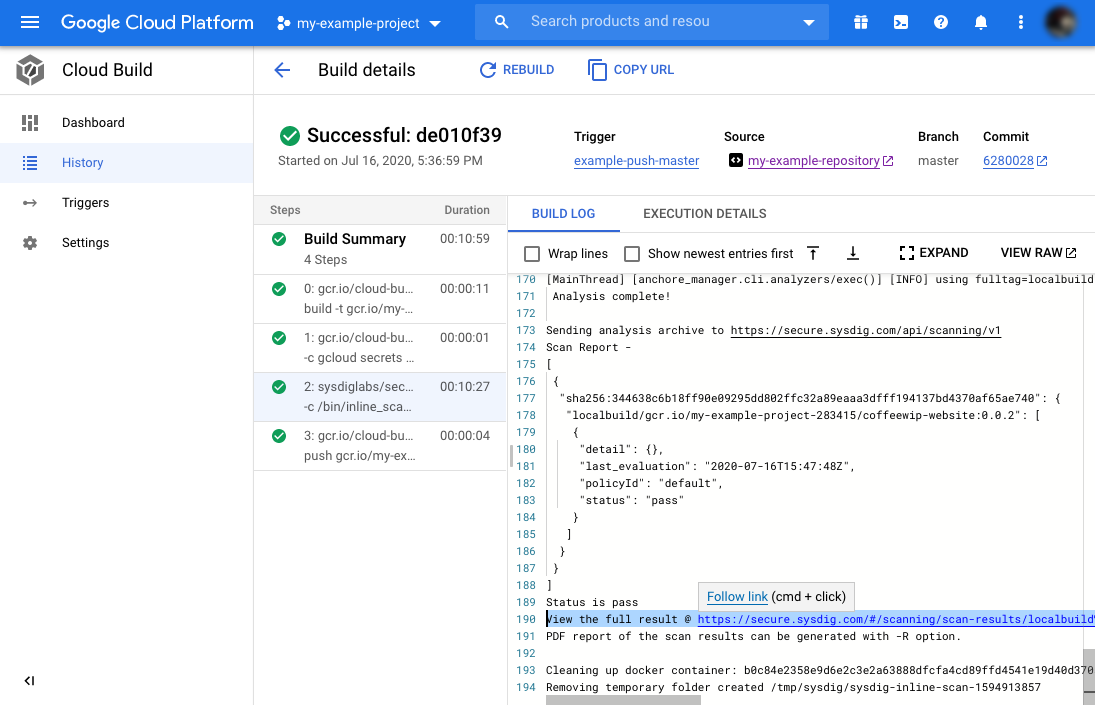
Follow the link there to the Sysdig Secure dashboard to read the report of the scanning.
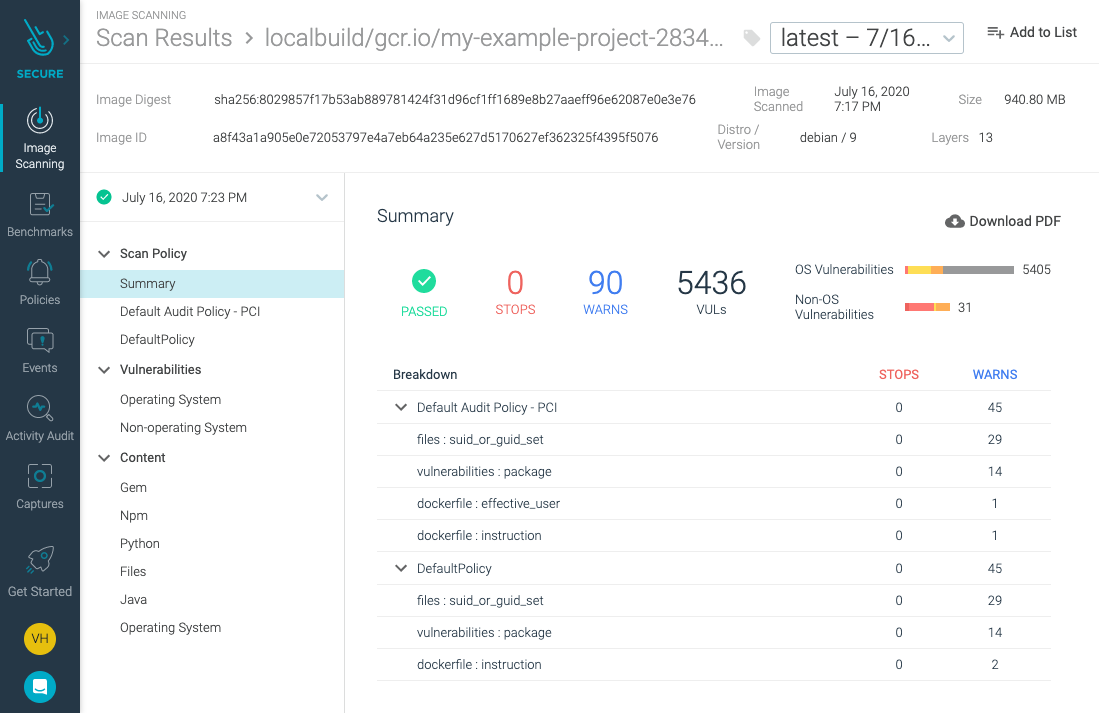
The report shows how multiple vulnerabilities have been identified in the image, but still, the pipeline succeeded.
Let’s update our image scanning policy so it interrupts the build if vulnerabilities are found.
Updating the image scanning policies in Sysdig
To change the image scanning policies, start from the Sysdig Secure interface.
Navigate to “Image Scanning,” “Scanning policies,” and “Policies.”
You will see a list of default pre-configured policies to detect general security threats and bad practices, as well as some specific security standards like PCI DSS or NIST 800-190.
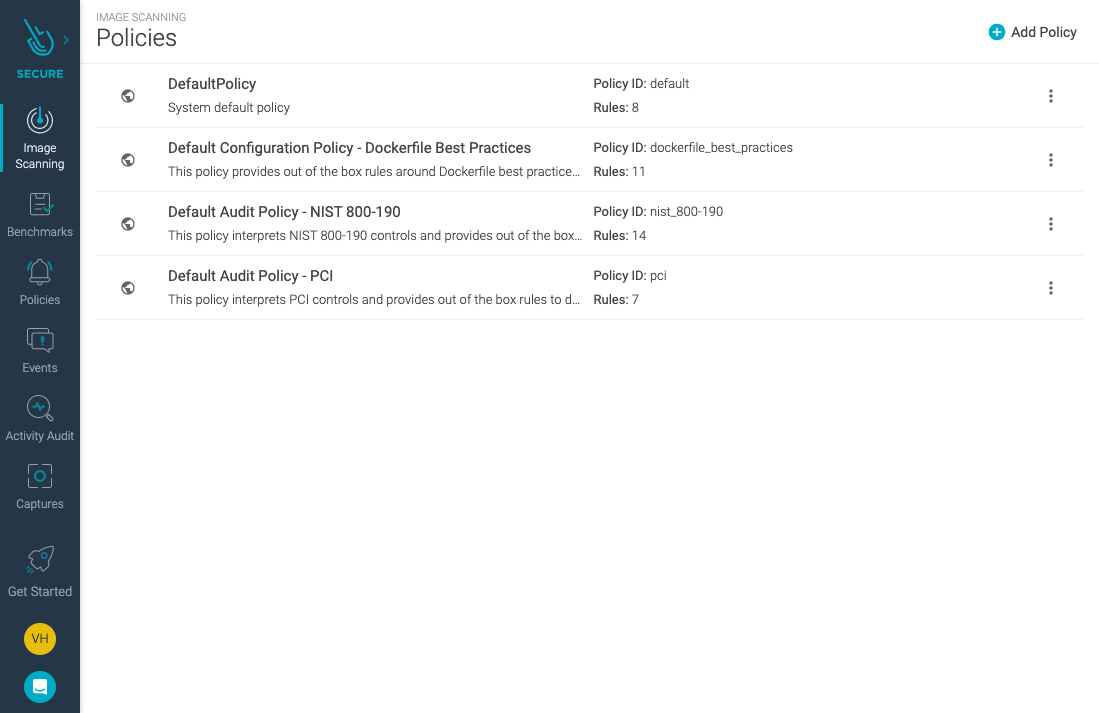
They are available out-of-the-box without you having to delve with convoluted security standards. You can read more about Image Scanning and policies at Sysdig’s documentation.
Press on “Default Policy” to edit it. You will see a list of “gates” to detect things like lack of Dockerfile instructions, exposing port 22, or detection of vulnerabilities in packages with high severity, for which a fix is available.
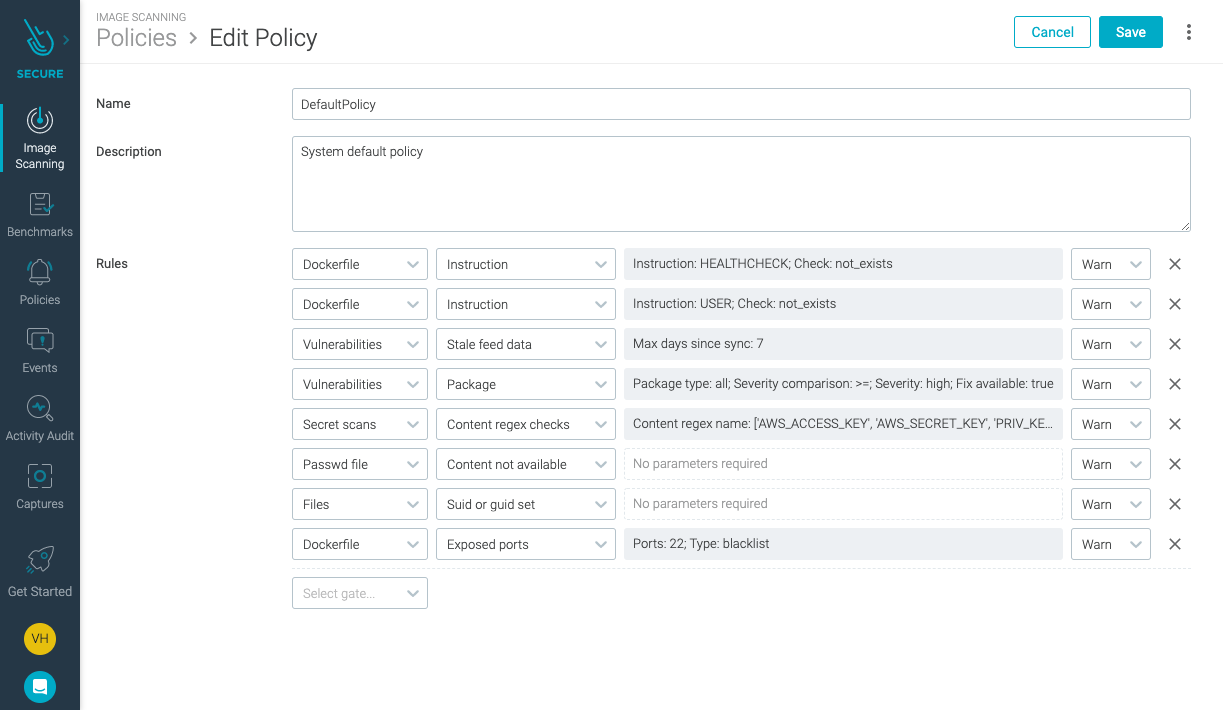
Locate the “Vulnerabilities” gate for “Package” with “severity high and a fix available.”
Change its behavior from “Warn” to “Stop.”
Click “Save.”
This will stop builds with high severity risks and prevent vulnerable images from entering the registry.
This policy protects beyond the pipeline. The Sysdig Secure image analyzer will continuously scan running images, and the Sysdig Secure Kubernetes admission controller will evaluate and scan images directly entering the infrastructure from any source that may not be a CI/CD pipeline. Those are excellent tools to complement your image scanning with Google Cloud Build workflow.
Breaking and fixing the build
If you navigate back to the image scanning report, it should have changed to a “failed” state. It is reflecting policy change on the already scanned image.
If you manually trigger the pipeline again, it will now stop at the image scanning step:
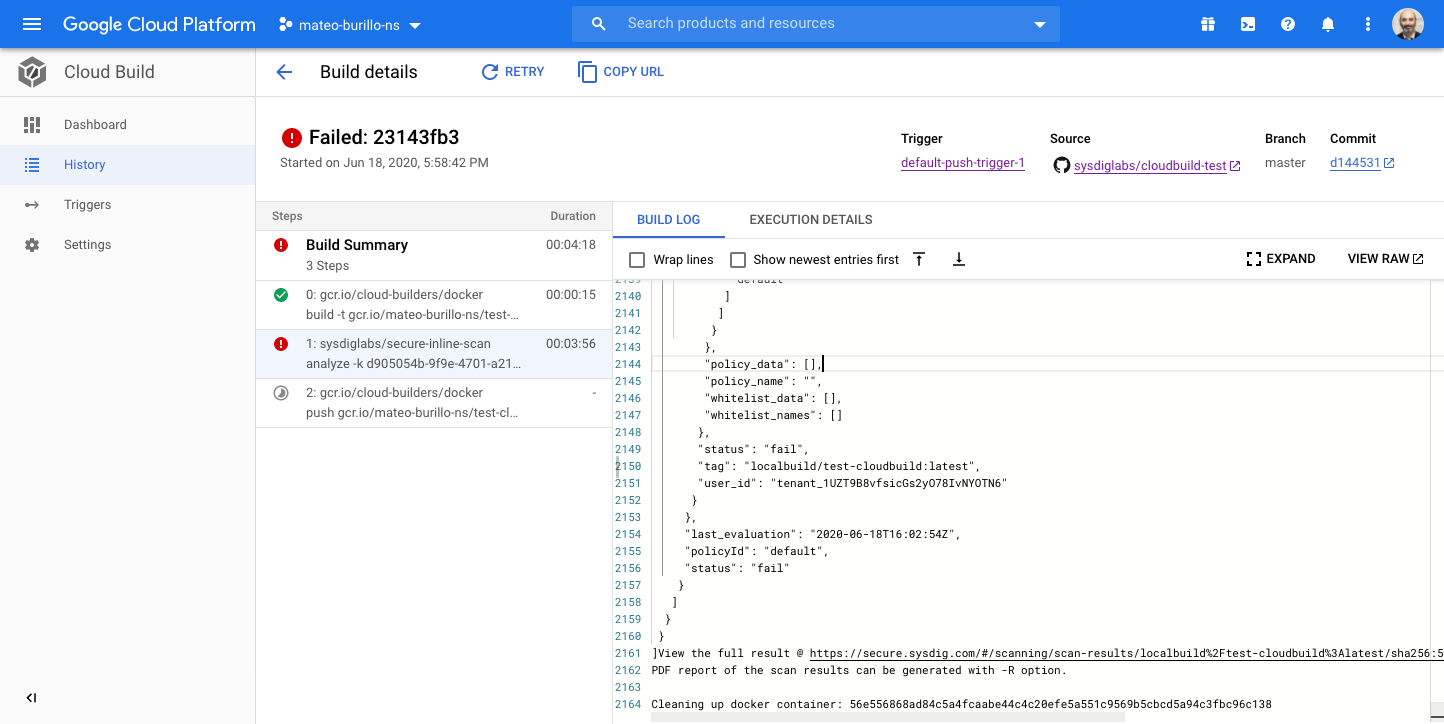
This is good. We prevented a vulnerable image from being published.
Now, what can we do to fix this image?
The problem in this example is it’s base image, which is far from ideal. We’ll use a more secure base image.
Edit the Dockerfile and change node:12 to bitnami/node.
Save, commit, and push your changes. All the steps should be green again:

It is an image scanning best practice to reduce your image’s content to only what you need, and not to use a base image that you know nothing about. Image scanning with Google Cloud build helps prevent security threats derived from misconfigurations like these.
Conclusions
Google offers a complete ecosystem for CI/CD that includes Google Cloud Build, Google Cloud Registry, Google Cloud Repository, and Google Secret Manager. Sysdig Secure image scanning brings several benefits to the mix:
- Image scanning in a CI/CD pipeline stops vulnerable images from reaching a registry.
- With inline scanning, image contents like proprietary source code or leaked credentials stay in your pipeline. Only the metadata from the analysis is sent to the image scanner backend.
- The analysis metadata will be re-evaluated if a policy changes. There is no need to re-scan the image.
- Sysdig Secure provides out-of-the-box policies to enforce and adhere to various container compliance standards (like PCI DSS or NIST 800-190).
Sysdig Secure image scanning also integrates seamlessly with most CI/CD pipeline tools, including Jenkins, Bamboo, Azure Pipelines, or AWS CodePipelines.
If you aren’t using Sysdig Secure for scanning your images, wait no longer and try it today!