


Falco Feeds extends the power of Falco by giving open source-focused companies access to expert-written rules that are continuously updated as new threats are discovered.

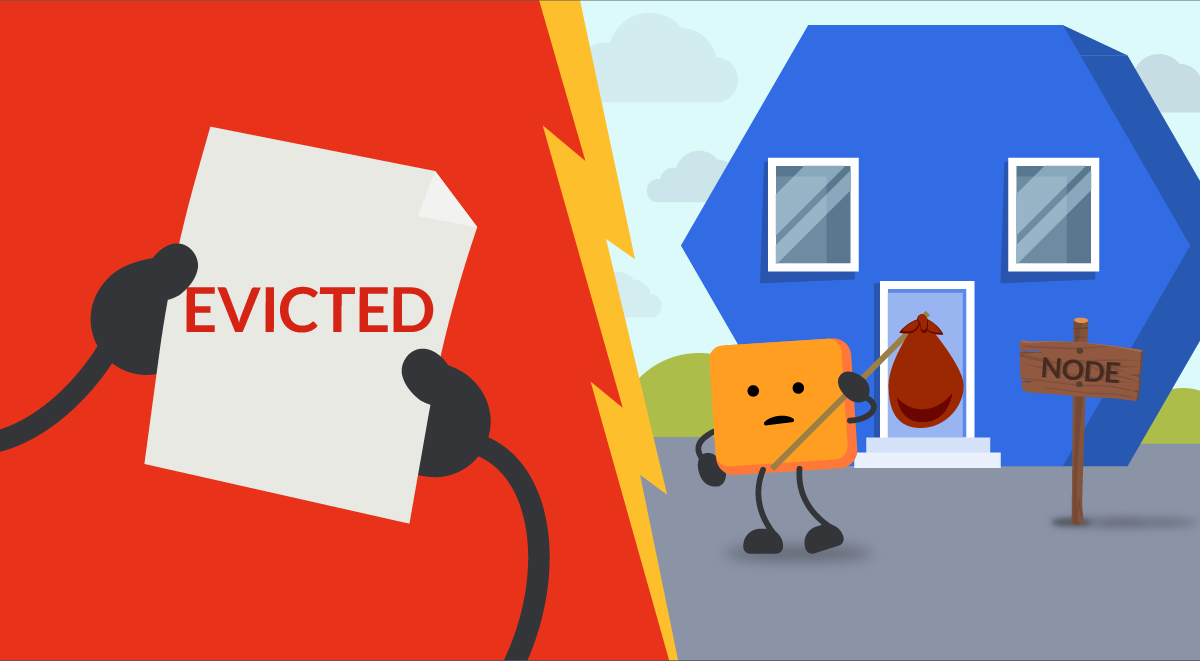
What does it mean that Kubernetes Pods are evicted? They are terminated, usually the result of not having enough resources. But why does this happen?
Eviction is a process where a Pod assigned to a Node is asked for termination. One of the most common cases in Kubernetes is Preemption, where in order to schedule a new Pod in a Node with limited resources, another Pod needs to be terminated to leave resources to the first one.
Also, Kubernetes constantly checks resources and evicts Pods if needed, a process called Node-pressure eviction.
Every day, thousands of Pods are evicted from their homes. Stranded and confused, they have to abandon their previous lifestyle. Some of them even become nodeless. The current society, imposing higher demands of CPU and memory, is part of the problem.
During this article, you will discover:
- Reasons why Pods are evicted: Preemption and Node-pressure
- Preemption eviction
- Pod Priority Classes
- Node-pressure eviction
- Quality of Service Classes
- Other types of eviction
- Kubernetes Pod eviction monitoring in Prometheus
Reasons why Pods are evicted: Preemption and Node-pressure
There are several reasons why Pod eviction can happen in Kubernetes. The most important ones are:
- Preemption
- Node-pressure eviction
Preemption eviction
Preemption is the following process: if a new Pod needs to be scheduled but doesn't have any suitable Node with enough resources, then kube-scheduler will check if by evicting (terminating) some Pods with lower priority the new Pod can be part of that Node.
Let's first understand how Kubernetes scheduling works.
Pod Scheduling
Kubernetes Scheduling is the process where Pods are assigned to nodes.
By default, there's a Kubernetes entity responsible for scheduling, called kube-scheduler which will be running in the control plane. The Pod will start in the Pending state until a matching node is found.
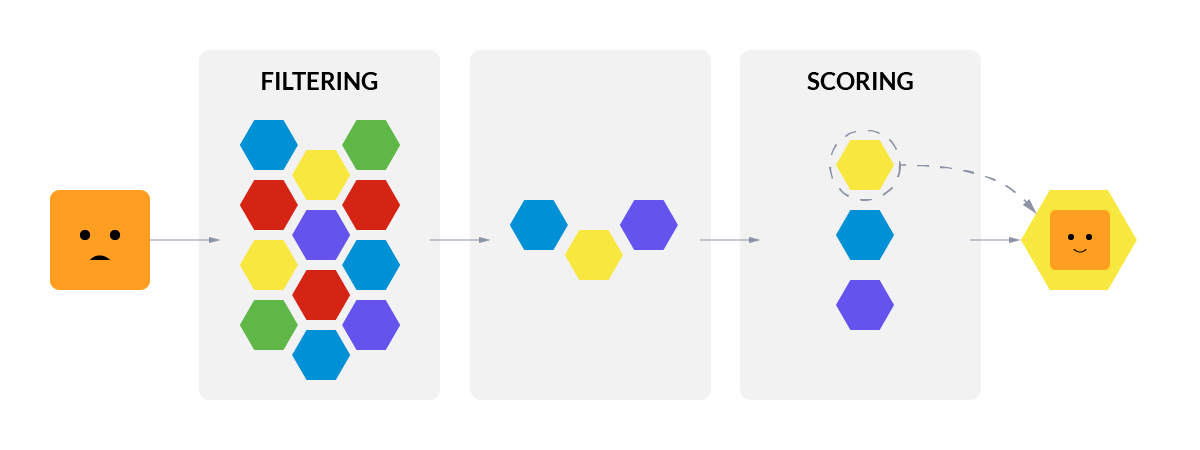
The process of assigning a Pod to a Node follows this sequence:
- Filtering
- Scoring
Filtering
During the Filtering step, kube-scheduler will select all Nodes where the current Pod might be placed. Features like Taints and Tolerations will be taken into account here. Once finished, it will have a list of suitable Nodes for that Pod.
Scoring
During the Scoring step, kube-scheduler will take the resulting list from the previous step and assign a score to each of the nodes. This way, candidate nodes are ordered from most suitable to least. In case two nodes have the same score, kube-scheduler orders them randomly.
But, what happens if there are no suitable Nodes for a Pod to run? When that's the case, Kubernetes will start the preemption process, trying to evict lower priority Pods in order for the new one to be assigned.

Webinar: Prometheus Got Out of Hand, Discover What Bloomreach Did Next! Register now
Pod Priority Classes
How can I prevent a particular Pod from being evicted in case of a preemption process? Chances are, a specific Pod is critical for you and should never be terminated.
That's why Kubernetes features Priority Classes.
A Priority Class is a Kubernetes object that allows us to map numerical priority values to specific Pods. Those with a higher value are classified as more important and less likely to be evicted.
You can query current Priority Classes using:
kubectl get priorityclasses
kubectl get pc

NAME                      VALUE        GLOBAL-DEFAULT   AGE
system-cluster-critical   2000000000   false            2d
system-node-critical      2000001000   false            2d
Priority Class example
Let's do a practical example using the Berry Club comic from Mr. Lovenstein:
There are three Pods representing blueberry, raspberry and strawberry:
NAME         READY   STATUS             RESTARTS   AGE
blueberry    1/1     Running            0          4h41m
raspberry    1/1     Running            0          58m
strawberry   1/1     Running            0          5h22m
And there are two Priority Classes: trueberry and falseberry. The first one will have a higher value indicating higher priority.
apiVersion: scheduling.k8s.io/v1
kind: PriorityClass
metadata:
  name: trueberry
value: 1000000
globalDefault: false
description: "This fruit is a true berry"

apiVersion: scheduling.k8s.io/v1
kind: PriorityClass
metadata:
  name: falseberry
value: 5000
globalDefault: false
description: "This fruit is a false berry"
- Blueberry will have the trueberry priority class (value = 1000000)
- Raspberry and strawberry will both have the falseberry priority class (value = 5000)
This will mean that in case of a preemption, raspberry and strawberry are more likely to be evicted to make room for higher priority Pods.
Then assign the Priority Classes to Pods by adding this to the Pod definition:
priorityClassName: trueberryLet's now try to add three more fruits, but with a twist. All of the new fruits will contain the higher Priority Class called trueberry.
Since the three new fruits have memory or CPU requirements that the node can't satisfy, kubelet evicts all Pods with lower priority than the new fruits. Blueberry stays running as it has the higher priority class.
NAME         READY   STATUS             RESTARTS   AGE
banana       0/1     ContainerCreating  0          2s
blueberry    1/1     Running            0          4h42m
raspberry    0/1     Terminating        0          59m
strawberry   0/1     Terminating        0          5h23m
tomato       0/1     ContainerCreating  0          2s
watermelon   0/1     ContainerCreating  0          2s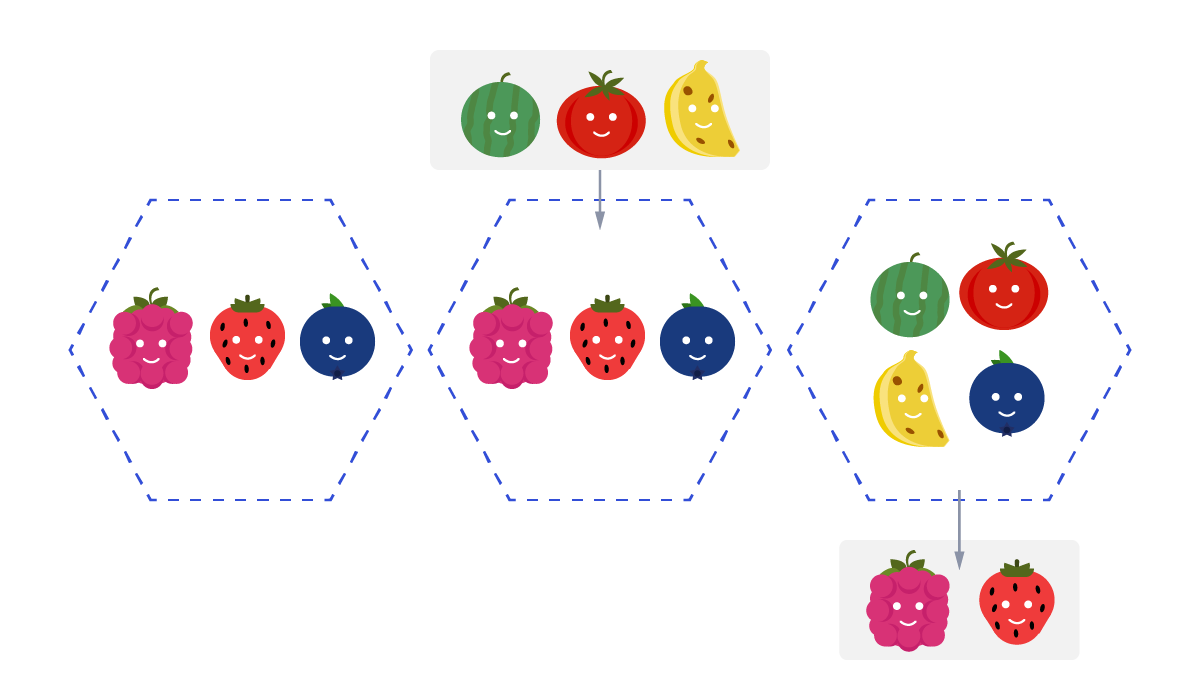
This is the end result:
NAME         READY   STATUS             RESTARTS   AGE
banana       1/1     Running            0          3s
blueberry    1/1     Running            0          4h43m
tomato       1/1     Running            0          3s
watermelon   1/1     Running            0          3s
These are strange times for berry club…
Node-pressure eviction
Apart from preemption, Kubernetes also constantly checks node resources, like disk pressure, CPU or Out of Memory (OOM).
In case a resource (like CPU or memory) consumption in the node reaches a certain threshold, kubelet will start evicting Pods in order to free up the resource. Quality of Service (QoS) will be taken into account to determine the eviction order.
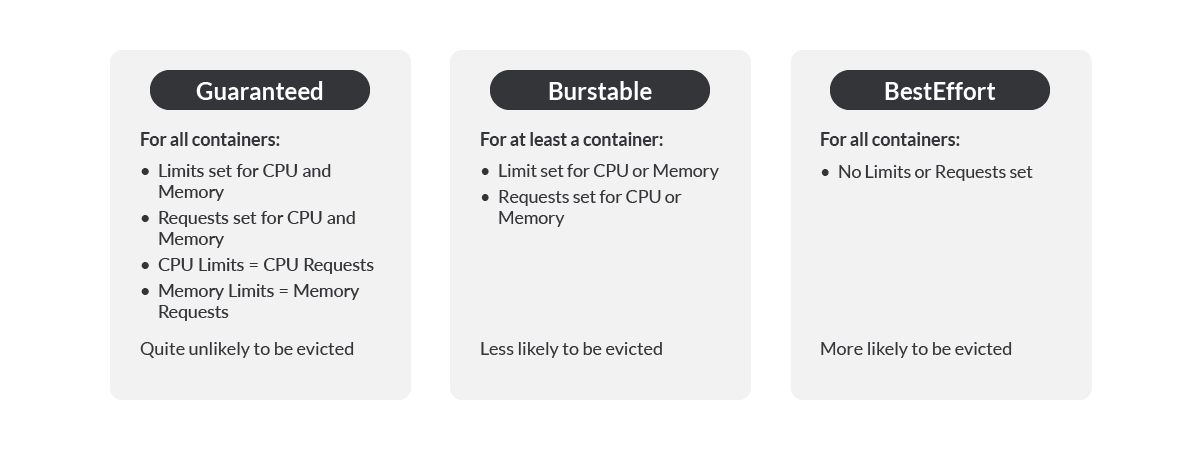
Quality of Service Classes
In Kubernetes, Pods are giving one of three QoS Classes, which will define how likely they are going to be evicted in case of lack of resources, from less likely to more likely:
- Guaranteed
- Burstable
- BestEffort
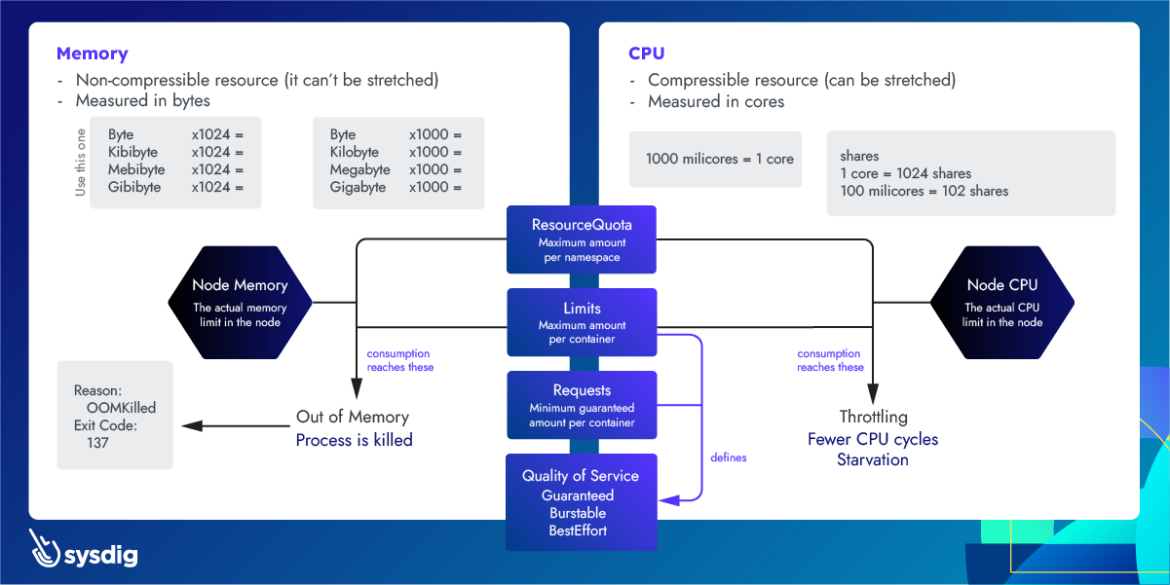
How are these QoS Classes assigned to Pods? This is based on limits and requests for CPU and memory. As a reminder:
- Limits: maximum amount of a resource that a container can use.
- Requests: minimum desired amount of resources for a container to run.
For more information about limits and requests, please check Understanding Kubernetes limits and requests.
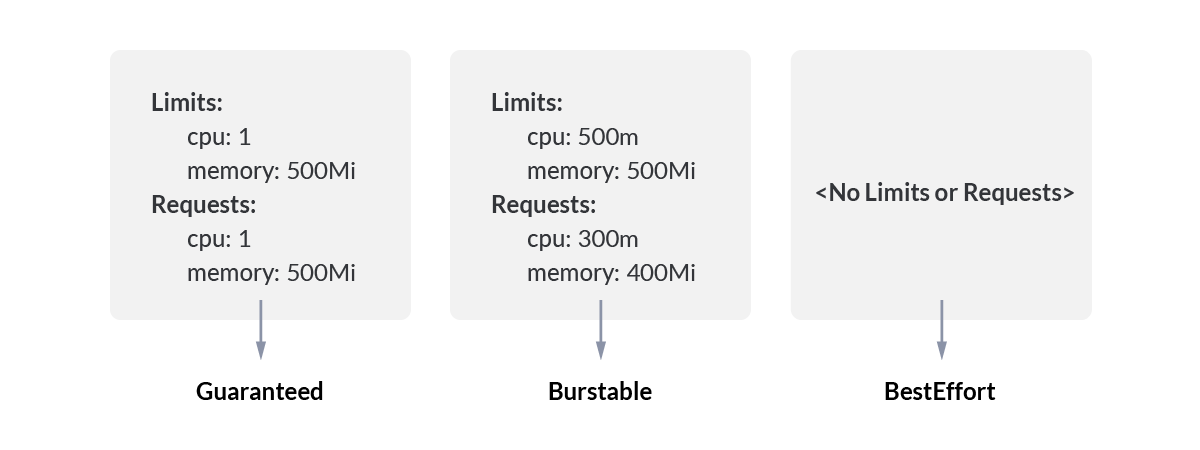
Guaranteed
A Pod is assigned with a QoS Class of Guaranteed if:
- All containers in the Pod have both Limits and Requests set for CPU and memory.
- All containers in the Pod have the same value for CPU Limit and CPU Request.
- All containers in the Pod have the same value for memory Limit and memory Request.
A Guaranteed Pod won't be evicted in normal circumstances to allocate another Pod in the node.
Burstable
A Pod is assigned with a QoS Class of Burstable if:
- It doesn't have QoS Class of Guaranteed.
- Either Limits or Requests have been set for a container in the Pod.
A Burstable Pod can be evicted, but less likely than the next category.
BestEffort
A Pod will be assigned with a QoS Class of BestEffort if:
- No Limits and Requests are set for any container in the Pod.
BestEffort Pods have the highest chance of eviction in case of a node-pressure process happening in the node.
Important: there may be other available resources in Limits and Requests, like ephemeral-storage, but they are not used for QoS Class calculation.
As mentioned, QoS Classes will be taken into account for node-pressure eviction. Here's the process that happens internally.
The kubelet ranks the Pods to be evicted in the following order:
BestEffortPods orBurstablePods where usage exceeds requestsBurstablePods where usage is below requests orGuaranteedPods
Kubernetes will try to evict Pods from group 1 before group 2.
Some takeaways from the above:
- If you add very low requests in your containers, their Pod is likely going to be assigned group 1, which means it's more likely to be evicted.
- You can't tell which specific Pod is going to be evicted, just that Kubernetes will try to evict ones from group 1 before group 2.
GuaranteedPods are usually safe from eviction:kubeletwon't evict them in order to schedule other Pods. But if some system services need more resources, the kubelet will terminateGuaranteedPods if necessary, always with the lowest priority.
Other types of eviction
This article is focused on preemption and node-pressure eviction, but Pods can be evicted in other ways as well. Examples include:
API-initiated eviction
You can request an on-demand eviction of a Pod in one of your nodes by using Kubernetes Eviction API.
Taint-based eviction
With Kubernetes Taints and Tolerations you can guide how your Pods should be assigned to Nodes. But if you apply a NoExecute taint to an existing Node, all Pods which are not tolerating it will be immediately evicted.
Node drain
There are times when Nodes become unusable or you don't want to work on them anymore. The command kubectl cordon prevents new Pods to be scheduled on it, but there's also the possibility to completely empty all current Pods at once. If you run kubectl drain nodename, all Pods in the node will be evicted, respecting its graceful termination period.
Kubernetes Pod eviction monitoring in Prometheus
In your cloud solution, you can use Prometheus to easily monitor Pod evictions by doing:
kube_pod_status_reason{reason="Evicted"} > 0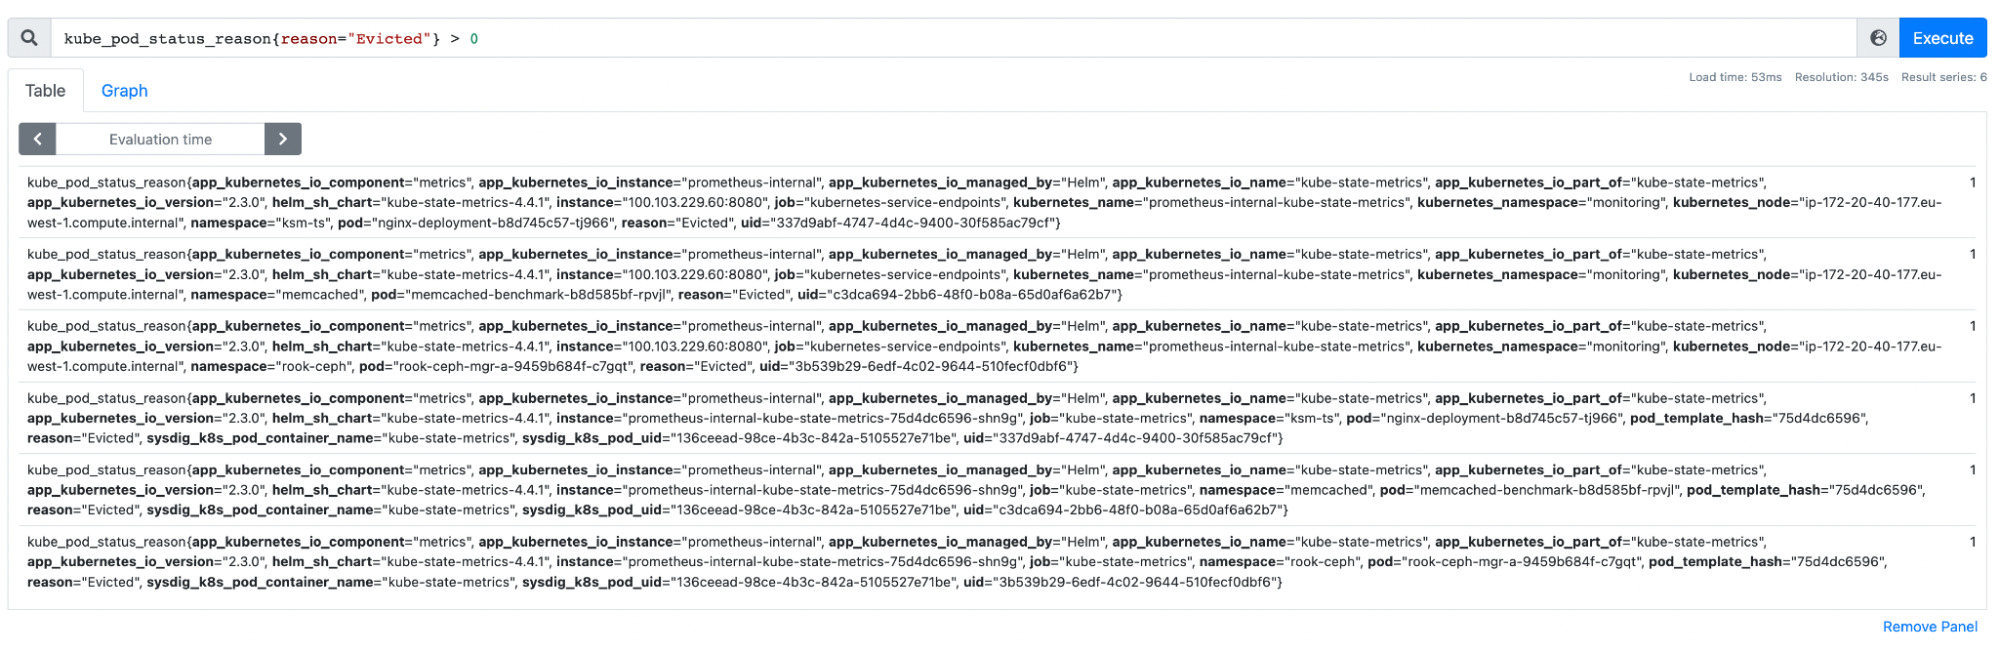
This will display all evicted Pods in your cluster. You can also pair this with kube_pod_status_phase{phase="Failed"} in order to alert on those who were evicted after a failure in the Pod.
If you want to dig deeper, check the following articles for monitoring resources in Prometheus:
- How to rightsize the Kubernetes resource limits
- Kubernetes capacity planning: How to rightsize the requests of your cluster
Conclusion
As you can see, eviction is just another feature from Kubernetes which allows you to control limited resources: in this case, the nodes that Pods will be using.
During preemption, Kubernetes will try to free up resources by evicting less priority Pods to schedule a new one. With Priority Classes you can control which Pods are more likely to keep running after preemption since there's less chance that they will be evicted.
During execution, Kubernetes will check for Node-pressure and evict Pods if needed. With QoS classes you can control which Pods are more likely to be evicted in case of node-pressure.
Memory and CPU are important resources in your nodes, and you need to configure your Pods, containers and nodes to use the right amount of them. If you manage these resources accordingly, there could not only be a benefit in costs, but also you can ensure that the important processes will keep running, no matter how.
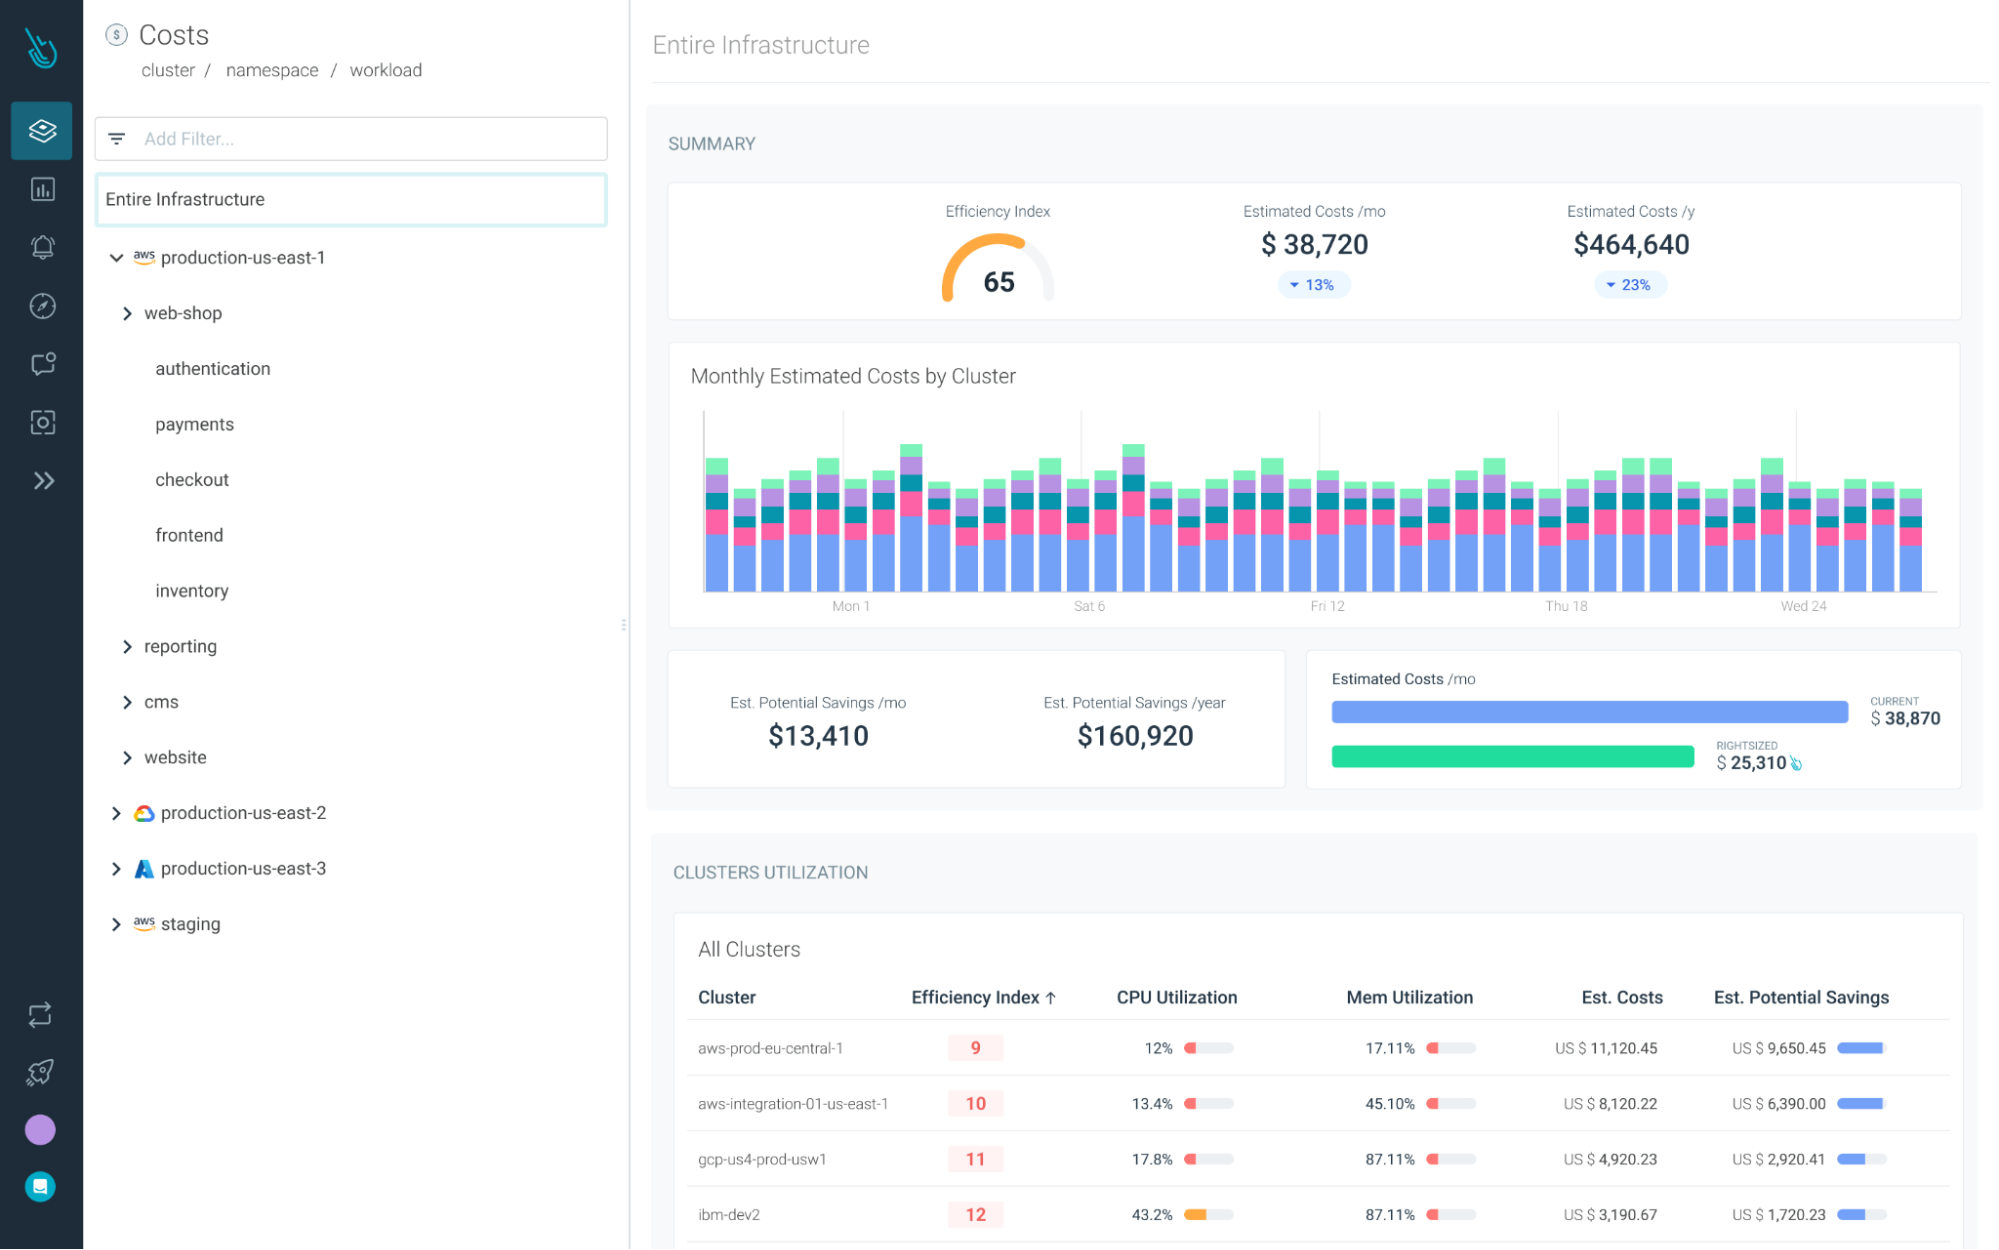
Reduce your Kubernetes costs with Sysdig Monitor
Sysdig Monitor can help you reach the next step in the Monitoring Journey.
With Cost Advisor, you can reduce Kubernetes resource waste by up to 40%.
And with our out-of-the-box Kubernetes Dashboards, you can discover underutilized resources in a couple of clicks.
Try it free for 30 days!