Securing Kubernetes components: kubelet, Kubernetes etcd and Docker registry – Kubernetes security guide (part 3).


Falco Feeds extends the power of Falco by giving open source-focused companies access to expert-written rules that are continuously updated as new threats are discovered.

In addition of configuring the Kubernetes security features, a fundamental part of Kubernetes security is securing sensitive Kubernetes components such as kubelet and internal Kubernetes etcd. We shouldn't forget either common external resources like the Docker registry we pull images from. In this part, we will learn best practices on how to secure the Kubernetes kubelet, the Kubernetes etcd cluster and how to configure a trusted Docker registry.
The 1st part of this Kubernetes Security guide focus on Kubernetes RBAC and TLS certificates while part 2 goes on Kubernetes Security Context, Kubernetes Security Policy and Kubernetes Network Policy.
Kubelet security
The kubelet is a fundamental piece of any Kubernetes deployment. It is often described as the "Kubernetes agent" software, and is responsible for implementing the interface between the nodes and the cluster logic.
The main task of a kubelet is managing the local container engine (i.e. Docker) and ensuring that the pods described in the API are defined, created, run and remain healthy ; and then destroyed when appropriate.
There are two different communication interfaces to be considered:
- Access to the Kubelet REST API from users or software (typically just the Kubernetes API entity)
- Kubelet binary accessing the local Kubernetes node and Docker engine

These two interfaces are secured by default using:
- Security related configuration (parameters) passed to the kubelet binary – Next section (Kubelet security – access to the kubelet API).
- NodeRestriction admission controller – See below Kubelet security – kubelet access to Kubernetes API.
- RBAC to access the kubelet API resources – See below RBAC example, accessing the kubelet API with curl.
Kubelet security – access to the kubelet API
The kubelet security configuration parameters are usually passed as arguments to the binary exec. For newer Kubernetes versions (1.10+) you can also use a kubelet configuration file. Either way, the parameters syntax remain the same.
Let's use this example configuration as reference:
/home/kubernetes/bin/kubelet –v=2 –kube-reserved=cpu=70m,memory=1736Mi –allow-privileged=true –cgroup-root=/ –pod-manifest-path=/etc/kubernetes/manifests –experimental-mounter-path=/home/kubernetes/containerized_mounter/mounter –experimental-check-node-capabilities-before-mount=true –cert-dir=/var/lib/kubelet/pki/ –enable-debugging-handlers=true –bootstrap-kubeconfig=/var/lib/kubelet/bootstrap-kubeconfig –kubeconfig=/var/lib/kubelet/kubeconfig –anonymous-auth=false –authorization-mode=Webhook –client-ca-file=/etc/srv/kubernetes/pki/ca-certificates.crt –cni-bin-dir=/home/kubernetes/bin –network-plugin=cni –non-masquerade-cidr=0.0.0.0/0 –feature-gates=ExperimentalCriticalPodAnnotation=true
Verify the following Kubernetes security settings when configuring kubelet parameters:
anonymous-authis set tofalseto disable anonymous access (it will send 401 Unauthorized responses to unauthenticated requests).- kubelet has a
`--client-ca-fileflag, providing a CA bundle to verify client certificates. `--authorization-modeis not set to AlwaysAllow, as the more secure Webhook mode will delegate authorization decisions to the Kubernetes API server.--read-only-portis set to 0 to avoid unauthorized connections to the read-only endpoint (optional).
Kubelet security – kubelet access to Kubernetes API
As we mentioned in the 1st part of this guide, the level of access granted to a kubelet is determined by the NodeRestriction Admission Controller (on RBAC-enabled versions of Kubernetes, stable in 1.8+).
kubelets are bound to the system:node Kubernetes clusterrole.
If NodeRestriction is enabled in your API, your kubelets will only be allowed to modify their own Node API object, and only modify Pod API objects that are bound to their node. It's just a static restriction for now.
You can check whether you have this admission controller from the Kubernetes nodes executing the apiserver binary:
RBAC example, accessing the kubelet API with curl
Typically, just the Kubernetes API server will need to use the kubelet REST API. As we mentioned before, this interface needs to be protected as you can execute arbitrary pods and exec commands on the hosting node.
You can try to communicate directly with the kubelet API from the node shell:
Kubelet uses RBAC for authorization and it's telling you that the default anonymous system account is not allowed to connect.
You need to impersonate the API server kubelet client to contact the secure port:
Your port numbers may vary depending on your specific deployment method and initial configuration.
Kubernetes API audit and security log
Kube-apiserver provides a security-relevant chronological set of records documenting the sequence of activities that have affected system by individual users, administrators or other components of the system. It allows cluster administrator to answer the following questions:
- what happened?
- when did it happen?
- who initiated it?
- on what did it happen?
- where was it observed?
- from where was it initiated?
- to where was it going?
The API audit output, if correctly filtered and indexed, can become an extremely useful resource for the forensics, early incident detection and traceability of your Kubernetes cluster.
The audit log uses the JSON format by default, a log entry has the following aspect:
From this document you can easily extract the user (or serviceaccount software entity) that originated the request, the request URI, API objects involved, timestamp and the API response, allow in this example.
You can define which events you want to log passing a YAML-formatted policy configuration to the API executable.
For instance, if you configure append the following parameters to the kube-apiserver command line:
The API will load the configuration from the path above and output the log to /var/log/apiserver/audit.log
There are many other flags you can configure to tune the audit log, like log rotation, max time to live, etc. It's important to note that you can also configure your API to send audit entries using a webhook trigger, in case you want to store and index them using an external engine (like ElasticSearch or Splunk).
Audit log policies
The YAML policies file has the following structure:
Using this config you can match the different keys of a log entry to a specific value, set of values or a catch-all wildcard. The example above will log the requests made by the admin user, and any request made by an anonymous system user.
If you create a new user (see above) that is not associated to any Role or ClusterRole, and try to get the list of pods:
The log will register the request:
You have a comprehensive audit policy example here. Rule ordering is important, decision is taken in a top-down first match fashion.
Extending the Kubernetes API using security admission controllers
Kubernetes was designed to be highly extensible, offering you the possibility to plug any security software that you might want to use to process and filter the workloads launched in your system.
A feature that makes admission webhooks specially interesting for the security compliance is that they are evaluated **before **actually executing the requests, so you can block the access to any suspicious software before the pods are even created.
There are two admission controllers specially relevant to this specific use case:
- ImagePolicyWebook and
- ValidatingAdmissionWebhook (alpha in 1.8; beta in 1.9), which is a newer implementation.
You can create your own admission controller implementing the webhook interface defined by Kubernetes. Additionally, several Kubernetes security vendors already provide deployment methods that hook an admission controller to the API.
Anchore Engine provides a webhook service specifically designed to enable this feature, let's run a quick example.
Assuming that kubectl and helm are available and configured in your cluster, run:
After running the install.sh script, you will need to enable the webhook Kubernetes configuration. How-to instructions will be printed on the Helm output:
A few minutes after enablement, all the pods will be running on the anchore namespace:
After following the instructions to enable the integration you will be able to see the new webhook configured:
Anchore will now analyse every image on any Pod scheduled in Kubernetes and containers evaluated as non-secure will never get into the running phase, like this:
Securing Kubernetes etcd
etcd is a key-value distributed database that persists Kubernetes state. The etcd configuration and upgrading guide stresses the security relevance of this component:
"Access to etcd is equivalent to root permission in the cluster so ideally, only the API server should have access to it. Considering the sensitivity of the data, it is recommended to grant permission to only those nodes that require access to etcd clusters."
You can enforce these restrictions in three different (complementary) ways:
- Regular Linux firewalling (iptables/netfilter, etc).
- Run-time access protection.
- PKI-based authentication + parameters to use the configured certs.
Run-time access protection
An example of run-time access protection could be making sure that the etcd binary only reads and writes from a set of configured directories or network sockets, any run-time access that is not explicitly whitelisted will raise an alarm.
Using Sysdig Falco it will look similar to this:
See Getting Started with Runtime Security and Falco and How to harden internal kube-system services to continue reading about Kubernetes run-time security.
PKI-based authentication for etcd
Ideally, you should create two sets of certificate and key pairs to be used exclusively for etcd. One pair will verify member to member connections and the other pair will verify Kubernetes API to etcd connections.
Conveniently, the etcd project provides these scripts to help you generate the certificates.
Once you have all the security artifacts (certificates, keys and authorities), you can secure etcd communications using the following configuration flags:
etcd peer-to-peer TLS
This will configure authentication and encryption between etcd nodes. To configure etcd with secure peer to peer communication, use the flags:
- –peer-key-file=
- –peer-cert-file=
- –peer-client-cert-auth
- –peer-trusted-ca-file=
Kubernetes API to etcd cluster TLS
To allow Kubernetes API to communicate with etcd, you will need:
- etcd server parameters:
- –cert-file=
- –key-file=
- –client-cert-auth
- –trusted-ca-file= (can be the same you used for peer to peer)
- Kubernetes API server parameters:
- –etcd-certfile=k8sclient.cert
- –etcd-keyfile=k8sclient.key
It may seem like a lot of parameters at first sight, but it's just a regular PKI design.
Using a trusted Docker registry
If you don't specify otherwise, Kubernetes will just pull the Docker images from the public registry Docker Hub. This is fine for testing or learning environments, but not convenient for production, as you probably want to keep images and its content private within your organization.
Allowing users to pull images from a public registry is essentially giving access inside your Kubernetes cluster to any random software found on the Internet. Most of the popular Docker image publishers curate and secure their software, however you don't have any guarantee that your developers are going to pull from trusted authors only.
Providing a trusted repository using cloud services (Docker Hub subscription, Quay.io, Google/AWS/Azure also provide their own service) or locally rolling your own (Docker registry, Portus or Harbor, etc), are two ways to solve this problem.
You will pre-validate and update every image in your registry. Appart from any QA and testing pipeline you regularly apply to your software, this usually means scanning your Docker images for known vulnerabilities and bad security practices.
Assuming you already have a pre-populated trusted repository, you need to tell Kubernetes how to pull from it and ideally, forbid any other unregistered images.
Configure private Docker registry in Kubernetes
Kubernetes provides a convenient way to configure a private Docker registry and store access credentials, including server URL, as a secret:
This data will be base64 encoded and included inline as a field of the new secret:
Then, you just need to import this secret using the label imagePullSecrets in the pod definition:
You can also associate a serviceAccount with imagePullSecrets, the deployments / pods using such serviceAccount will have access to the secret containing registry credentials.
Kubernetes trusted image collections: banning non trusted registry
Once you have created your trusted image repository and Kubernetes pod deployments are pulling from it, the next security measure is to forbid pulling from any non-trusted source.
There are several, complementary ways to achieve this. You can, for example, use ValidatingAdmissionWebhooks. This way, the Kubernetes control plane will delegate image validation to an external entity.
You have an example implementation here, using Grafeas to only allow container images signed by a specific key, configurable via a configmap.
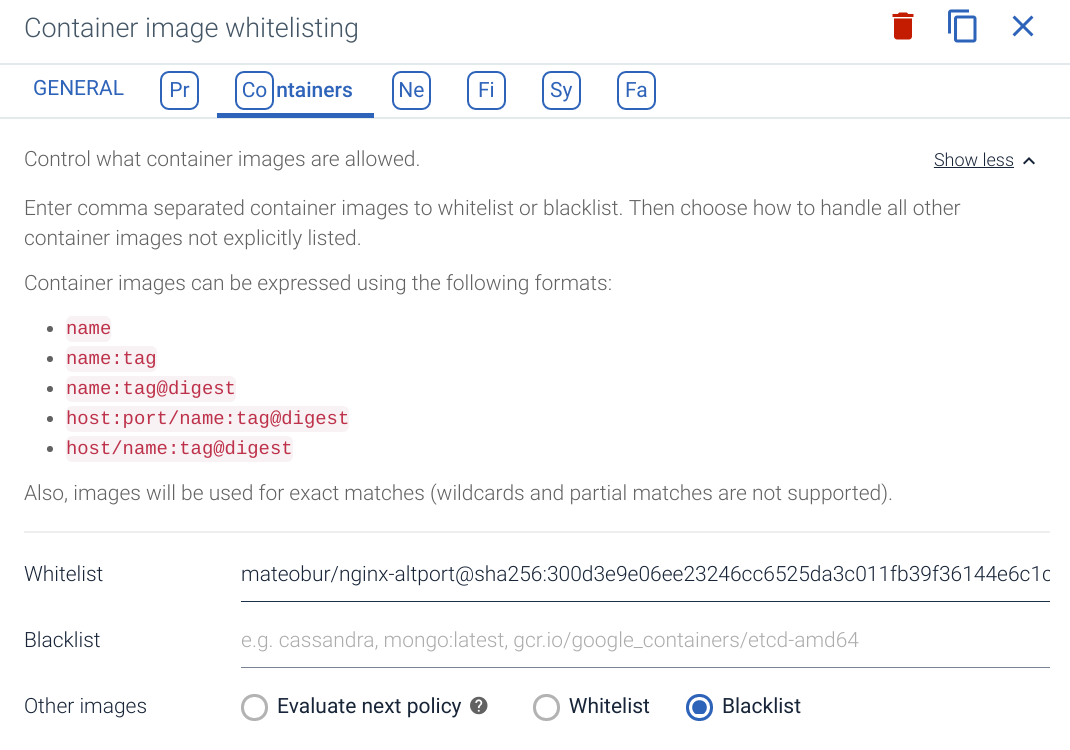
Using Sysdig Secure, you can also create an image whitelist based on image sha256 hash codes. Any non-whitelisted image will fire an alarm and container execution will be immediately stopped.
Next steps
This post provided some insights on how to secure sensitive Kubernetes components and common external resources such as the Docker registry. Now you know how to secure Kubernetes kubelet and the internal Kubernetes etcd cluster, which are the most important pieces.
Want to dig deeper into Docker runtime security? Next chapters will offer plenty of practical examples and use case scenarios covering Kubernetes runtime threat detection.
Ping us at @sysdig or on our open source Sysdig Slack group to share anything you feel should be included in this comprehensive Kubernetes security guide.